1. Overview
Kartris is a free ASP.NET web application for running online stores. The system is fully featured e-commerce CMS (content management system) that can store and display product and other data to customers, and has the e-commerce elements that allow items to be selected and purchased, and orders to be processed.
Kartris is written in VB.NET 'web forms' with an MS SQL 2012+ database, and as such must be hosted on an MS Windows Server running the Microsoft IIS web server for production deployment, although it can be run for development and test purposes on a variety of Windows installations. The software consists of three main elements:
- The pages, controls, business logic, templates and other files (including full source code) that run the site
- The database, which stores all product, customer and other data, and the associated code (including stored procedures and the data access layer)
- Other product specific files such as uploaded product images, downloadable files, etc.
Kartris has a modern, user-friendly interface that makes use of AJAX to deliver a fast, feature-rich experience that works on all modern browsers.
Certain sections of this manual are highlighted either for importance, or because they refer to more technical information that is intended largely for developers. We have marked such sections in colour as follows:
Sections marked like this contain technical information intended primarily for developers and IT specialists who are setting up Kartris systems. A general user can normally ignore these sections.
Sections containing important security or other warnings are highlighted in red. All users should pay special attention to these sections.
2. Setup
There are two main scenarios for setup – local and remote. 'Local' means installation on a computer you have full access to such as your desktop or laptop computer, or a server if you have full admin rights. 'Remote' means a computer you can only access via FTP and MS SQL.
2.1. Prerequisites
You must have the following software installed in order to run Kartris.
- IIS7.x (Windows Server 2008 or Vista) or IIS8 (Windows Server 2012 or Windows 8 or above)
- MS SQL 2008 R2 Express or above (available free from Microsoft's web site) or one of the full versions of MS SQL 2008 or above
- ASP.NET 4.6+
For best performance, a modern browser such as Firefox, Chrome, Safari or Edge for the back end. The front end still supports versions of Internet Explorer still under support.
2.2. NuGet
NuGet is a Microsoft run service that allows you to import packages from an online repository, directly into Visual Studio. This is probably the easiest way to get hold of the latest Kartris code to set up a new local version for development.
2.2.1. Setup a new web project in Visual Studio
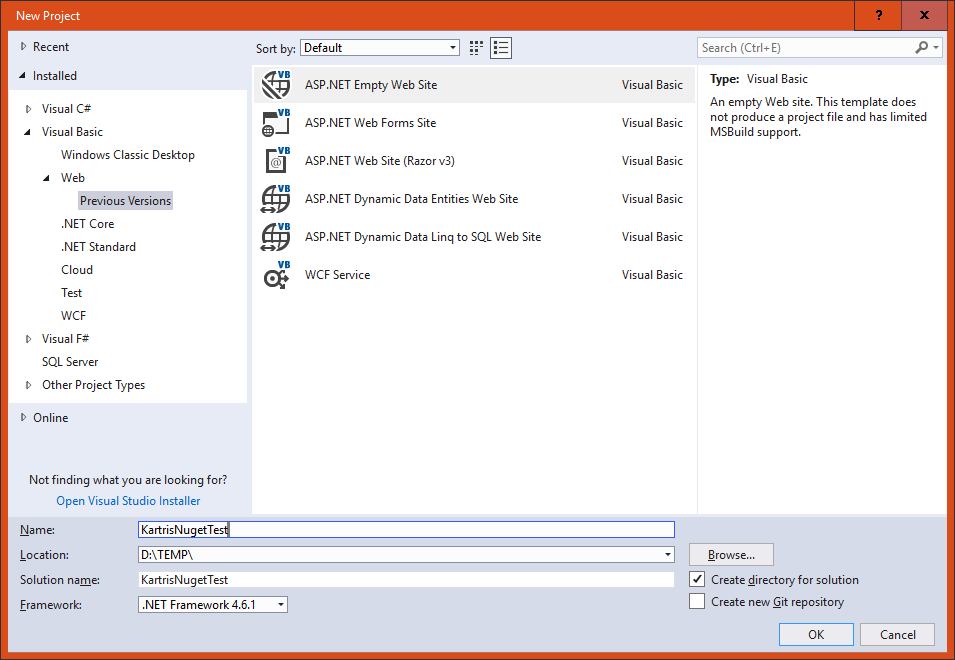
Select Installed > Visual Basic > Web > Previous Versions from the left hand panel.
Then choose ASP.NET Empty Web Site in the main content area, and choose a name and location for your project. The version of the framework isn't so important, as that should be set later when we pull the files in. But you must have at least .NET 4.6 installed.
Next, remove any files and folders that Visual Studio 'helpfully' adds to the web site, so it really is empty.
2.2.2. Install from Nuget
Select Tools > NuGet Package Manager > Manage NuGet Packages for Solution.
Click the 'Browse' link/tab, then type 'Kartris' in the search box. You should find the Kartris package.
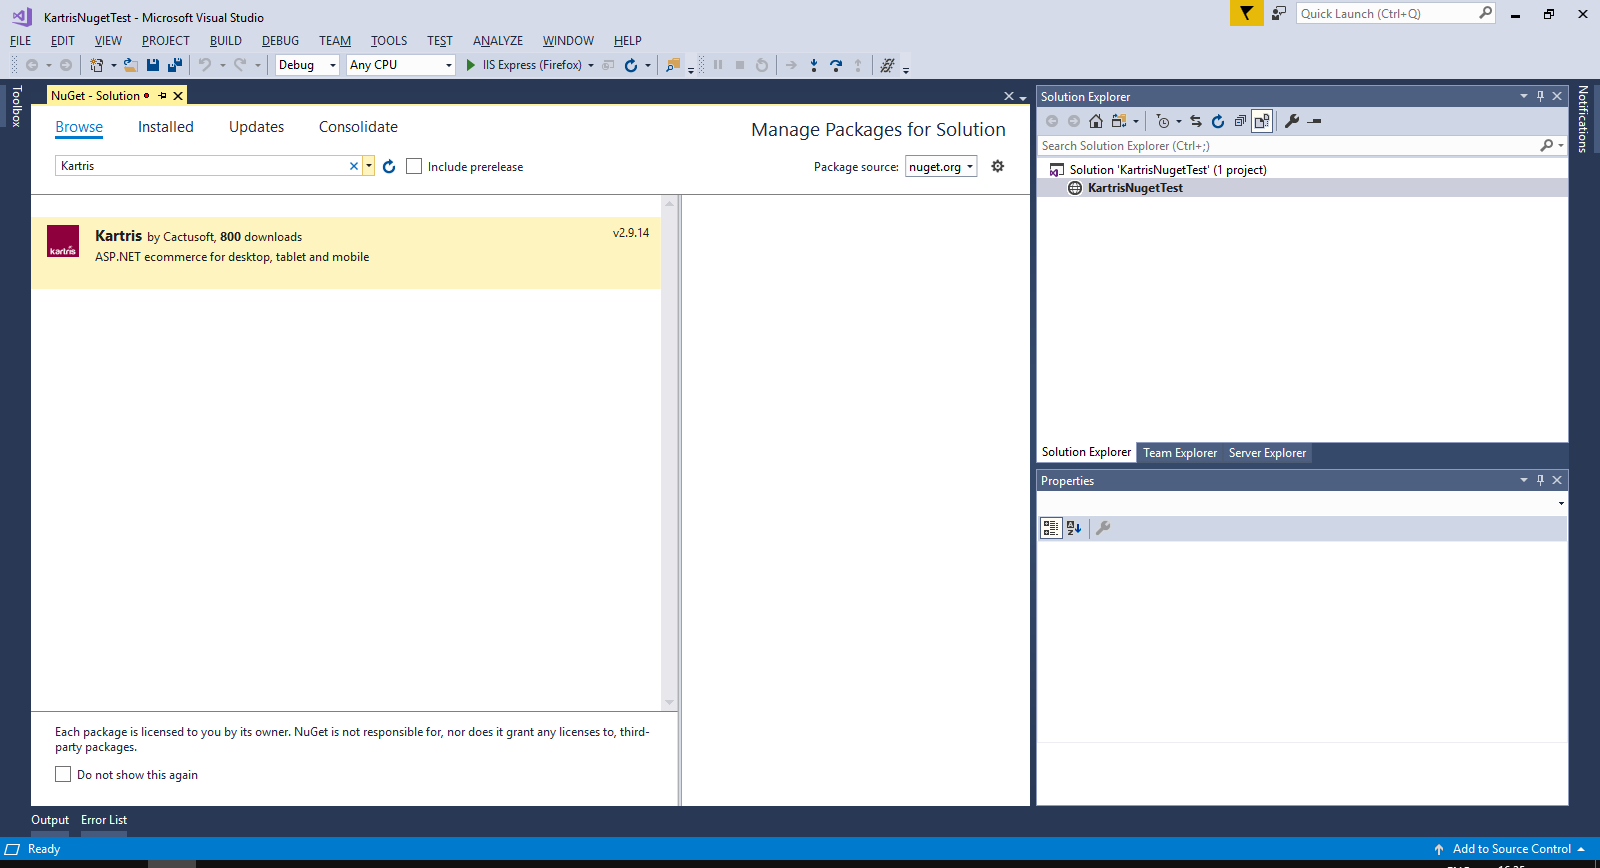
Click to select this, then check the box to install to the project you've just set up. Click the Install button.
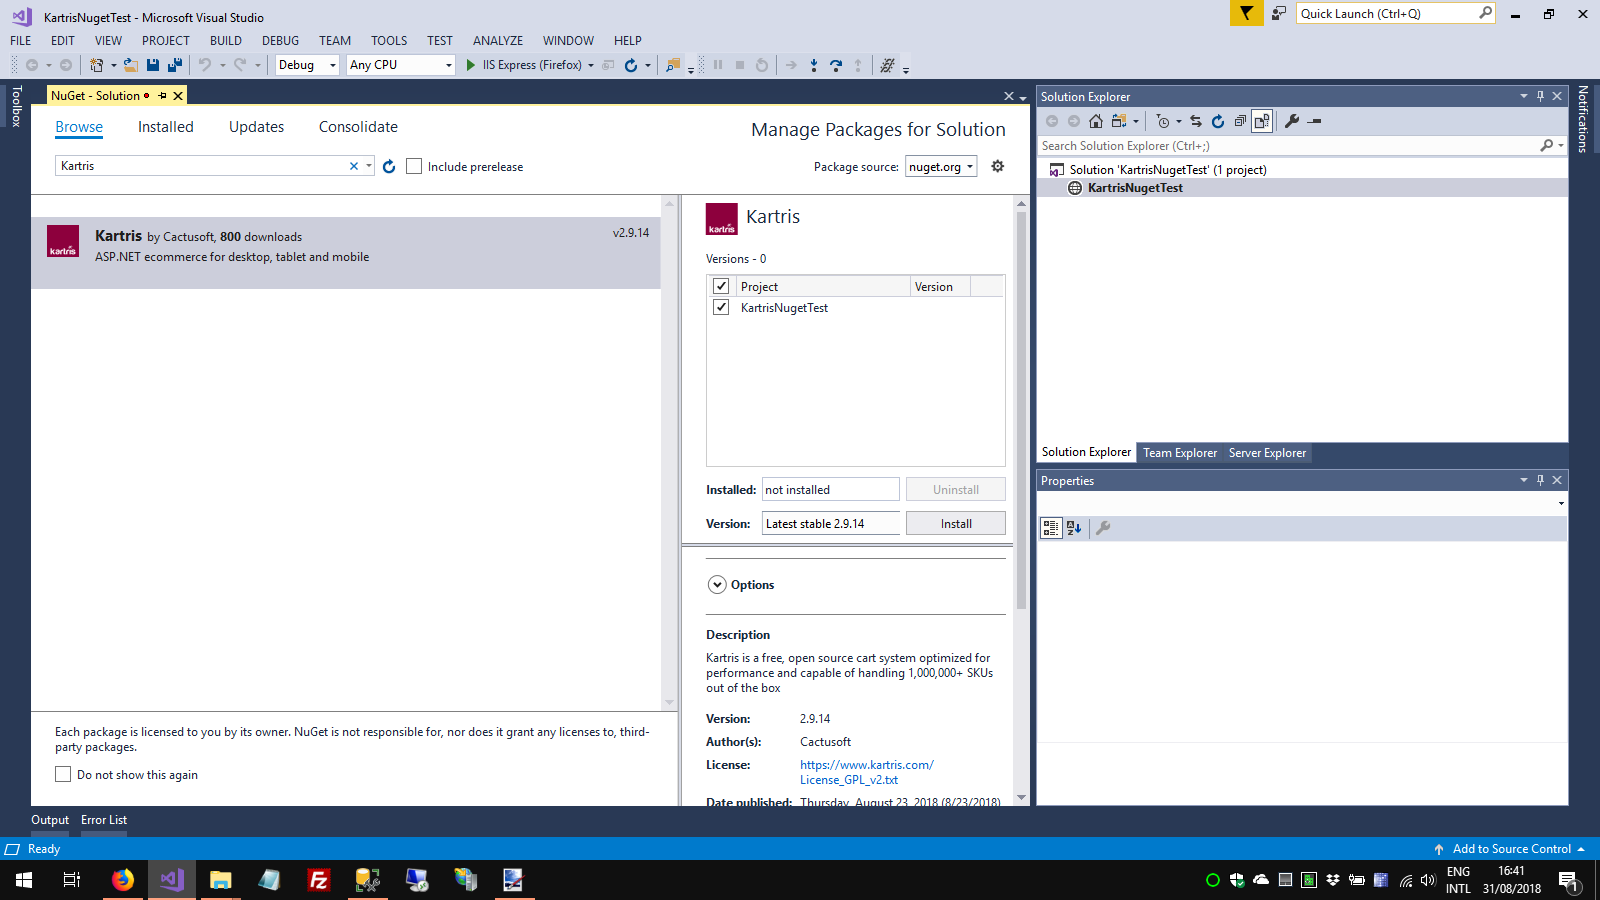
Visual Studio will show you a list of dependencies. Click OK to proceed with the installation. You will also need to approve some licenses for dependencies. The required Kartris files will then be downloaded to your web.
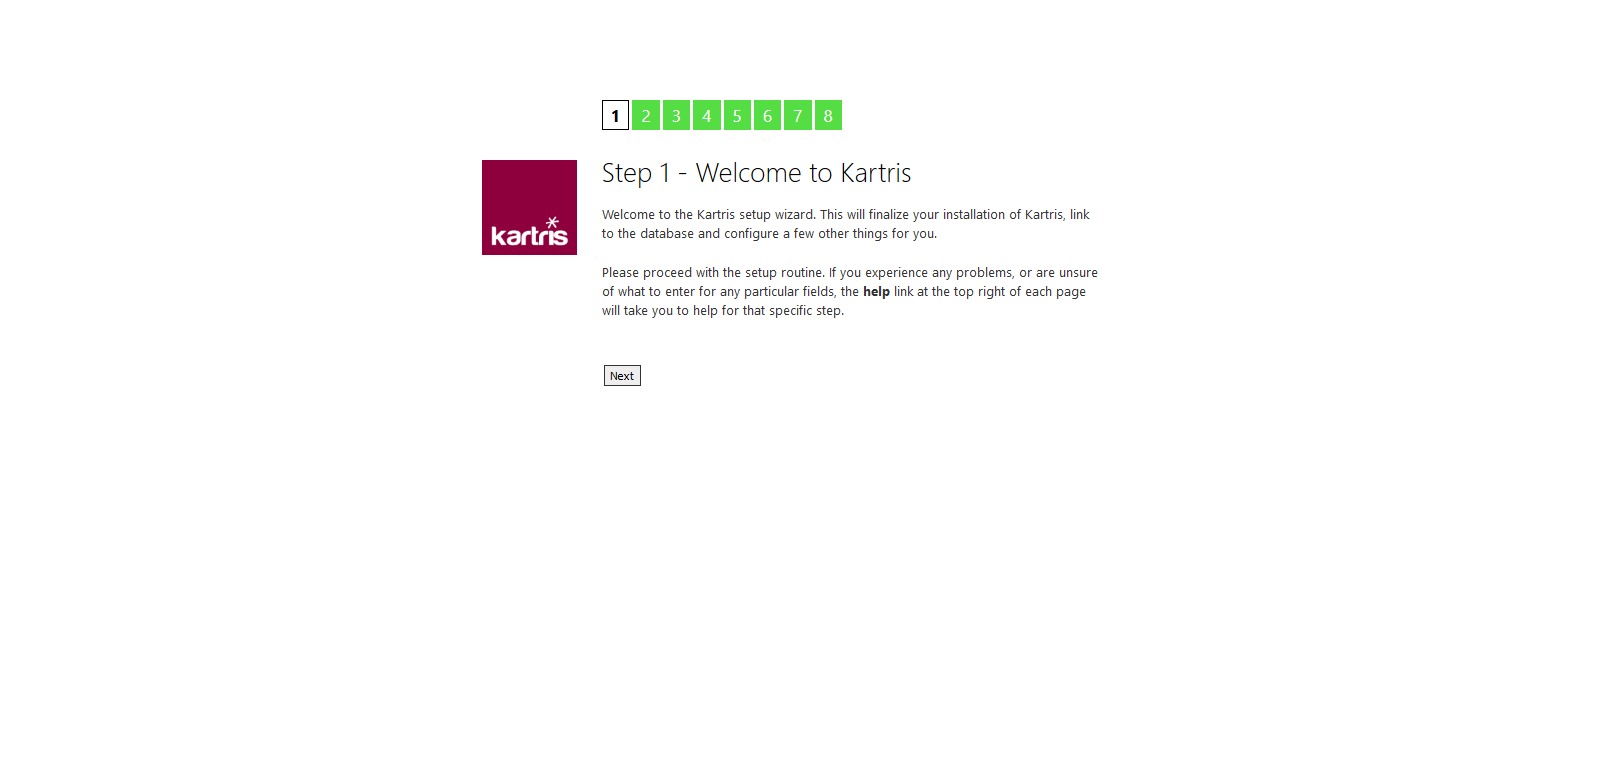
2.2.3. Setup routine
In Visual Studio, click to run the web site. You will get a warning that there were errors (this is because we don't yet have a database). Click YES to run the last successful build. You should see the setup routine in your web browser.
Follow the steps through. You will get to a step that lets you setup a database. Specify the path to your SQL Server, choose a database name and select that this is a new database, and Kartris can create and populate this for you. The checkbox to add demo data adds a few sample products and orders, which make it easier to test the basic features, and can easily be deleted later.
Installing the database can take a few minutes. Once done, you should see the admin account details that the setup routine created for you. We suggest you make a note of these now somewhere safe. You can change the password later if you wish, from within the Kartris back end.

Once you get to the end of the setup process, you should see two links, to access the front and back ends of Kartris.
The setup routine will make changes to the web.config file, to include the connection string to the new database and some other minor changs.
2.3. Manual installation
2.3.1. Download the software
Our site downloads page has links to download the latest zip:
https://www.kartris.com/t-Downloads.aspx
The software itself comes as a zipped file.
If you want to obtain the very latest up-to-date code, you can go to the source repository on Github (this may contain development code, unfinished work, bugs and other issues, so the version zips on our downloads page are strongly recommended).
Don't forget to unblock any zip files you download before you unzip them. More information...
2.3.2. Installing
2.3.2.1. On IIS 7.5+
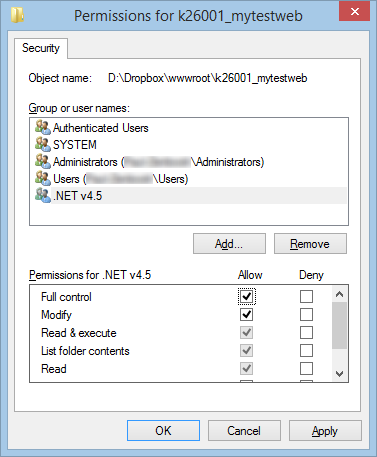
The process on IIS7 and earlier will be similar, the main difference being that the web site will run as a specific Windows user rather than an app pool identity. So you will need to add that user to your SQL Server, and create Windows permissions for it.
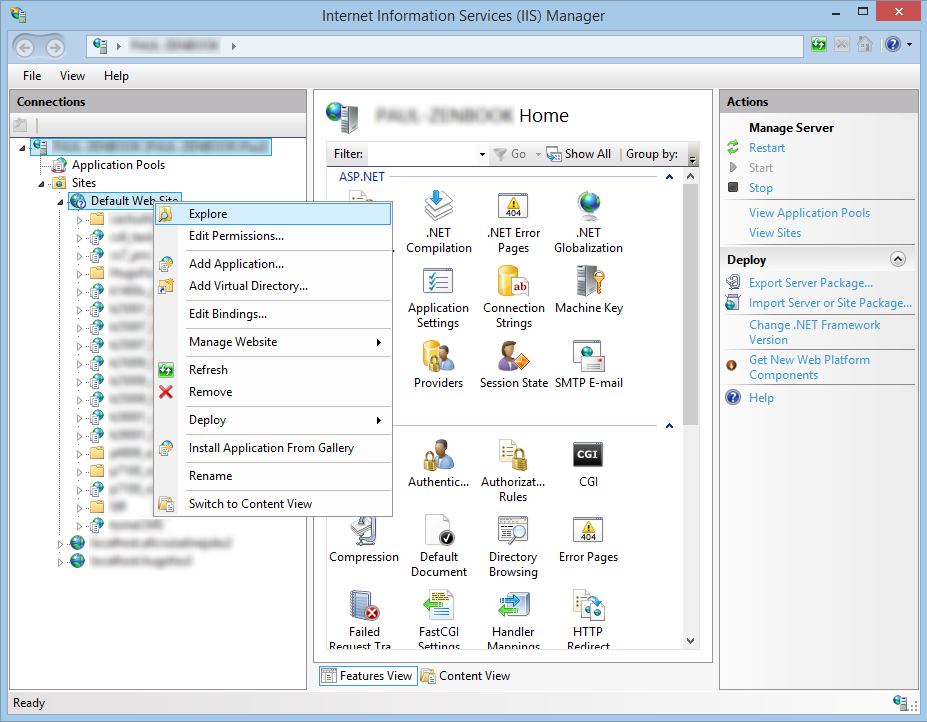
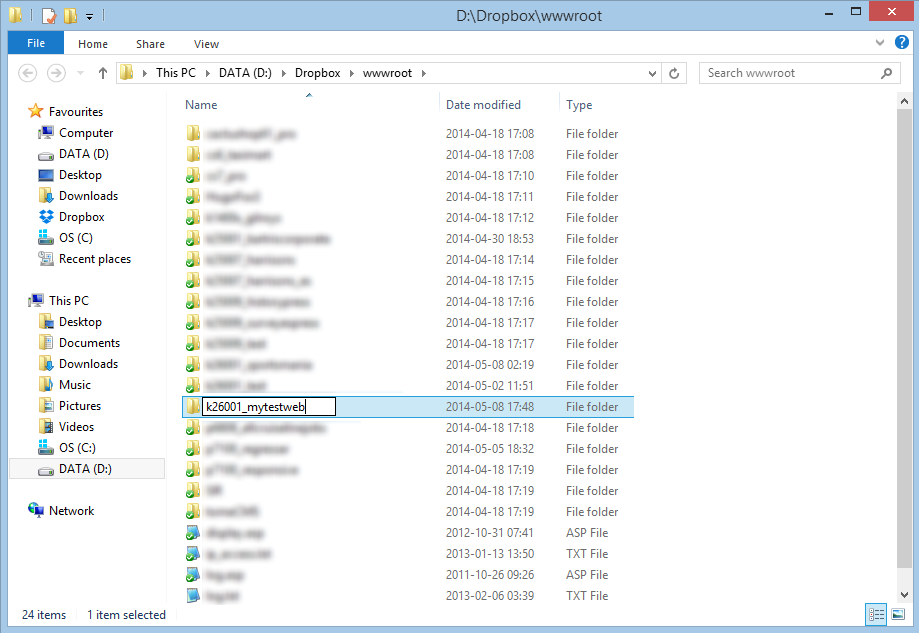
Step 1 - Find where your IIS web root folder is and add a new folder into it. If you're not sure where it is, go to IIS, right click the Default Web Site and select 'explore'. The default location is normally C:\inetpub\wwwroot, but you can move this to another location for disk space reasons, or locate it into your Dropbox if you want files to be backed up to the cloud.
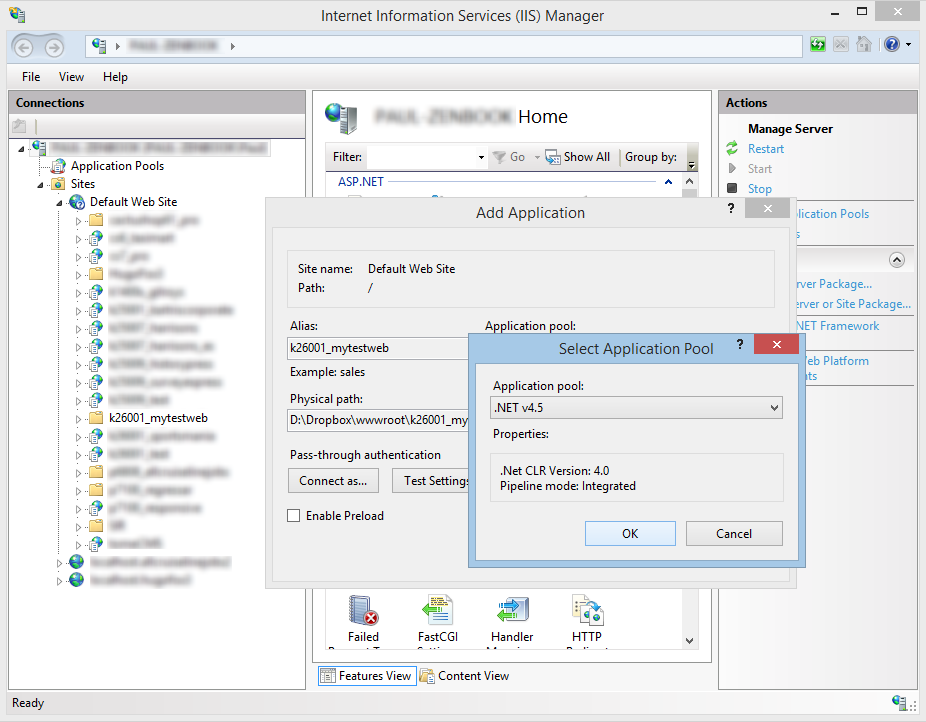
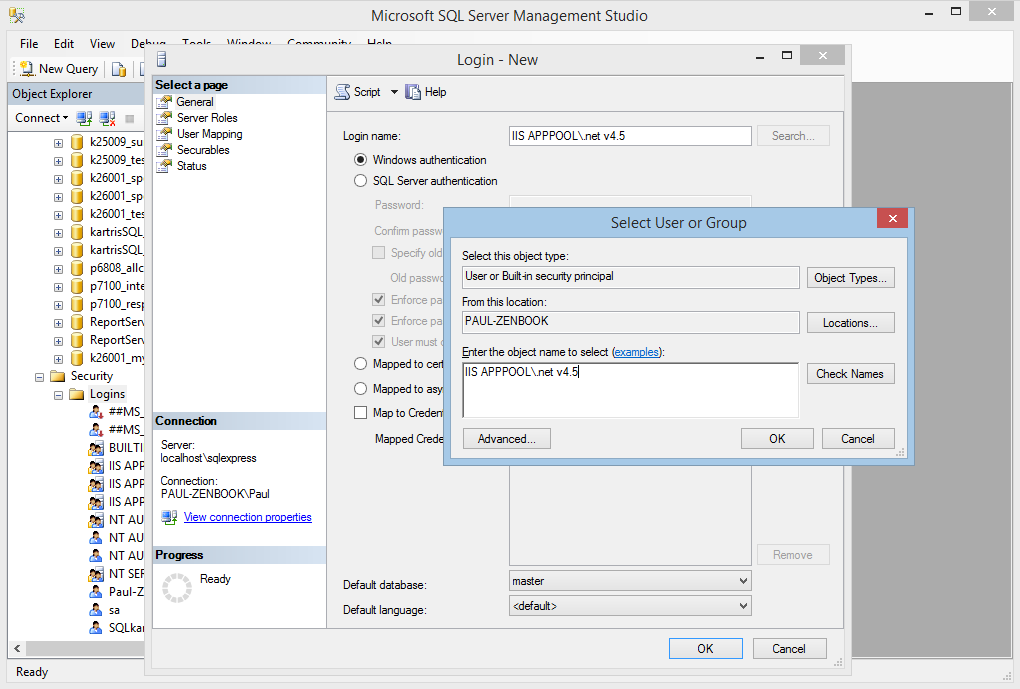
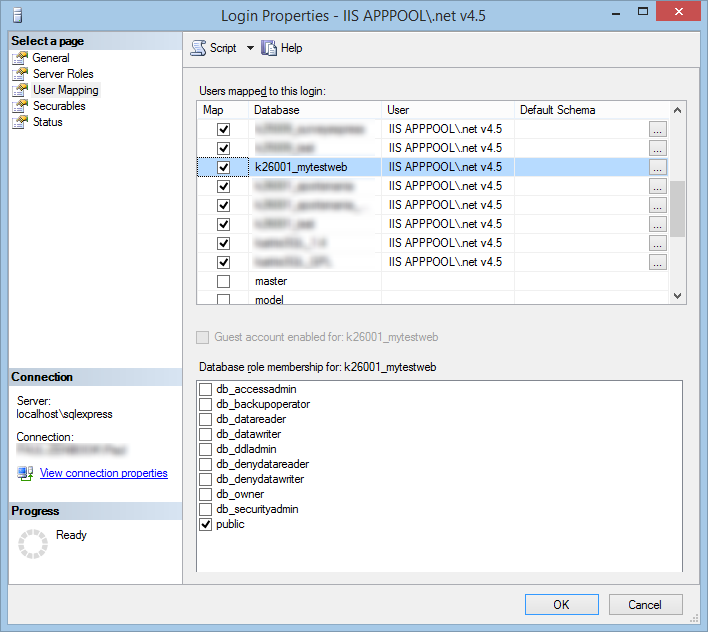
To find users on this database, open up the 'Security' folder in SQL Management Studio and then 'Logins'. If you don't see 'IIS APPPOOL\.net v4.5' (or whatever the name of your app pool is), then you need to add it. If you see the user there already, you can skip to the next step. Otherwise, right click on 'Logins' and type the name of the app pool into the dialogue, then 'Search'. Another window appeals, and you need to enter 'IIS APPPOOL\.net v4.5' again into the box here. When you click 'Check names' you should see the text change, hiding the IIS APPPOOL part. This indicates that it is a valid user. OK everything, and this new user should now appear under 'Logins' in the treeview.

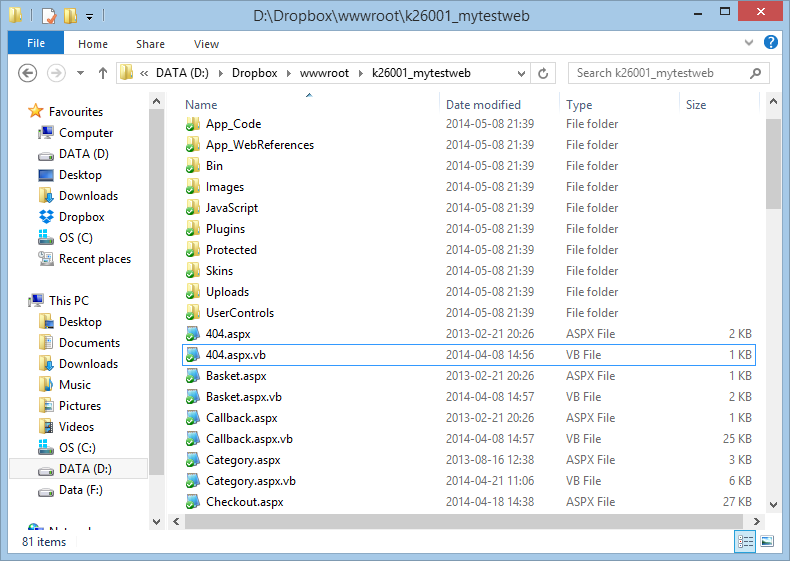
To do this, find the web root in Windows explorer, right click the k26001_mywebsite folder, and select 'properties', then the 'security' tab.


2.4. Microsoft Web App Gallery
Kartris is featured within the Microsoft Web App Gallery. Various Microsoft Tools including IIS.
Kartris - Microsoft Web App Gallery
2.5. Installing Kartris on web space
- Unzip Kartris to a folder on your desktop. Using FTP, upload the files to your web site.
- Make
sure your hosting is set to run as ASP.NET
4.0.
- Call up the site in your web browser, and the setup routine should run.
- When you get to the stage to setup the database connection, you will probably need to use the database address (or IP), name, username and password given to you by your web host. The install routine will try to rewrite your web.config file with these connection details, but if the permissions do not allow this, you can download it from the setup routine and then upload to the root of your site with FTP instead.
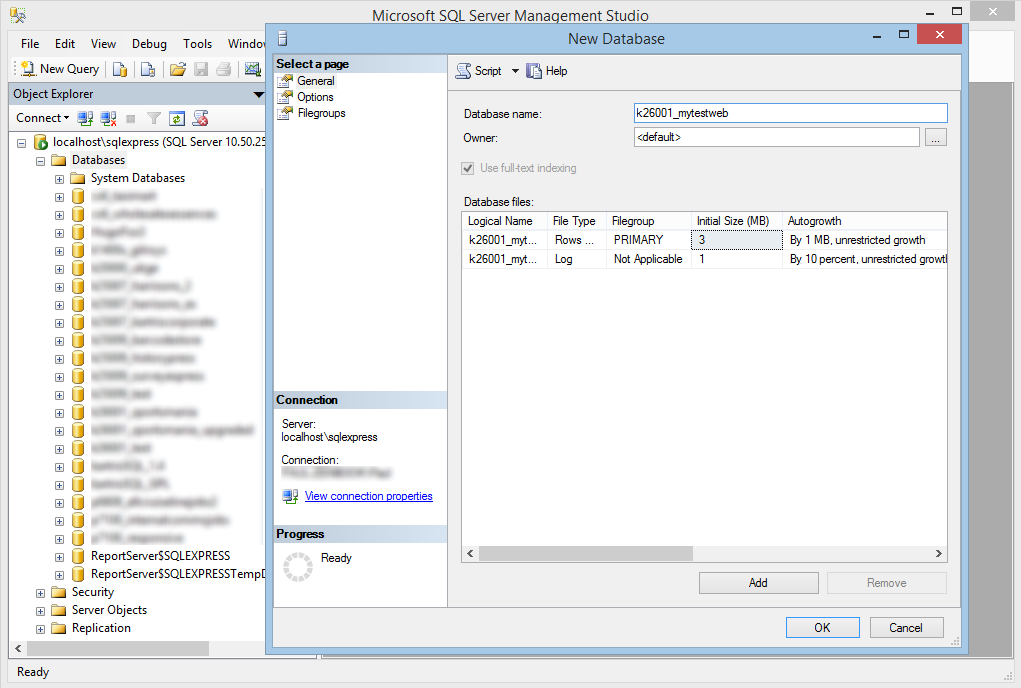
- If you get problems running the database
setup and want to create the database first through MS SQL's
Management Studio interface, the .sql file is located here:
Uploads/Resources/kartrisSQL_MainData.sql
When you run the setup routine again, it should notice that you already have a Kartris database populated. - Once setup and
logged in to the back end, you can go to the front end by clicking the
Kartris logo link in the top left of the
page.
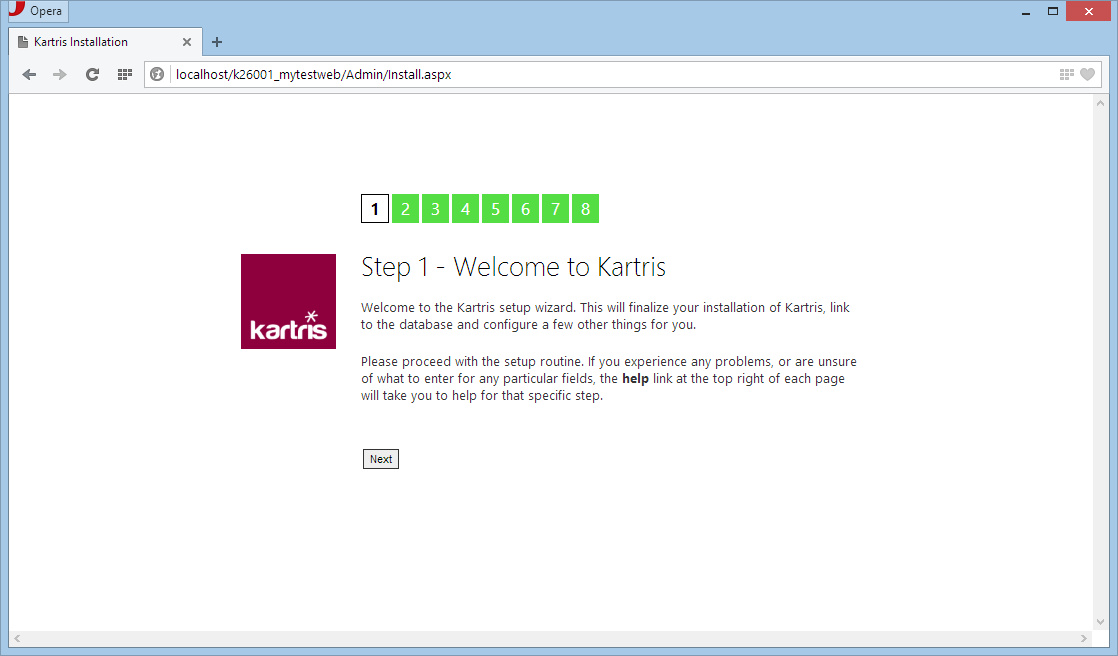
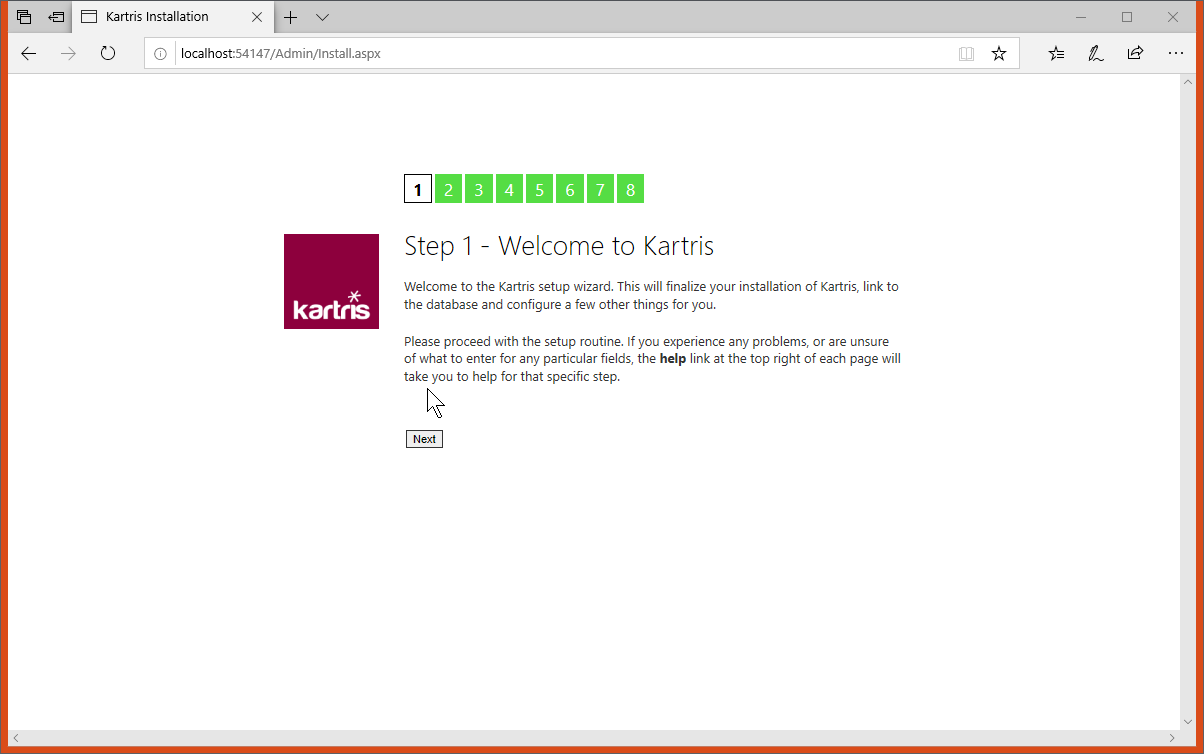
2.6. Install routine
The install routine is a series of setup screens that displays in your browser when you first upload files and successfully run Kartris. This sets some basic settings and creates an admin login password too. The steps are as follows:
2.6.2. Installation - Step 2: Hash Salt Key
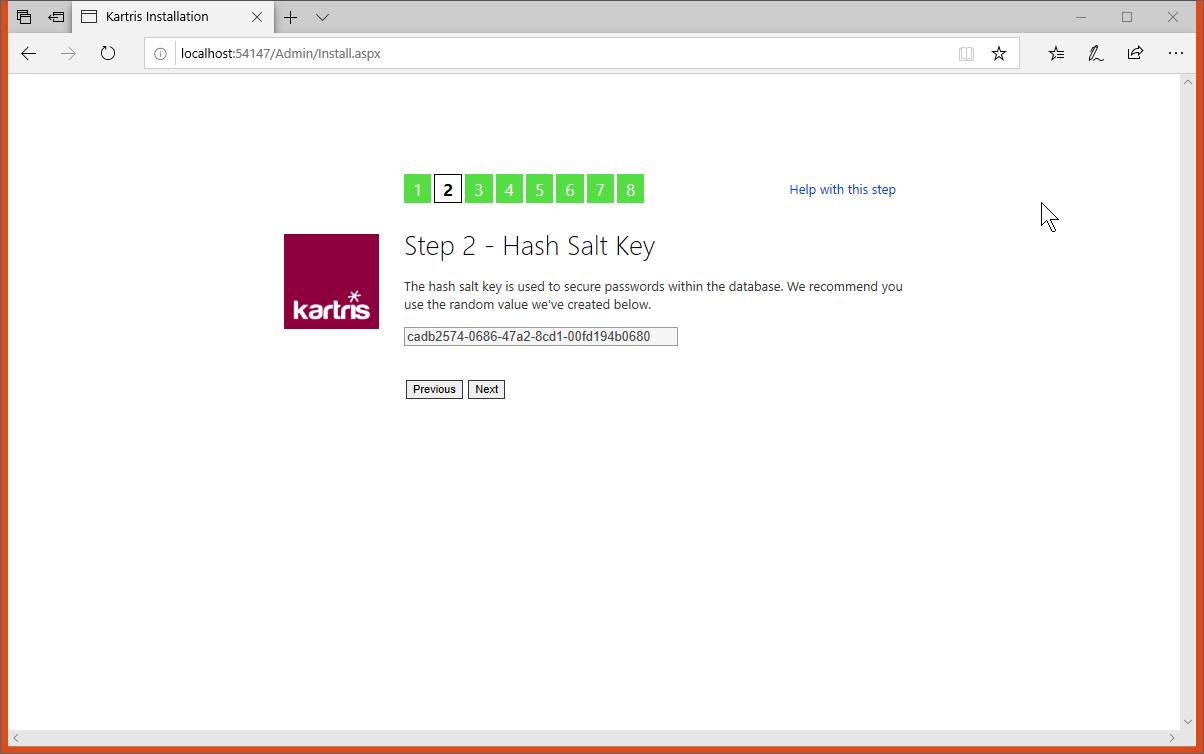
For security, Kartris secures passwords for both admin and user accounts by "hashing". For a new installation, just click to proceed here and accept the new random hash salt value we've created.
For more information about Kartris's password security, see @18.4. Password security .
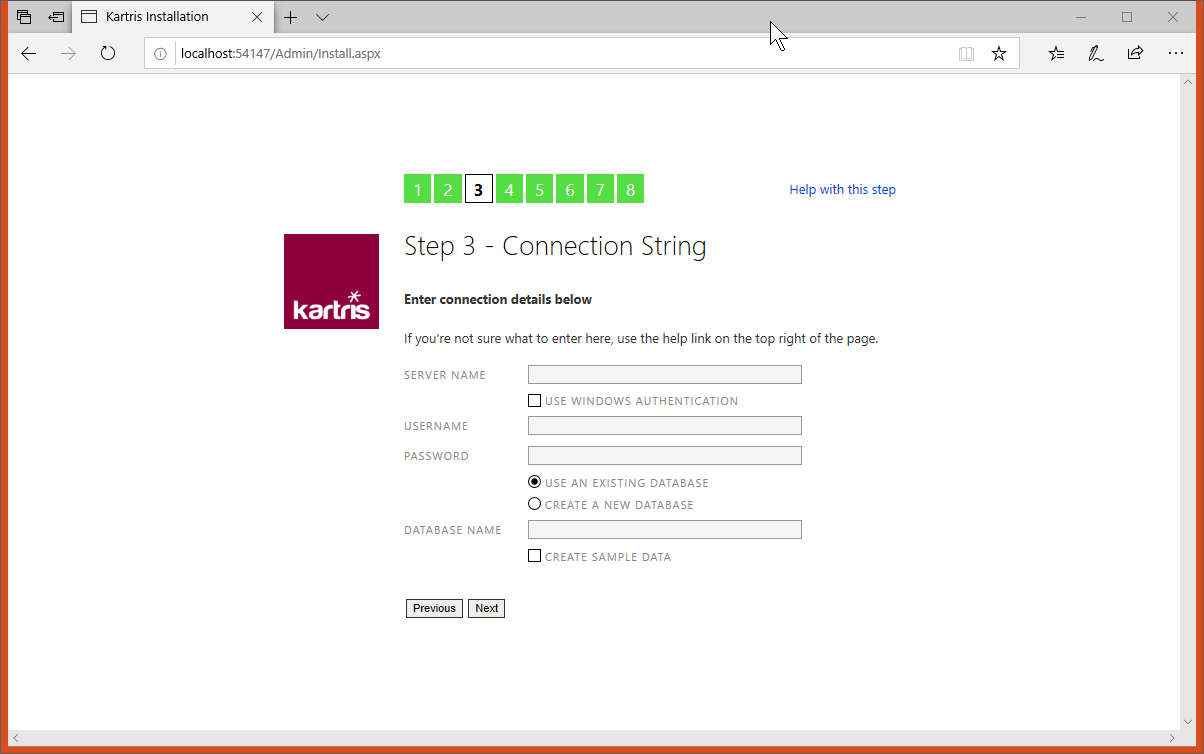
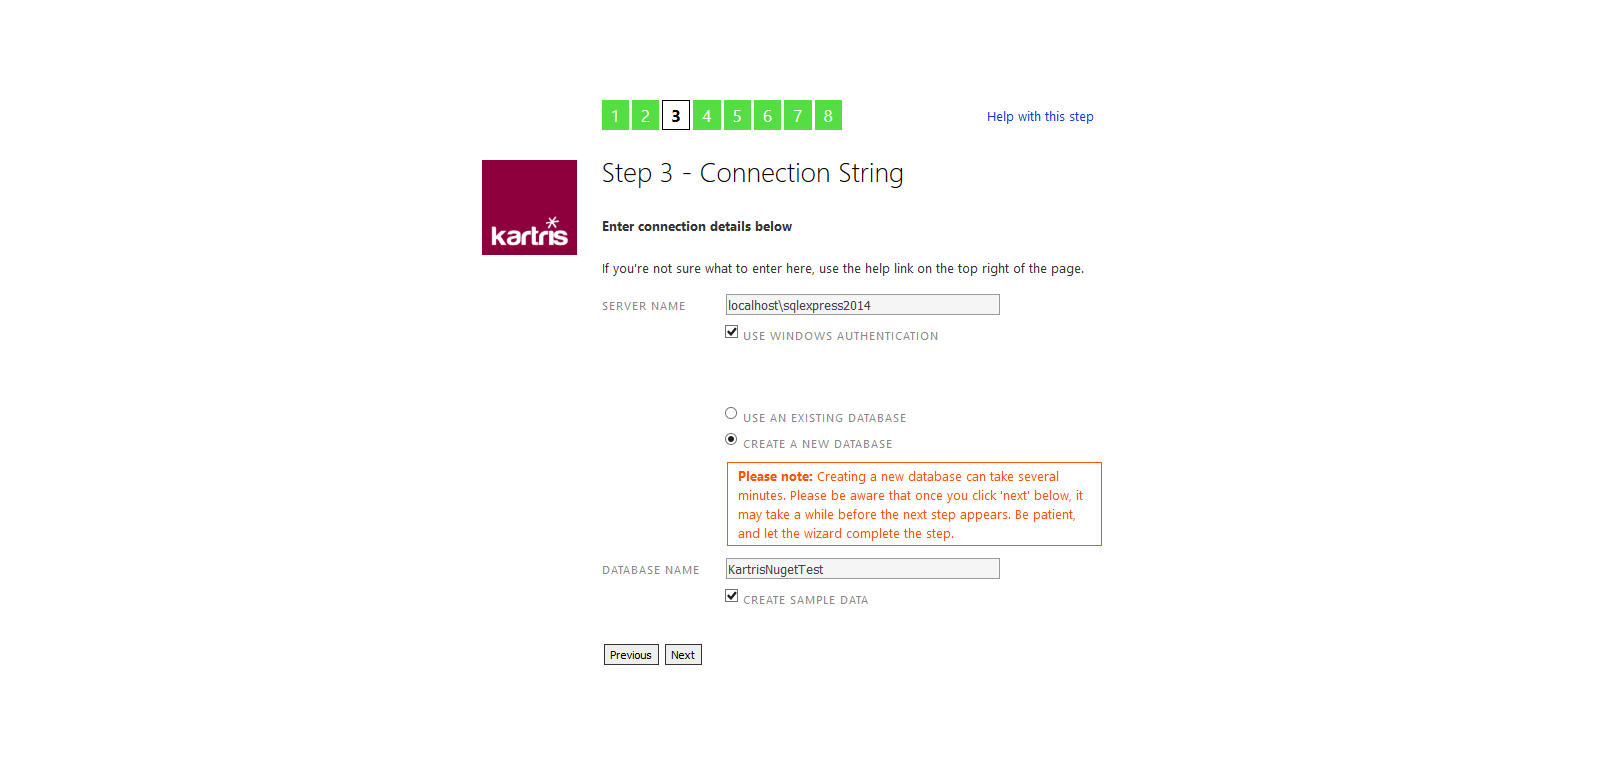
2.6.3.1. Server name
If you want to double check the name of your MS SQL Server instance, you can open up Microsoft SQL Server Management Studio (from your programs menu in Windows) and then check the name shown there. If your database server is running on the internet, or on your network, it might have an IP address or another name. It will normally be something like this:
localhost\sqlexpress
2.6.3.2. Use Windows authentication
Where you have the MS SQL and web server running on the same machine, and if you're developing in Visual Studio, you can use Windows authentication. There is no username or password stored in the connection string; the web server app pool account should have permission to access the database. If you are using Visual Studio, in most cases that user has admin permissions for databases, so you should not specifically need to set it up.
2.6.3.3. Use existing/new database
Generally it is best to set up the database manually first on your MS SQL Server, and then enter the name here. It is also possible to create a database too but it requires sufficient permissions. If you're running in Visual Studio, it should have sufficient permissions to create a new database.
2.6.3.4. Create sample data
Even if you don't check this box, we add a lot of required data into your Kartris installation such as config settings, language strings and so on. But if you'd like to have a little test data in your new site such as categories, products, customers and orders, check this box. You can easily remove this test data later.
2.6.4. Installation - Step 4: Set Up Database
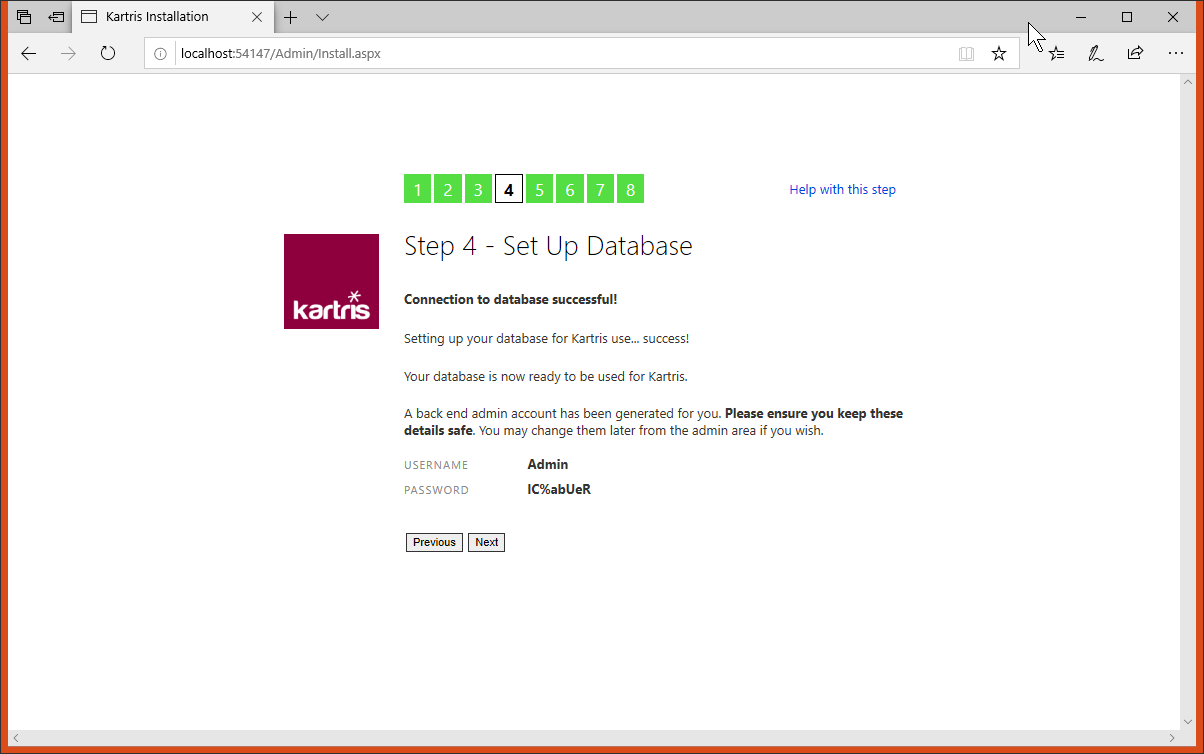
If the permissions are right, Kartris will connect to your database, run any setup scripts to create the database structure and stored procedures, and will generate an admin login. Copy and paste these details somewhere so you can access the store when setup is complete. You will be able to change the admin password or create other admin user accounts later.
2.6.5. Installation - Step 5: Important Config Settings
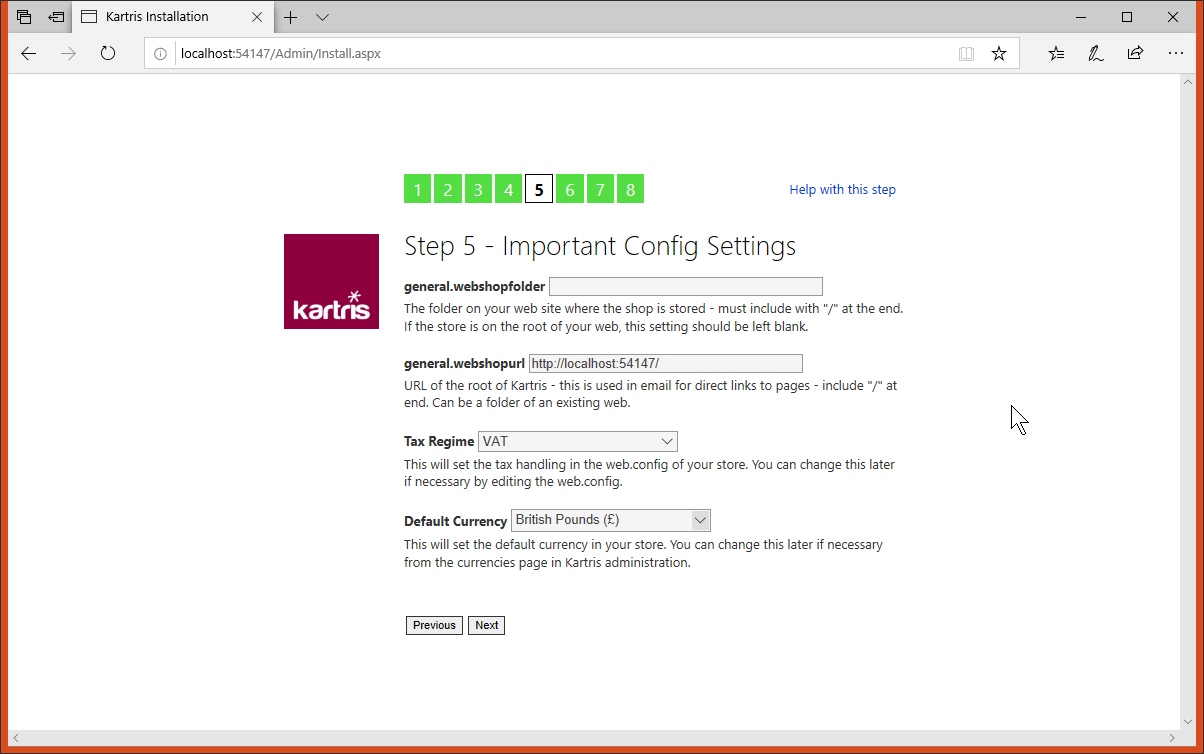
Kartris should automatically pick up the web address you're using. You can also choose a tax regime and default currency.
2.6.5.1. Tax regimes
2.6.5.1.1. VAT
This option is for countries that have a VAT tax system, outside of the EU. The UK, post brexit (most likely) and New Zealand can use this option, for example. Tax is calculated based on a percentage figure for each line item in an invoice, and then at the end you get a total for the goods, the tax, and a grand total.
2.6.5.1.2. European Union
This works similarly to the @2.6.5.1.1. VAT option above, but has some extra features. Because the EU consists of nearly 30 countries, it will set all of them to charge tax (based on the TaxRegime.config file in the root of the web, which contains a list of all EU members). VAT will be added to all orders from an EU country. But if the country is not the home country of the site, a VAT number field will show. If a valid EU VAT number is entered here, the VAT will be zeroed as the customer would declare this purchase and pay VAT in their own country at the prevailing rate.
2.6.5.1.3. US
This is a simple sales tax system where tax is calculated as a percentage of the order value, rather than on individual items. You can set the tax rates of multiple states so if you have locations in multiple locations, orders will pay the correct amount. In states where sales tax varies by county, you can also add in those locations and have the appropriate tax rate for each (this would be done after the tax setup wizard has done the basic setup).
2.6.5.1.4. Canada
Canada has a sales tax system with two taxes, GST and PST. In some provinces, these are combined into a single HST amount. If Canada tax is selected, there will be two tax amounts configurable for each item.
2.6.5.1.5. Other
This creates a simple % sales tax to be added at the end of an order. In most cases, you will find one of the above models may more closely resemble your country, in which case it would be better to select that model, and then make country changes manually later.
2.6.6. Installation - Step 6: Folder Permissions
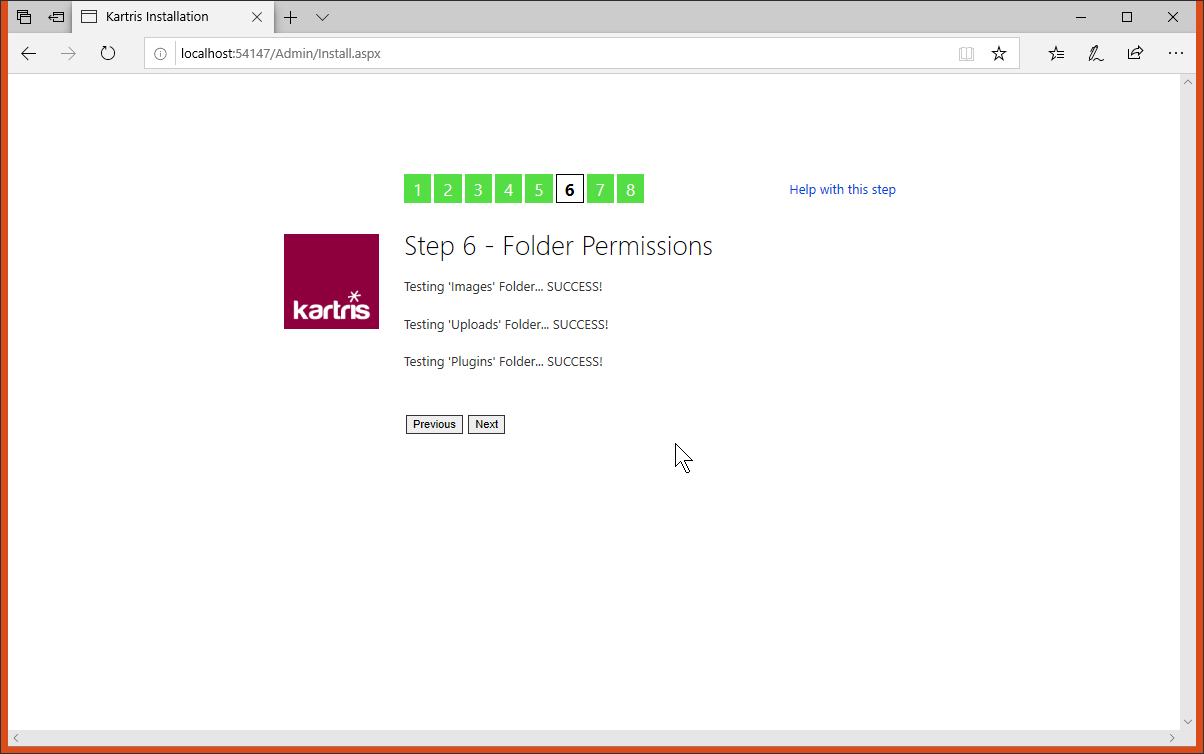
The install routine will check write permissions to ensure it can operate properly. These permissions are required to ensure you can upload images, and logs of errors can be created, for example.
2.6.7. Installation - Step 7: Review Settings
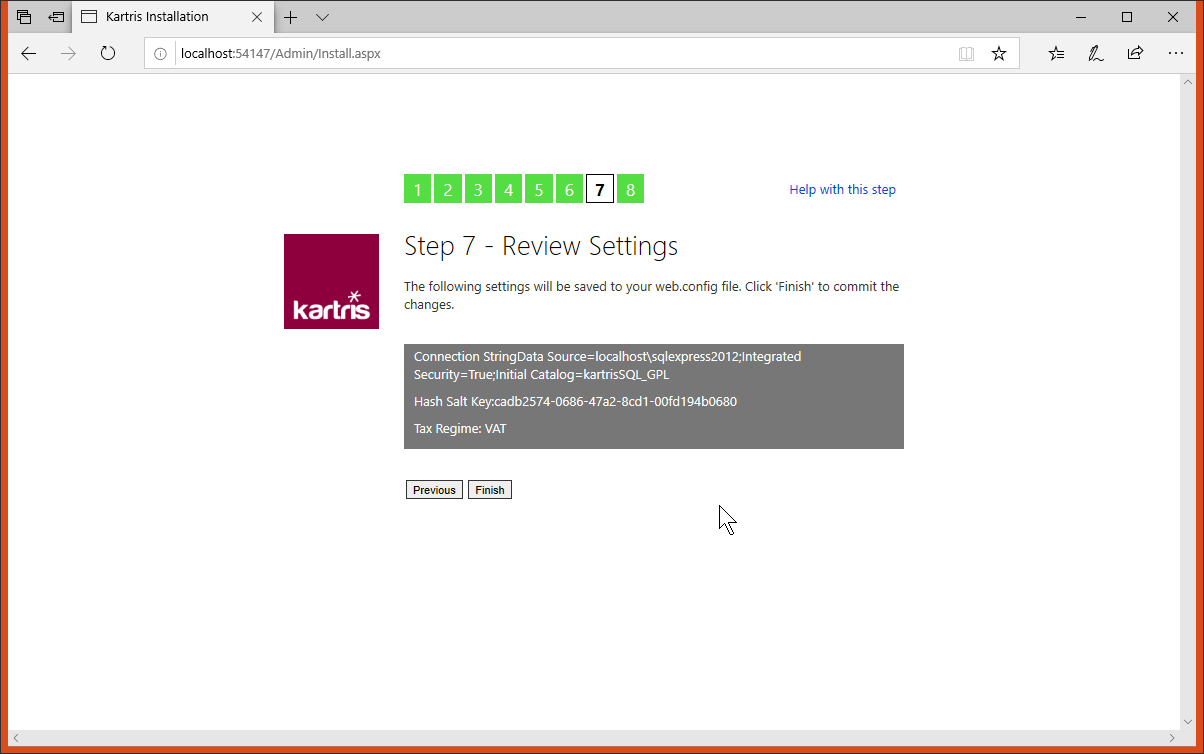
The install routine will show you the changes it will make to the web.config in order to set the database connection up. It will also change the resource provider (via the globalization tag) so the software will use the database for language resources rather than the file which is used by the install routine.
If Kartris cannot write/modify the web.config file, it will give provide a link for you to download the new edited file. You will then need to load this to your site, via FTP or just copying and pasting (on a local site). You may need to restart the site if the file is locked. Generally the site will restart after the web.config is updated.
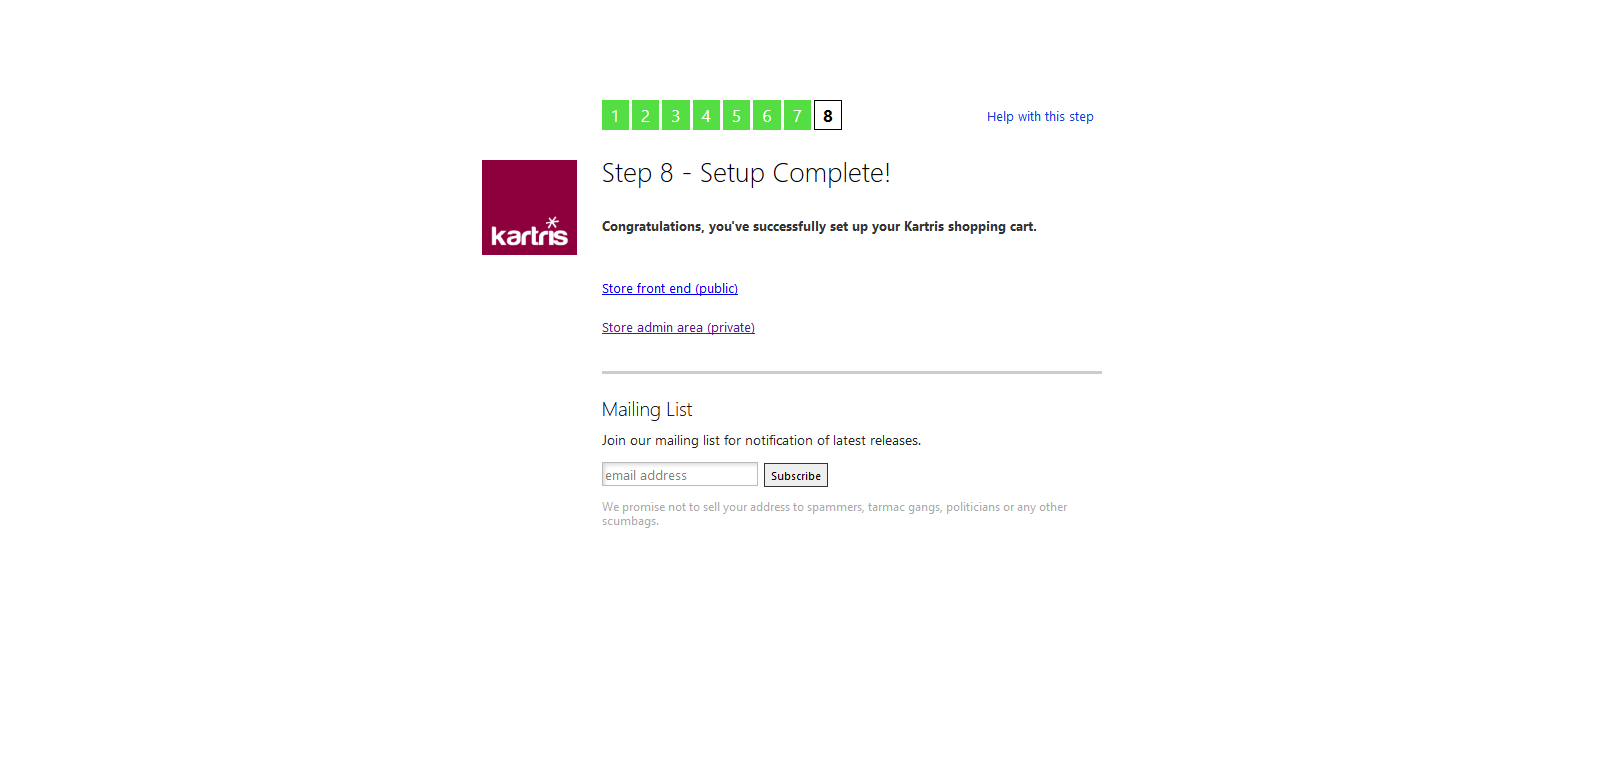
2.6.8. Installation - Step 8: Completion
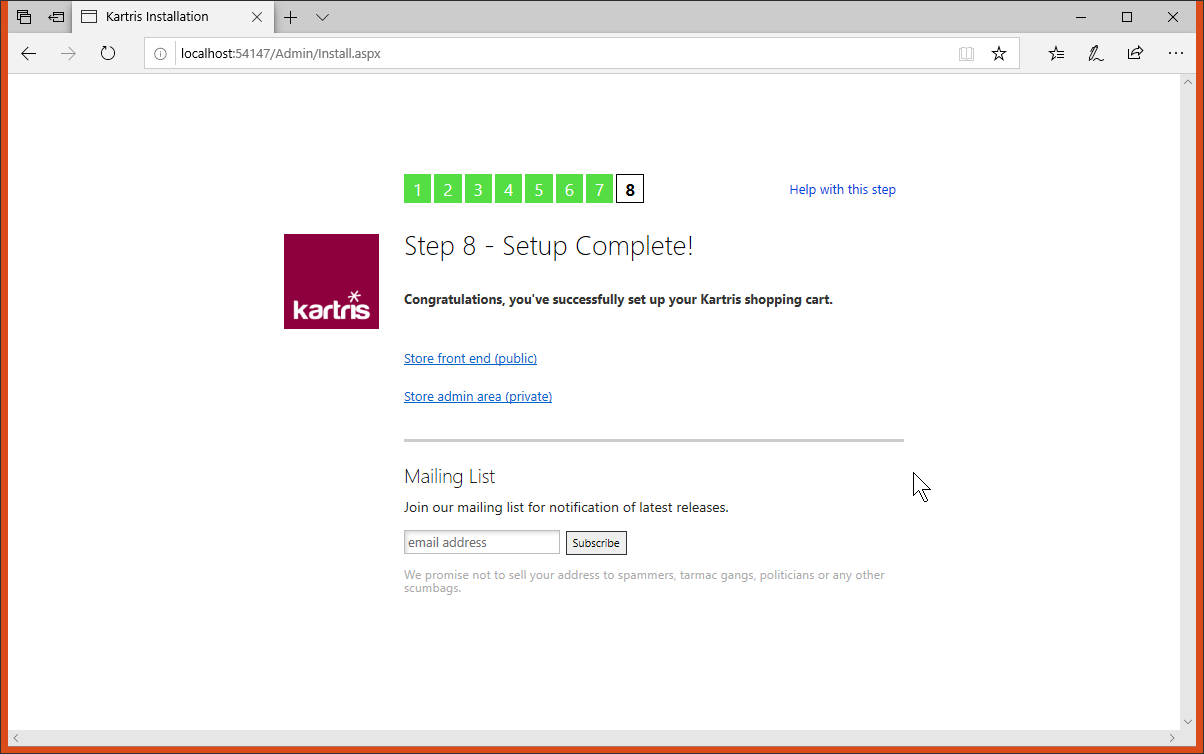
If all went ok, you should see a link to the front end back ends. It may be a little slow the first time you access Kartris after it is first installed, or the server restarts. But once loaded, it should be responsive and fast.
2.7. Forcing the install routine to run again
<add name="KartrisSQLConnection" connectionString="Data Source=localhost\SQLEXPRESS;Database=BadDBName;Integrated
Security=True;connect timeout=50" providerName="System.Data.SqlClient"/><!--<globalization resourceProviderFactoryType="Kartris.SqlResourceProviderFactory"
culture="auto" uiCulture="auto" enableClientBasedCulture="true"/>-->2.8. Upgrading
If you wish to upgrade an existing Kartris site to the latest version, then you need to proceed as follows:
- Download and install the latest Kartris to a new web.
- Create a new database by restoring a backup of your old Kartris database.
- Run the update SQL scripts on the database with SQL Management Studio to take it up to the latest version. These scripts are located in the new Kartris web, at this location:
/Uploads/Resources/
You need to run the scripts necessary to take your database from its present version, to the latest version, in the right order. For example, if upgrading a v1.4001 to v2.5003, you would need to run these SQL updates on the database in this order:
UpdateSQL_1.4001_To_1.4002.sql
UpdateSQL_1.4002_To_2.0000.sql
UpdateSQL_2.0000_To_2.0001.sql
UpdateSQL_2.0001_To_2.0002.sql
UpdateSQL_2.0002_To_2.5000.sql
There is not necessarily an SQL script for each Kartris release; one is only required if there were database changes. So in this case, we've upgraded the database to v2.5000, because that is the latest version of the database. Similarly, if you were upgrading v1.4004, you would need to start with the UpdateSQL_1.4002_To_2.0000.sql upgrade script, to ensure you get all the required changes.
You may get errors show up in the console during the upgrade process, but generally you can ignore these. It's normally because you have new language strings or config settings already for some reason, and so trying to add these in fails. But everything else should still be able to run, and since you have the required records already, there should be no problem. - Hook up your new web to the new upgraded database. To do this, edit the web.config file to make the following changes (a) database connection (b) ensure that the 'globalization' tag is uncommented (see @2.7. Forcing the install routine to run again for more details).
- You should also copy the 'hashsalt' value from the app settings near the top of your new site web.config file. If you don't do this, you may find your back end login no longer works.
- You should now be able to import your old skin to the Skins folder, and set up your site to use this from the back end.
- If you changed any user controls or code in your prior version, you can try to import this to the new site. But be aware that they may not be compatible, or that by importing older files, you may lose newer functionality which we've added to the new version.
- Other parts of the old site that will probably need to be imported too:
- Images folder, Uploads folder (except Logs, Resources, Temp)
- the .sitemap files in the root (these format navigation menus on your skin as well as breadcrumb hierarchy)
- any robots.txt in the web
- the .config files from any payment systems you have setup, these are stored in the relevant folder within /Plugins and hold the payment gateway configuration for that payment system).
3. The Back End
The back end is the admin section for Kartris. In some cases the terms 'back end' and 'admin section' may be used interchangeably.
3.1. Logging in
[your site domain]/Admin/
You will need your username and password. Note that if you forget these details, it is not possible for anyone to recover them, since they are 'hashed' for security. Instead, they can only be reset.
If you have another user who has 'config' permissions in the back end, they can edit your login and create a new password for you. If you are the only admin, then you must either using the Data Tool to do the reset, or force your site to run the setup routine again, see @2.7. Forcing the install routine to run again.
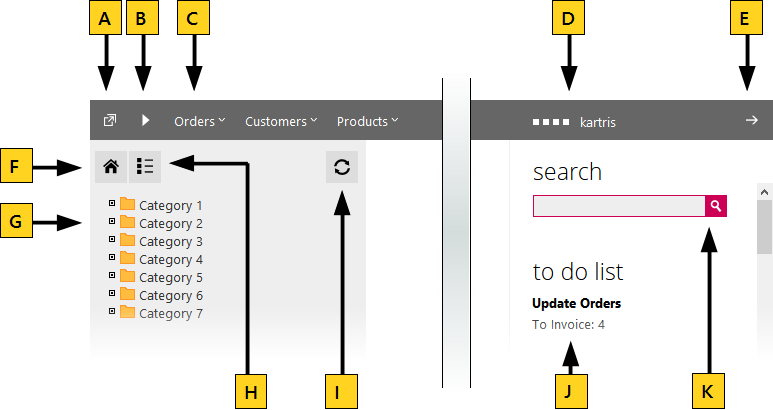
3.2. Navigation and toolbar buttons
3.3. Creating and managing logins
3.3.1. Creating logins
The primary login accounts for Kartris don't have any 'delete' option and the permissions for these accounts cannot be changed. This ensures that the main admin accounts are always valid, and that you cannot inadvertently lock yourself out of control by removing the primary accounts or reducing their access level.
Note that anyone with config permissions can create new users with any permissions they wish, or edit their own permissions to give themselves any permissions they choose. Bear this in mind if you grant configuration permissions to a user but deny them 'orders' permission, for example. The user would be able to edit their own permissions to give themselves 'order' permissions if they wanted.
3.3.2. Setting permissions
User accounts can be restricted using the permissions checkboxes so that they can only access certain areas in the back end. The back end is divided into four broad areas:
- Configuration permissions - user can change config values, shipping, tax, countries and other setup details
- Product permissions - user can view/edit categories, products and versions
- Orders permissions - user can view/change customers, orders, affiliates and coupons
- Support permissions - user can view/change support tickets and knowledgebase articles
This permissions structure serves two purposes. Firstly it allows you to prevent certain users from being able to make major changes to site settings, or products, for example, while allowing them to process orders. Secondly, it simplifies the back end somewhat by removing extraneous menus for users who do not need them.
3.4. Config settings
The config settings should not be confused with the web.config, which is a file on the site holding basic configuration for the site including the database connection. Config settings control all kinds of things relating to the functioning of your store, from the sizes of various images to the availability of certain features to users.
Values are stored in the database (in the tblKartrisConfig table); this has a number of advantages over setting values in the web.config.
- Keeps the web.config relatively uncluttered
- Works even when there is no 'write' access to the root (where the web.config is located)
- Does not force the application to restart (which editing the web.config does)
- Helps config settings to persist when you upgrade Kartris to a newer version
- Config settings can be searched easily from the main back end search box, or from their own dedicated search box within the config settings section.
Some important config settings are set during the setup routine; most of the others are less critical and can be tweaked later once you have Kartris running and your site under development.
3.4.1. Finding config settings
If you are less familiar with the config settings, you will find it easier to navigation to the config settings page (Configuration > Config Settings). From here you can navigate a hierarchical dynamic menu of the config settings. Hovering over either 'frontend', 'backend' or 'general' links will open out the menu – new sections will fold out as you hover over certain entries. This can be a good way to explore and find new settings relevant to particular features.
3.4.2. Changing config settings
Once you have located a config setting, you can click to edit it. Be extremely careful to ensure that you do not set config settings to an invalid value. This can cause errors in the operation of Kartris. Great care should be taken to double check values being changed before you click to submit any changes.
It is also possible to change config setting values directly in the tblKartrisConfig table of the database. However, the new setting will only take effect after the site is restarted (this is because the actual config setting values that Kartris uses are stored as application variables which are built when the application starts from the database values - updating config settings through the Kartris back end also triggers a rebuild of these values).
3.4.3. Useful config settings
3.4.3.1. General site settings
3.4.3.2. Security & access
frontend.users.access - this provides control over the level of access to the site that the public has.
'No' = full site viewable
'Yes' = must login to view site
'Partial' = prices & add buttons hidden until login
'Browse' = full site viewable, must login to checkout
3.4.3.3. Images
3.5. Regional setup
3.5.1. Tax regime
This value gets set during the setup routine, and it's unlikely most stores would ever need to change this. But if for any reason you do, you can find the tag in the web.config file and change it manually.
<add key="TaxRegime" value="EU" ></add>The possible values are:
- EU
- US
- Canada
- SIMPLE
3.5.1.1. Tax rates
The tax system in Kartris works differently for US/simple models, and EU tax.
The tax rates page itself is only really active when the tax regime is set to EU. It will list various rates which can be used for the various bands of VAT in your country. For example, in the UK these would be 0%, 20%, 5%, etc.
Once these are set, you can choose which tax band applies when creating or editing product versions. For example, in the UK some items such as childrens' clothes are exempt from VAT, while most items will come under the 20% tax band.
3.5.2. Regional setup wizard
The tax settings of your store depend to a large degree on where you are based.
To simplify matters, Kartris features a 'Regional Setup Wizard' (found within the 'Regional Setup' menu). This walks you through some simple questions and then sets up the various tax settings for you, including determining which countries/states are activated and set to have tax charged to them.
Note that the tax regime used is hardcoded in this wizard. That's because it uses the tax regime specified in the web.config file, which is generally set when the store is first set up.
See @3.5.1. Tax regime for more details.
3.5.3. Currency
You will see something like this:
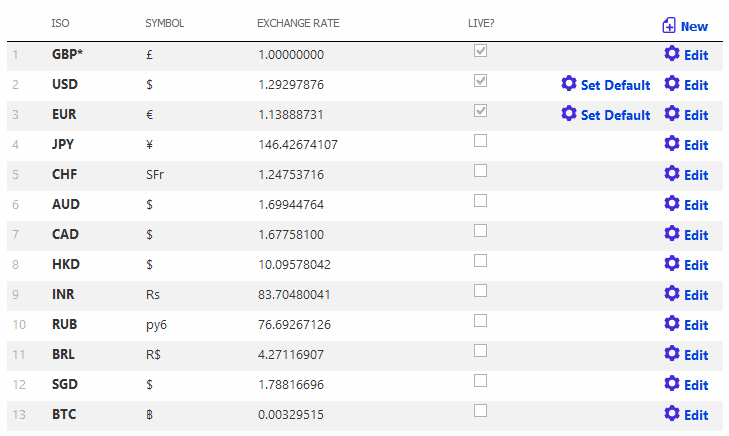
To change your default currency, simple edit the values in the default slot. You will need to know the ISO codes of your currency, which can be looked up here:
ISO 4217 - currency ISO codes
You can also determine how the currency is laid out using the two format fields as well as choose which decimal separator is used. Some currencies have the unit *after* the value, and in much of Europe, the comma is used instead of a point/period as the decimal separator.
You can edit the other currencies in a similar way, but for these, you can also set the exchange rate relative to the default currency.
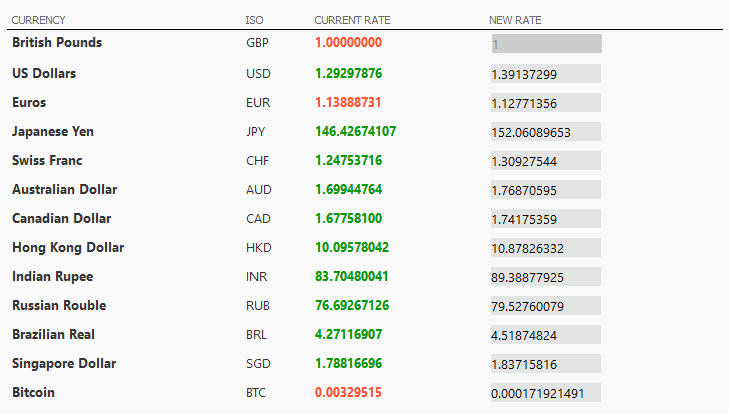
3.5.3.1. Live currency rates
3.5.4. Price display
3.5.4.1. Prices inc/ex tax
This is controlled by the general.tax.pricesinctax config setting which should be set to 'y' for tax inclusive prices, and 'n' for ex-tax prices.
Note that for tax inclusive prices, tax is calculated 'per item' rather than per row of the basket. As such, a rounded 'ex tax' price can be calculated. But for ex-tax pricing, tax is applied to each row of the basket. Consequently, it is not possible to show a rounded inc-tax price for individual items, because this would in many cases not quite tally with the actual tax on the order (due to the different rounding used, per-item and per-row) and would be likely to confuse customers or lead to complaints that the site has added up the tax wrongly. Instead a percentage figure is shown where necessary.
3.5.4.2. Tax display
Most stores will typically show a singe price for each item, which might be either inc tax or ex tax. In this case, you should set your frontend.display.showtax config setting to 'n'. If you wish to show the tax associated with an item, set this to 'y'.
The way prices are displayed within Kartris depends on both of the following config settings:
- frontend.display.showtax
- general.tax.pricesinctax
The exact format will vary as follows:
|
Table to show how the two tax config settings affect the display on the site |
frontend.display.showtax |
||
|
y |
n |
||
|
general.tax.pricesinctax |
y |
Ex tax £8.51 Inc Tax £10.00 |
Price £10.00 |
|
n |
Ex tax £10.00 Tax 17.5% |
Price £10.00 |
|
Note that if you enter prices into your store ex tax, and then switch to inc tax, the prices won't change (for example, an item entered as £10.00 won't suddenly become £11.75 – it will still be £10.00, just that this will now be considered inc tax instead of ex tax).
3.5.5. Shipping / postage
Kartris has a flexible shipping system that lets you define shipping for particular countries/states, order weights/values and for different shipping types. You can also set real-time shipping lookups to handle all or just some shipping possibilities. For example, you may want to ship domestically within the US by one courier, ship orders up to 10kg to Europe by a different courier, and then specify your own pricing for orders to Europe above this weight, and for all other shipping zones.
3.5.5.1. Shipping by weight or order value
3.5.5.2. Shipping methods
You can set up any number of shipping methods for your store, such as 'standard post', 'express post', 'courier' and so on. These will allow you to set separate pricing structures for each.
Once you have created shipping zones and shipping methods, you can then start to set the rate structure denoting the cost of shipping, or link to real time shipping systems. Click the 'rates' link by each shipping method to set rates.
3.5.5.3. Shipping zones
You can set up any number of shipping zones for your store. A shipping zone is an area which has its own shipping price levels. Countries and state records will be mapped to the appropriate shipping zone later. At the simplest, you might want a 'home' zone for orders in your own country, a 'regional' zone for countries nearby, and a 'rest of world' zone for everywhere else, for example.
If you want to subdivide your own country into various shipping zones, you can do this by having multiple regional 'country' records each mapped to their own shipping zone. So for example, a store in the UK might decide to have three shipping zones within the UK:
- United Kingdom - Mainland
- United Kingdom - Highlands and Islands
- United Kingdom - Northern Ireland
You would then need to have three corresponding 'country' records, each of which is mapped to its appropriate shipping zone.
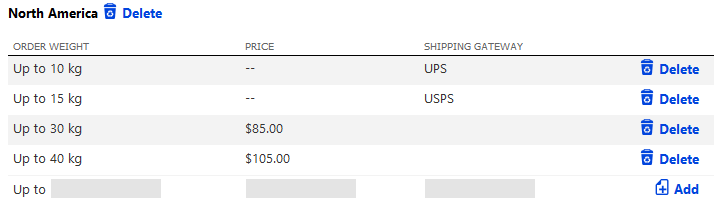
3.5.5.4. Shipping rates
This brings up a list of the bands that are in effect for each shipping zone. You can create any number of bands for each zone to fine tune the shipping price for any weight/value. This process can be repeated for each shipping method.
If a real-time shipping price system like UPS, USPS or Fedex is enabled, you can also specify that this be used for that particular band.
3.5.5.5. Free delivery and downloads
3.5.5.6. Real-time shipping providers
3.5.5.6.1. UPS setup
Go to www.ups.com and sign up to create an account. Next, you will need access to the API, and also an 'access key' to retrieve the shipping rates (you need the XML key, when the option is given). You can apply for these here:
https://www.ups.com/upsdeveloperkit?loc=en_US
Note that the UPS web site is almost unfathomably complicated in layout, confusing to find anything, and the forms seem to behave in inexplicable fashion, asking for you to fix errors which are not displayed, wiping your address and other data and so on. Nothing we can do about this unfortunately. You might have to contact UPS support if you cannot figure it out.
Once you have the 'access key', you can start to enter your account details into the UPS settings in Kartris. You will need to refer to UPS documentation with regarding to what values to enter for the various fields.
Once the STATUS field is set to ON, UPS will be available. You can then go to shipping and view the shipping methods and rates. For each band you add, or for the 'all higher orders', you will see an extra text field. You can add 'UPS' or 'USPS' into this, if you want orders meeting this criteria to use real-time shipping. If you want to edit an existing band, you must delete it and create a new one with your preferred shipping provider, or value. This system is therefore very flexible; you can mix both UPS and USPS, specifying one or the other for particular locations (regions) and weights (or costs). You can also have your own static pricing for orders over the limit of what UPS or USPS will deal with (if for example you can use some other provider for large orders, or even hire a truck).
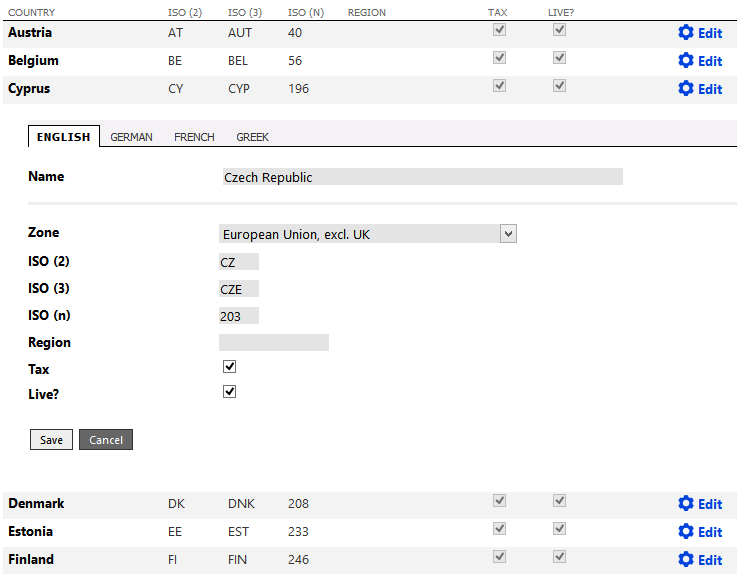
3.5.6. Countries and States

The USA, Canada and Australia all have provinces or states. If your store is in one of these countries, instead of having a single country record, you will have multiple records - a Country / State record for each state or province. Each of these records has the same country ISO code, but can also accept a regional code (such as two-letter US state code) which may be used by some external systems such as real time shipping price lookups.
You can also view countries by shipping zone. It is up to you which shipping zones you decide to have, and which countries are mapped to them. Each shipping zone is a region of the world (or country, if you have multiple country records) for which the shipping cost will be the same. For example, if your store is in the USA and shipping to France, Germany and Belgium is the same price, then you should have all these countries mapped to the same shipping zone.
If your store is set to EU as the tax regime, you can set for each country whether tax is to be charged or not (boolean). If your store is set to US or Canada, you can set the tax rate that applies for each state.
3.6. Database admin
You may find that some tabs referred to below are not visible when you log in. In this case, the backend.expertmode config setting is probably off. This setting hides some back end features, even to those with 'config' user permissions. You can edit the config setting to turn on expert mode, which will show advanced tabs in the db admin section.
Expert mode also allows you to edit certain field details of config settings and language strings that are normally hidden.
3.6.1. Home screen
3.6.2. Clear data
This provides an easy way to clear data related to products, orders or sessions. For each type of deletion, the system knows which tables should be cleared.
Where possible, avoid clearing individual tables directly in the database unless you're absolutely sure you understand the consequences. There are some tables in Kartris (such as config settings and language strings) that should always have data, even in a new install that has no products or customer records.
Deleting data from some tables without understanding the relationships can also leave orphan records behind. For example, version records always link to a parent product. If you delete all data from the products table only, you would end up with many orphan records from versions, language elements (the language specific content of products like descriptions and names), related products, etc.
3.6.3. Run query
This provides an easy way to run a query against the database. You can user SELECT, INSERT, DELETE or UPDATE queries.
SELECT queries will return results in a tabular format.
3.6.4. Data export
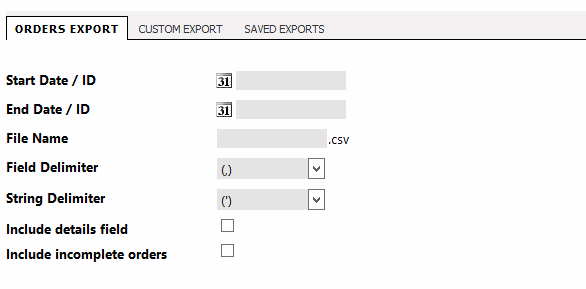
3.6.4.1. Orders export
The file format is CSV - comma-separated values. This is a text format which spreadsheet programs such as MS Excel and Libre Office Calc can open. If you find data shows up in the spreadsheet with single quotes around values, try exporting again but select a double-quote as the 'string delimiter'.
3.6.4.2. Custom exports
Custom exports are saved reports that you can run to output specific data that you need. If you go to the 'Saved Exports' tab, you can see some pre-written custom exports that come as standard within Kartris - clicking on edit will allow you to see how these are constructed. An export requires the following information:
- Export name (any name will do, it just lets you identify this export in a list)
- Field delimiter (separator between different data values, normally a comma)
- String delimiter (the marker around text / non-numeric values - experiment with a single or double-quote and open up the resulting file in your spreadsheet program such as Microsoft Excel - if you see the single or double-quote mark around data, then try using a different delimiter)
- Database query
Microsoft Access and MS SQL Management Studio also include graphical tools to help you build queries.
Advanced users may also prefer to create stored procedures and then call these from the saved export - our standard 'Products data for data tool' export which is included in a default installation uses this method.
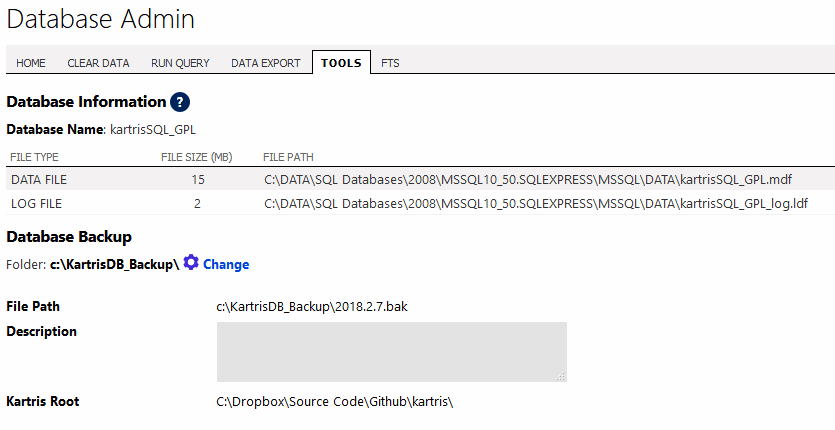
3.6.5. Tools
This gives an overview of your database, and lets you back it up. Note that this fires the backup facility within MS SQL server. It does not enable a remote backup. You should discuss with your hosting provider about the best way to obtain an off-server back up of your MS SQL database.
The page shows the root of the current web, which can help you format the correct path to create the backup file in the correct location within your web in order to let you download it with FTP.
3.6.6. Full-text search (FTS)
But larger sites will get a huge benefit from this; especially when you have tens of thousands of items, or more.
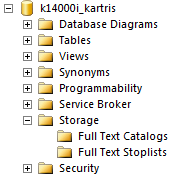
Before attempting to activate this feature, check that your server supports it by expanding your database and looking for the 'full text catalogs' folder, as shown below.
3.7. Reports
3.7.1. Error logs
Uploads/Logs/Errors/
Error logs are created with a .config extension to ensure the raw files cannot be served to web users (even if they know the location and name of a particular log file).
The presence of errors does not automatically indicate an issue with your site. 404s (file not found), cancelled orders and some other events will be recorded, as well as errors due to partially formed pages being submitted (for example, if a visitor has a slow internet connection and only receives part of the page before pushing a button). The logs are designed to be a useful tool to provide information to help resolve issues rather than a digest of problems on your site that need to be resolved.
3.7.2. Admin logs
Kartris keeps logs of certain actions by admins such as logins and changes to config settings. This can be useful when diagnosing problems that you suspect were caused by admins changing settings.
4. Product Data
4.1. Relationships
Before you start entering product data, it is important to understand the way this data is structured in Kartris.
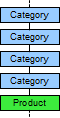
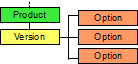
There are three basic required elements of product data structure:
- categories
- products
- versions
A product must have at least one version, and feature in at least one category – so in this respect, all three elements of data structure are required for every product item you have.
4.1.1. Unlimited category levels
4.1.2. Multiple parent categories

4.1.3. Mix products and subcategories

4.1.4. Product types
4.1.4.1. Single product

4.1.4.2. Multiple version product

4.1.4.3. Options product
You can control whether a selection is required for a particular option. So for example, when configuring a computer, the RAM and processor selections would be required (because a computer must have both) but the secondary hard-disk size selection might be optional (if the component was not necessary required).
4.1.4.4. Combinations product
This is similar to an options product, and is created in the same way. But once you have configured the options, you can choose to create 'combinations'. The system will then create a unique version record for each permutation of the options. This allows you to record stock level for each permutation separately, have a different SKU / item code for each permutation and set a unique price for each too.
The number of permutations will be limited to a few hundred for performance reasons. Remember that you only need to create a combinations product if you are stock tracking or need a unique SKU or price for each permutation - otherwise use an options product.
4.1.4.5. Custom control product
In some cases, none of the built-in Kartris product types will suit your purposes. A typical example would be a site producing bespoke curtains or signage. You would need the user to enter a height and width (which could for example be anything in mm between 30 and 3000). Options would be impractical as you'd need to create every option between 30 and 3000. Furthermore, height and width values would both be required to calculate the area of fabric needed, and then the price - but option prices can only apply to a single option selection.
Fortunately, if you're familiar with ASP.NET, it is possible to create virtually any type of product configurator and plug it into Kartris. This is done by creating a custom user control that contains all the logic needed to price and detail a product. Examples of the kind of thing that is possible with a custom user control:
- A product configurator for signage, with choice of materials, prices/m2 and all other data pulled from an Excel spreadsheet
- A product configurator for insurance policies which uses an XML web service to pull pricing from another remote web site
- A product configurator which uses a formula to calculate the price of the item based on the various values entered
For more information, see @14.3. Custom product controls
4.2. Adding product data
4.2.1. Creating a new category
If you intend to have a 'shop by category / shop by brand' option, then you should start with just two top level categories (one for each) and nest everything else inside those. Remember that products can have multiple parent categories, so any product can be in both sections (or subcategories within them).
To add a new top level category, go to 'Products > Add New Category'.
Alternatively, you can list the top level categories with the 'categories' icon next to the home button on the left hand menu, then click the 'new' link to the top right of this page. If you want to create subcategories, navigate to the parent category where you want to place the subcategory, and then click the 'new' link. This will pre-fill the 'parent' category into the form.
4.2.1.1. Product display type
There are several options for how to format product appearance on the front end of the site in the listings. You can set this globally (for products that are set to use the global default) using the frontend.products.display.default config setting or override it at category level, which will apply to all the products displayed within that category.
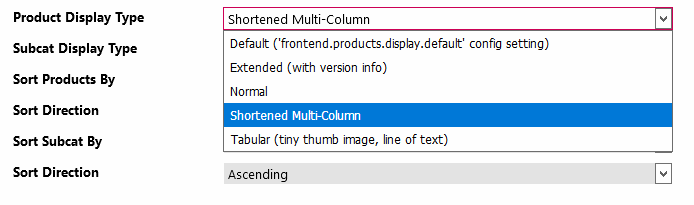
4.2.1.1.1. Shortened multi-column
This formats products into a box, typically several per row, featuring a product image, the product name and 'from' pricing (if turned on).
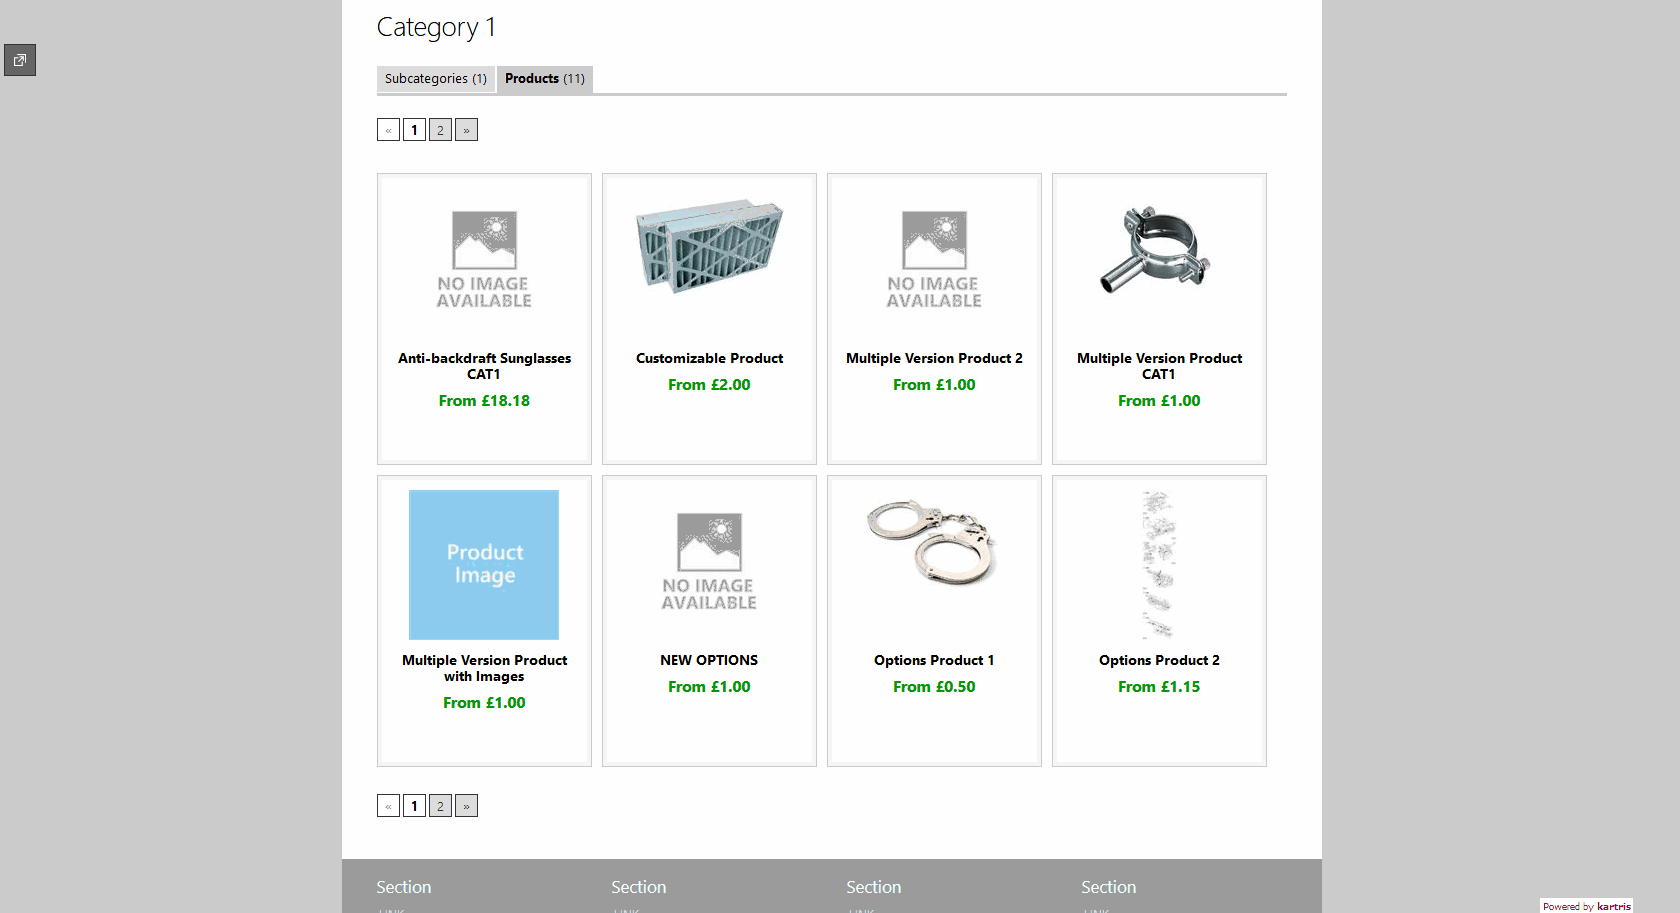
The template used:
/UserControls/Templates/ProductTemplateShortened.ascx
CSS class:
.products_shortened (located in sections.css)
4.2.1.1.2. Normal
This formats products one per row, with an image, product name and truncated description, plus the 'from' price (if turned on).
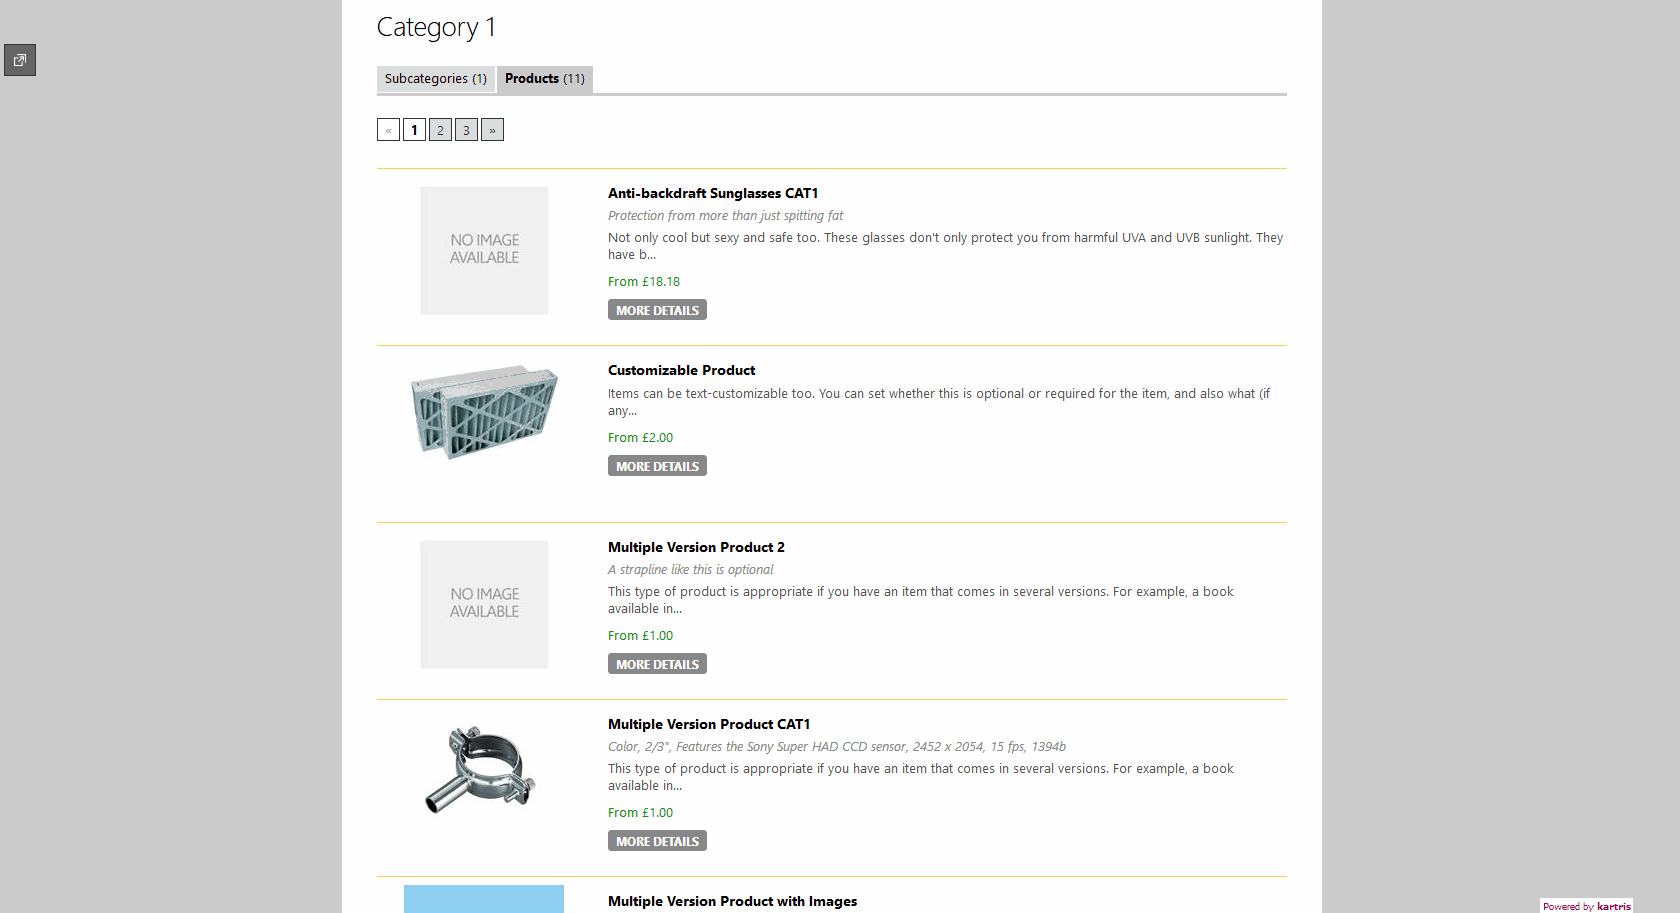
The template used:
/UserControls/Templates/ProductTemplateNormal.ascx
CSS class:
.products_normal (located in sections.css)
4.2.1.1.3. Extended
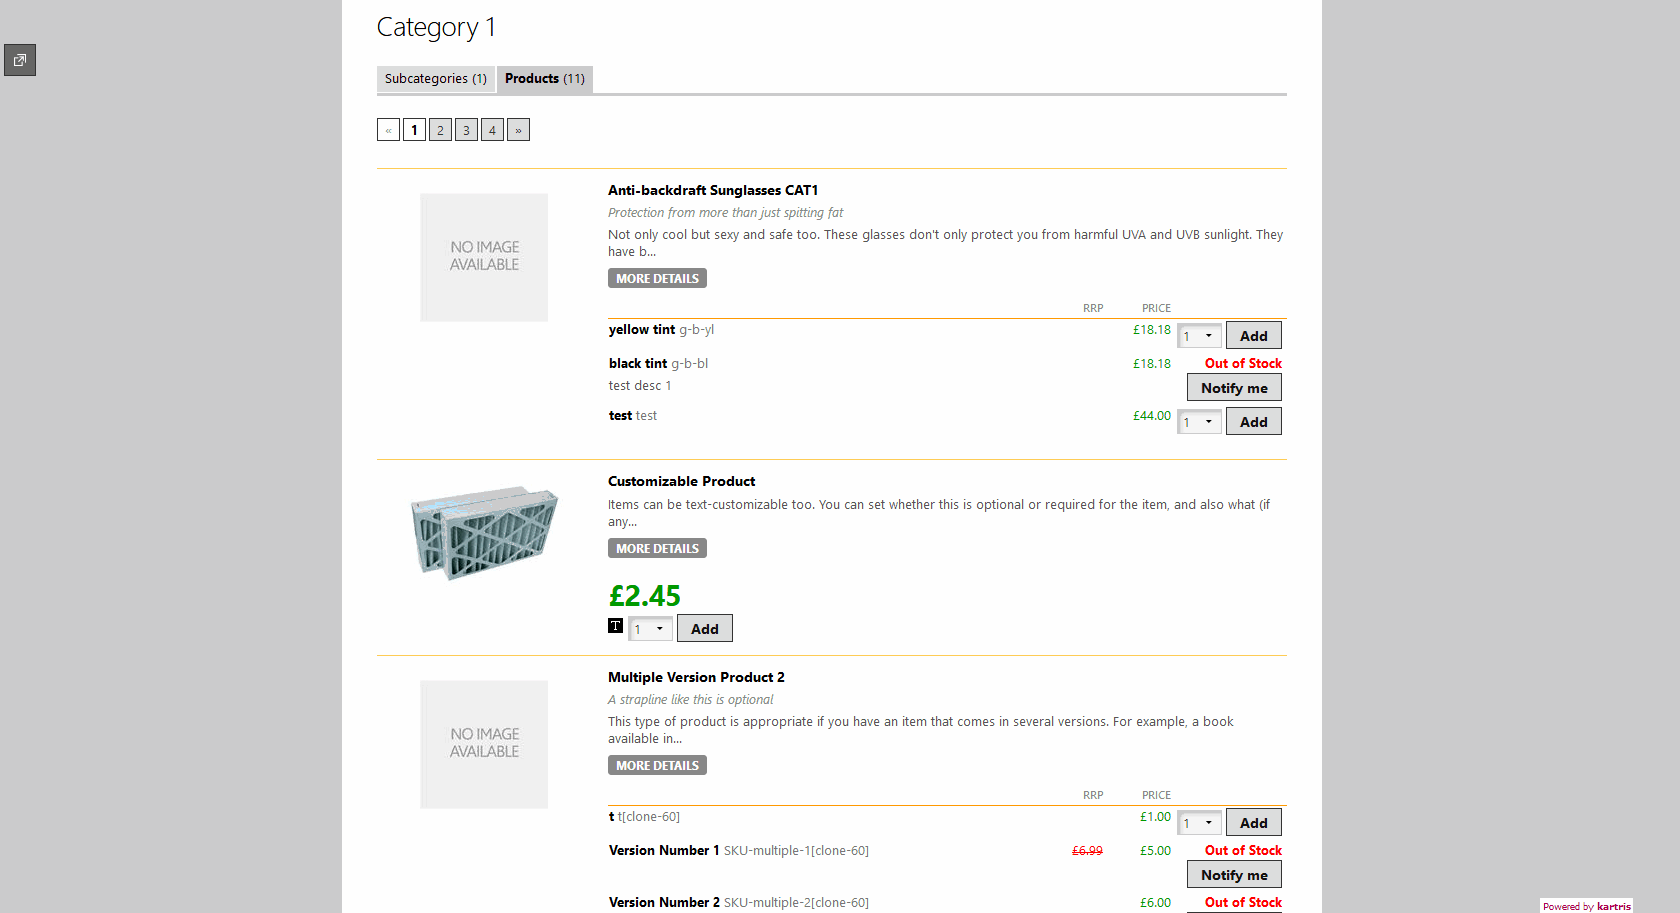
This formats products similarly to 'Normal', but also includes their versions, so pricing can be seen and items added to the basket directly from the product listings, without having to click through to the product page itself. Any type of product - single version, multiple version or options - can be displayed in this way, including different types on the same page. 'Out of stock', text-customization and other version features all work exactly as they would on the product page itself.
The template used:
/UserControls/Templates/ProductTemplateExtended.ascx
CSS class:
.products_extended (located in sections.css)
4.2.1.1.4. Tabular
This is similar in terms of content and structure to 'Shortened multi-column', though has a different control and CSS class, allowing for different formatting if desired.
The template used:
/UserControls/Templates/ProductTemplateTabular.ascx
CSS class:
.products_tabular (located in sections.css)
4.2.1.1.5. Number of products per page
You can set the number of products per page for each type of product display from the following config settings:
frontend.products.display.extended.pagesize
frontend.products.display.normal.pagesize
frontend.products.display.shortened.pagesize
frontend.products.display.tabular.pagesize
frontend.search.pagesize
4.2.2. Creating a new product
Then you can either go to 'Products > Add New Product', or you can click the 'New' link next to the products section in a category view. This will bring up the product editor page.
4.2.2.1. Category parent
Kartris supports multiple category parents. You can use the same process to add further categories. All the categories that a product belongs to will be listed in the multiple dropdown.
To remove a category from being a parent of this product, simply highlight it in the multiple dropdown list and click the 'Remove selected' link.
These product-category relationships will only be saved when the product is updated/created with the 'Save' button.
4.2.2.2. Product type
There are three selectable types of product – single version, multiple version and options product. These are explained further in @4.1.4. Product types.
When you select the product type, some of the dropdown menus immediately below will be enabled or preset to certain values and disabled. This is because certain selections of these only apply to certain product types.
If you are editing an existing product, and find that you are not permitted to change the product type, it is most likely because the product has associated data which is incompatible with the other product types. For example, if you have a multiple-version product, it cannot be changed to a single version or options products without first deleting the extraneous versions.
4.2.2.3. Product not visible warning
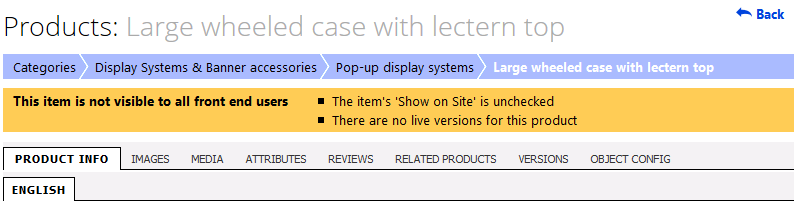
This makes clear if there are any reasons why the product being viewed is not visible from the front end of the web site. The reasons include:
- No valid live version
- Product is disabled ('show on site' checkbox unchecked)
- Product belongs to a customer group (in this case, the warning makes clear that the product is only visible to members of that group, and not the wider public)
- None of the parent categories are live
If you find for some reason that a product you created doesn't show up on the front end of the site, check it in the back end - this warning should provide clear guidance on the reason, and hence what steps you need to take to fix it.
4.2.2.4. Creating a version
If you create a 'single version' product, a new version is automatically created. However, you must still go to the 'versions' tab in order to enter a price and other minimum information, as well as to set the new version live.
For other product types, you must also create at least one version before the product is complete and can be visible on the front of the web site to be purchased.
4.2.2.4.1. RRP
To activate this, you must first turn the RRP display on with the frontend.versions.display.showrrp config setting, then you can set a value for RRP for each version. Note that this only shows on some version types; options products do not display this for example, because the price of options products is not fixed - and providing an RRP for each permutation of options would be unnecessarily complex for what is essentially just a guide and marketing device.
4.2.2.5. Editing versions and adding content
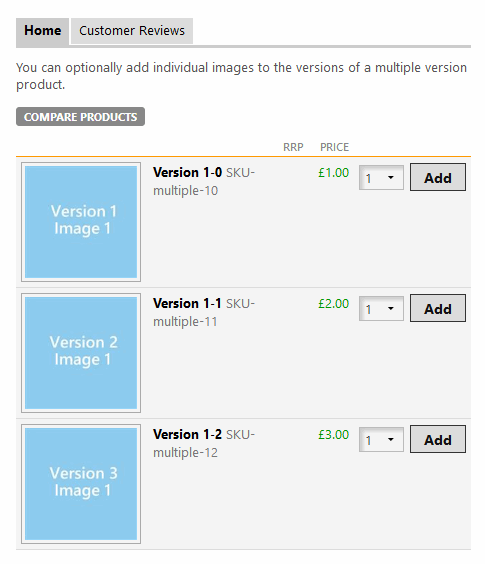
Once you have created a version, you may wish to add images or media. This can only be done for multiple version type versions.
4.2.2.5.1. The 'Images' tab
Kartris versions can have unlimited images. To add an image for a version, click the images tab and then 'Add new'.
Hit 'Browse' and navigate to an image on your local computer. Ideally, this image should be sized already for use as a 'large view' image on your site. Ideally this should be big enough to exploit the space available on large screens (e.g. 1200px or more wide) but compressed to a reasonable size (perhaps couple of hundred KB).
Once selected, click the 'upload' link to the left of the browse box.
You can upload multiple images one by one, or you can multi-select in the dialog and upload several at once. They will appear here as a list. The image order can be changed using the up/down buttons, or it can be deleted.
Where there are multiple images, only the first will display within the version listing. The others will be visible in a gallery under the first image if the image is clicked to view the large view.
4.2.2.5.2. The 'Media' tab
You can upload or create links to media in much the same way as for products. See @4.2.2.8. The 'Media' tab for more details.
4.2.2.6. Finding and viewing versions
You can navigate the category structure and see products listed; clicking the [+] sign to the left hand side of the product name will expand the product so that its versions are visible.
Versions can also be found from the search box in the Kartris back end. When editing a product, you can switch to the 'versions' tab to see all versions listed.
4.2.2.7. The 'Images' tab
Kartris products can have unlimited images. To add an image for a product, click the images tab and then 'Add new'.
Hit 'Browse' and navigate to an image on your local computer. Ideally, this image should be sized already for use as a 'large view' image on your site. Ideally this should be big enough to exploit the space available on large screens (e.g. 1200px or more wide) but compressed to a reasonable size (perhaps couple of hundred KB).
Once selected, click the 'upload' link to the left of the browse box. The image should appear in the list.
The image aspect ratio will be maintained, and it will be reduced in size where necessary for use as various sized thumbnails, normal sized view, and large view.
You can upload multiple images one by one, or you can multi-select in the dialog and upload several at once. They will appear here as a list. The image order can be changed using the up/down buttons, or it can be deleted.
Where there are multiple images, the first will be used for the product on the front end of the site. On the product page itself, the first image will display larger, while the others will be thumbnailed below in a gallery. A large view feature is automatically provided.
If no image is included, a place-holder image may be displayed on the front end instead, depending on the frontend.display.image.products.placeholder config setting.
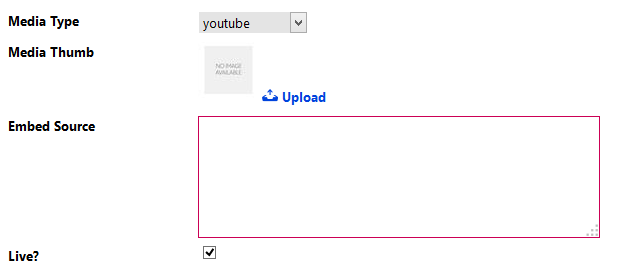
4.2.2.8. The 'Media' tab
Kartris supports a number of different media formats that you can upload or attach to products or versions. You can also choose an icon for each media clip (for example, a screenshot), otherwise the media will be served with a default icon for whatever the type is.
4.2.2.8.1. Youtube

4.2.2.8.2. flv, mp3, html5video, swf
If you would prefer that the media be served as a download, check the 'Downloadable?' box.
4.2.2.8.3. pdf, doc
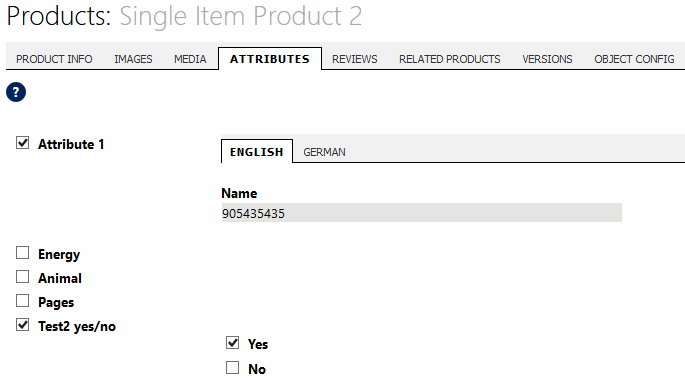
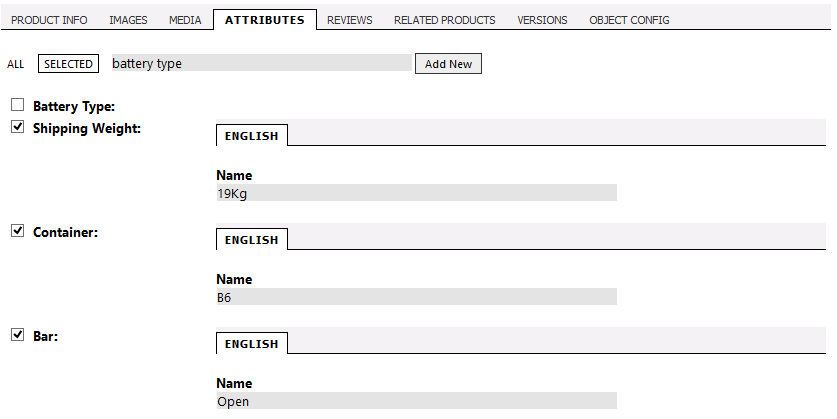
4.2.2.9. The 'Attributes' tab
Attributes will need to be set up before using this feature.
For more information on setting up attributes see @4.5. Product attributes
Check the attributes you wish to use. If they are free-text type, a text box will appear (this accepts values for all languages configured in your Kartris). If the attribute is a fix-option type, you will get a choice of selection.
4.2.2.10. Related products
4.2.2.11. The 'Object Config' tab
4.2.2.12. Special pricing for certain customers
4.2.3. Expanding versions in main view

4.3. Sort order of products and categories
4.3.1. Default sort order
frontend.categories.display.sortdefault
frontend.products.display.sortdefault
frontend.versions.display.sortdefault
The sort direction (ascending or descending) is determined by these config settings:
frontend.categories.display.sortdirection
frontend.products.display.sortdirection
frontend.versions.display.sortdirection
These are the 'global' settings. When you create new categories and products, they will default to using these config settings for sorting the child categories, products and versions under them.
4.3.2. Changing the sort order of products
The sort criteria for items is set at the parent. If you want certain products to show in a particular order, you must set this at the parent category of those products. First you set the criteria by which products will be sorted:
Sort Products By :
- Product ID
- Product Name
- Product Creation Date
- Product Last Modified Date
- Product Category Sort
The last one of these should be selected if you wish to manually sort the products into exactly the order you required.
You also need to set a sort direction:
- Ascending
- Descending
For example, sorting by 'Product Last Modified Date' and sort direction 'Descending' will show the most recently edited/added products first.
Alternatively, from v2.9014 onwards, you can also drag and drop sort too.

If sorting products manually ("Product Category Sort"), make sure you select the direction as 'ascending'. It won't work correctly if set to 'descending' as the code that tries to find the item above or below to swap with will find the wrong value.
4.3.3. Changing the sort order of categories
The sorting of categories is conducted in a similar way to sorting products; subcategories sorting criteria is controlled from the parent category.
Top level categories are always manually sorted. You can click the 'view categories' toolbar button and then change the sort order of categories with the up/down buttons to the left hand side of each category.
Alternatively, from v2.9014 onwards, you can also drag and drop sort too.
4.4. Options
Options products are typically used when you have an item that is has more than one aspect of variation. For example, if you have an item that is available in 5 different colours, you should generally create it as a multiple version product, with each colour as a different version. But if the same item is available in 5 different colours AND 3 different sizes, then you have two different variables. In such cases, options result in a cleaner interface from the customer perspective.
4.4.1. Creating options
Give the option a name, such as 'Colour', choose the display type. You will also have to set language specific names for this option for use on the front of the site. Click 'save'.
Next, click on the 'Option Values' link for the option group you just created.
Enter the name, e.g. 'Blue'. You can also enter a price and weight modifier for this option to reflect the fact that some options come at additional cost. Note that these values are just defaults – you can change them per product when you use the option later if you wish.
Add as many options as you need.
4.4.2. Using options
Click the 'options' tab within a product (if there is not one, make sure you created a product of the correct type, on the main Product Info tab).
You can enter basic info for the item, including the base price.
On the 'Product Options' tab, you can select which option groups apply to this item, and which options in each to include. You can also override the default price and weight modifiers. For each option group, you can check the box if it is optional – in this case a select is not required. You can also select which of the option values is the default value – the menu or radio button on the front end will default to this.
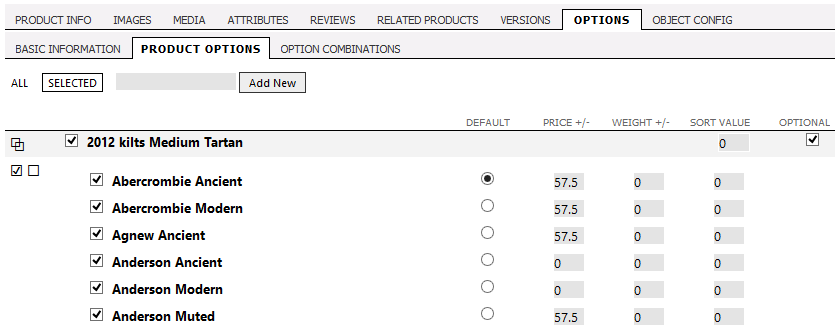
On sites with fewer than 25 option groups, when you view the options tab under a product, all the options will be shown.
On sites with 25 or more option groups, only the option groups which have been selected for this product are shown, and they are collapsed by default. They can be opened to view the option values with the overlapping squares icon. Once expanded, there are two links to quickly select or deselect all the option values.
Once you have created options, you can choose to convert the options product to a combinations one. Click on the 'option combinations' tab. For more detail see @4.1.4.4. Combinations product.
4.4.2.1. Sort order value explained
So if you want 'colour' to appear after the selection for 'size', set the sort order value to 10 for size and to 20 for colour.
It makes sense to assign in steps of 10 rather than with consecutive numbers, as it gives you the flexibility to insert new values later without having to change all the sort values. For example, you can insert a new option 'style' between size and colour by giving it a sort value of 15.
4.4.2.2. Price and weight modifiers
Similarly, a particular option that adds additional weight can be accounted for (important if your shipping prices are related to item weight).
4.5. Product attributes
Attributes are entered at product level, so if you have multiple versions or an options product, care should be taken to ensure that the attributes apply to the product in general, including all versions.
4.5.1. Attributes vs. options
Attributes are sometimes confused with 'options', but they are quite different. Options are choices that are available to a customer to select when choosing a product. Attributes on the other hand are fixed pieces of information that apply to the product and cannot be selected or deselected by a customer.
To give an example of usage, a book might have a number of attributes:
-
ISBN (unique book number that all books have)
-
Publisher
-
Author
-
Genre (thriller, romance, non-fiction, etc.)
-
Format (hardback, paperback, audio book, e-book)
Once created, you can enter the information for each and every book you feature on your site (although there is no requirement to enter any attributes for any item where you don't wish to).
4.5.2. Creating attributes
Go to 'Product > Product Attributes'. A list of all current attributes appears. You can click to create a new attribute, or edit an existing one.
Attribute type is fixed as 'text', but other types may be supported in future.
You can control if the attribute is displayed in the product page from the checkbox – unchecking the box means the attribute is hidden from displaying there.
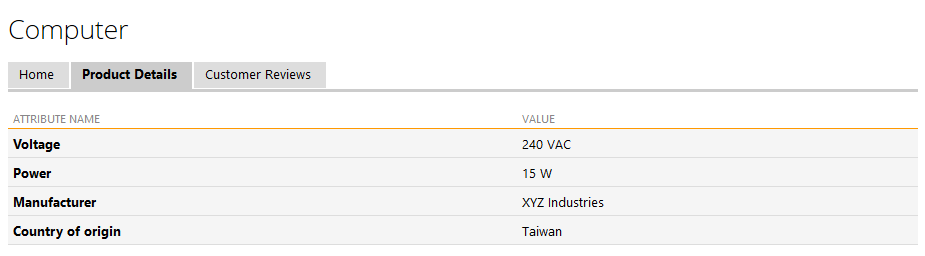
If all the attributes of a product are hidden in this way, the 'product details' section on the product page will be hidden.
You can control whether an attribute is searchable too, with the 'include in search' checkbox. For example, you might not want voltage to be searchable, but you would most likely want the author attribute for a book to be searchable, or the ISBN number, as customers are very likely to use these to find particular items.
The final option is 'Show on comparison table'. This sets the circumstances under which the attribute will be displayed when comparing products.

4.5.3. Setting attribute values at product level
4.5.4. Object config
The object config system is a way of storing extra settings at product, version or category level, which can be edited from the item's page in the back end. These are kind of like config settings, but they apply just to a specific product or version.
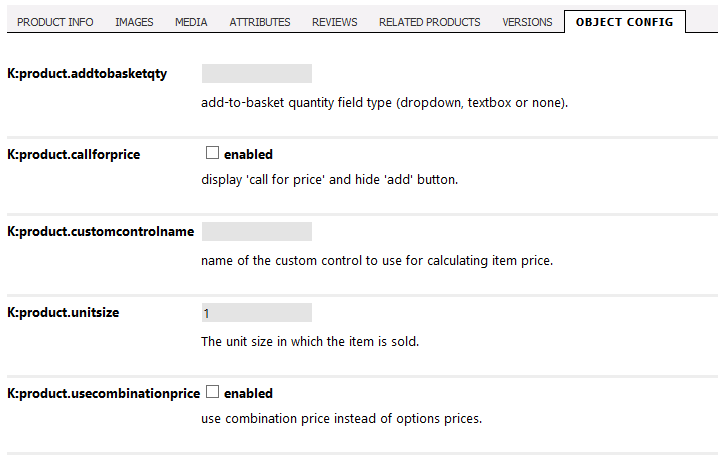
To retrieve the value in code, just call it like this:
ObjectConfigBLL.GetValue("K:product.addtobasketqty", 99)
Where 99 is the database ID of the product, version or category that the object config setting is for.
4.5.4.1. K:product.addtobasketqty
This controls the display of the 'add to basket' region of the product. The valid values are:
- 'dropdown' - a select menu numbered from 1 upwards (to a number set in frontend.basket.addtobasketdropdown.max) displays just in front of the 'add' button so a customer can select a quantity and then add that number of items to the basket; this is most appropriate where users will only ever purchase a small number of similar items.
- 'textbox' - a free text field where the customer can enter a quantity and then click 'add'.
- 'none' - no quantity selection, just an 'add' button which adds a single item to the basket; this is most appropriate for big ticket items or customizable items where a customer is only ever likely to order one.
It should be noted that a customer can still edit the quantity of items as free text within the basket page, or click multiple times to add further items, so this setting does not create any limitation on what a user can checkout with.
Where no value is entered, the product will default to use the frontend.basket.addtobasketdisplay config setting value. So you should set that to act globally on your store, and then use this object config value on a per product basis to override it for particular items if desired.
4.5.4.2. K:product.callforprice
4.5.4.3. K:product.customcontrolname
Custom controls is an advanced developer topic. It is a prototype system that allows the normal product 'add item' section for a specific product to be replaced by a custom user control. The control can handle all the logic of displaying options, accepting text input, looking up prices from a web service or spreadsheet or new database table, making calculations and formulating the price and description of an item which can then be placed into the standard Kartris basket. This permits total flexibility in the kind of products Kartris can handle, with total freedom for skilled developers to create complex configuration tools for products. It's particularly useful for handling custom measured items such as curtains, signage, boxes, etc. where the price can be a factor of multiple dimensions which themselves have 100s or 1000s of possible values. In these cases, it's simply not possible to use options.
This object config setting holds the name of a control in the /UserControls/Custom/ folder that this product should use, for example 'SampleCustomControl.ascx' (which we include as a sample in the core Kartris zip).
4.5.4.4. K:product.unitsize
Most items you sell will probably be sold as individual pieces, in which case the unit size is 1. This means the basket allows only values divisible by 1 (i.e. integer values).
But for some items, you may want to change this. If you sell cloth for example, it may be that you price it in metres, but can provide it in any length to the nearest centimetre. In this case, you can set the 'unitsize' object config for this item to 0.01 (1cm = 0.01m, the unit you're pricing in). Setting the value to 0.05 would mean only values rounding to 5cm would be accepted, and so on.
It can also work in the other direction. If you sell screws or bolts to the nearest 100 or 50, you can set the unit size to those values, so customers can only add values divisible by 100 or 50 to the basket.
The unit size can be any value, you could set it to 12 if bread rolls are priced individually but only available in 'dozens' or 0.25 if you price an item in kilograms but actually deliver it in multiples of a quarter kilo.
If a user tries to add an incompatible quantity, either from the product page, or by editing quantities in the basket, a warning is displayed indicating that the item can only be ordered in multiples of whatever value you have set.
It is important to remember though that the posted price on the web site is always for 1.000 of an item. So for cloth or rope, it would be the per metre price (even if you can choose fractions of a metre) and for screws or bolts, it would be the single item price, even if the item must be purchased in larger quantities.
4.5.4.5. K:product.usecombinationprice
By setting the 'usecombinationprice' object config on, you can price the individual combinations you create for a product without this being calculated by the base price plus/minus any option price modifiers.
4.5.4.6. K:version.extrasku
4.6. Suppliers
Suppliers are manufacturers or resellers from whom the store purchases items it sells.
To access suppliers functionality, go to 'Products > Suppliers'.
Any suppliers you set up will be available in the 'suppliers' selection when editing or creating a product.
Setting the supplier is useful to help with managing stock in the back end of Kartris. You can list all the products from a particular supplier from the suppliers page – this makes it easy to locate all items from a particular source if you have a recall or other issue to attend to.
Also, you can filter the stock level warnings ('Products > Stock Levels') by supplier. This allows you to see which items need ordering from any particular supplier while preparing an order.
4.7. Stock tracking
If you sell items where you have a limited number in stock, and where your resupply period might be more than a day, you will normally want to use stock tracking to ensure you don't sell items that you cannot deliver.
4.7.1. Activating stock tracking
Stock tracking does not need to be activated globally for the store. Instead, you can apply just to the items that you need to track stock for.
When creating or editing a version, check the 'stock tracking' checkbox. There are two relevant text fields: the actual stock quantity, and the warn level.
When the stock quantity reaches the warn level or below, a stock warning will appear in the 'To Do' list on the right hand side of the back end. This way, you can re-order more stock before your supplies are exhausted.
4.7.2. Out of stock
Items which are out of stock will have their 'Add' button on the front end replaced by an 'out of stock' message to prevent the items being purchased.
You can use the frontend.orders.allowpurchaseoutofstock config setting to allow out of stock items to be purchased on your store.
4.8. Free delivery and downloadable items
4.8.1. Digital / downloadable items
The 'Downloadable File' option allows you to upload a file for the item. This is not ideal for huge files, but should generally be able to handle files up to several megabytes in size.
The links to download files will be available to purchases in the 'downloads' section of their 'my account' pages.
4.8.1.1. Controlling access to files
frontend.downloads.hidden - if this is set to 'y' (default), Kartris will hide the path of a file from the user and stream it them instead. This provides additional security for files.
frontend.downloads.daysavailable - this is the number of days after a purchase that downloadable items are available for. The default is zero, which means there is no limit. If you only want a customer to be able to retrieve the download for 2 weeks (for example) then you can set this to 14 days.
frontend.downloads.instant - for security, you may only want files to be available to purchasers once you have set the order status to 'dispatched'. This is useful if you are concerned about fraudulent orders, which may be more common for downloadable items where no physical delivery address to retrieve the goods is required. If set to 'y' files will be available from the 'my account' area immediately when the order is paid and called back. The default is 'n'.
4.8.2. Free shipping
For more information on configuring your store's shipping, please see @3.5.5. Shipping / postage.
5. Orders
Orders are accepted through the front end of Kartris. But this is just the first step. The store owner will want to review orders, possibly check for fraud or other problems, and then assuming all is well, process them.
This section deals with processing orders and the various options and settings that affect the order process.

5.1. Finding orders
The first step to processing an order is to find it – there are several options for this in Kartris:
- The 'Orders' menu - this can bring up a list of orders filtered by various criteria such as recent, awaiting invoice, awaiting payment and so on.
- The main back end search box can find orders by ID.
- The search box on the orders list page can find orders by ID or date.
- Orders requiring attention (generally new orders) will show in the 'To do' list on the right hand side.
- You can click to view a customer's orders from either the customer listing, or the customer detail page; so if you need to find an order for a particular customer, you can find the customer by email or name (or part of) and then from there find their order(s).
- In Kartris 1.4x onwards, the order IDs on the customer's order history tab are also clickable.

5.2. Processing orders
5.2.1. Order status

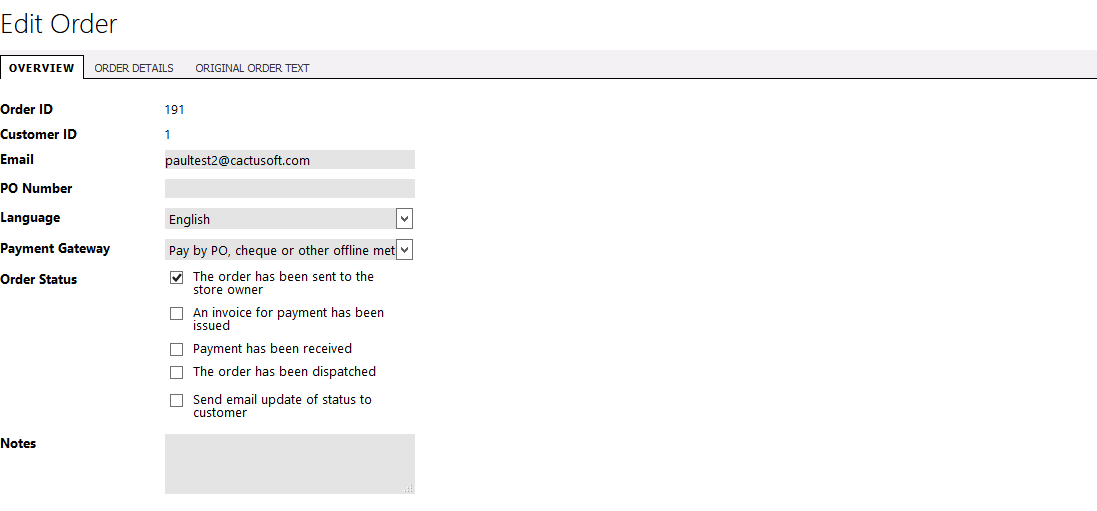
There are 4 stages for orders to move through. These are indicated by 'Order Status' checkboxes when viewing an order in the back end.
-
The order has been sent to the store owner – this box is checked when an order is successfully placed. Sometimes we refer to this simply as 'sent'.
-
An invoice for payment has been issued – this box is checked manually in the admin section to record that an invoice has been issued to the customer for payment.
-
Payment has been received – this box indicates that payment for the order was successfully received. In the case of an online payment, the callback process normally triggers this box to be checked automatically when a successful payment is made.
-
The order has been dispatched – this typically signifies that the order process is complete where payment was received via the web site. It is checked manually by the store owner once the order has been shipped. For orders that have been invoiced, this is of course not the end of the order process as payment is still awaited.
-
The order has been cancelled (Kartris v2.0+) – checking this box retains the order in the database, but cancels it from order totals and releases any stock items back to the store.
In the most common scenario where a customer makes an online payment for the items in their basket, the first three boxes will typically be checked, leaving only the dispatch of goods to be manually changed on the order.
You can see and also adjust the status of any order by changing the status checkboxes and saving:
5.2.2. Order progress
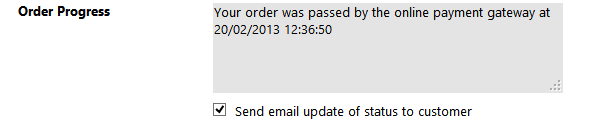
The 'Order Progress' box is normally updated automatically for online payments just to confirm the payment, but the admin user can add extra comments and choose whether to send the status update to the customer by email. This is a useful way of notifying the customers of shipping delays or any other issues that might affect their order. These comments can be viewed from the 'My Account's section if the customer logs in to check the order progress.
5.3. Editing orders
There are a few common situations which may require you to edit an order:
- The customer made a mistake, or changed their mind, and contacts you before you processed it
- You cannot obtain one or more items in the order
- The customer wanted to change address or some other detail
Rather than cancelling the order and letting the customer start again, you can choose to edit the order.
First, click to the order you wish to edit, and click the EDIT button at the top. You will see a multi-tabbed page, the first tab is the basic customer details.
The second tab is probably where most changes will be made as it lets you change the items in the order. When you first view this, the basket side to the right will be blank. Click the button to load the items from the original order into the basket.
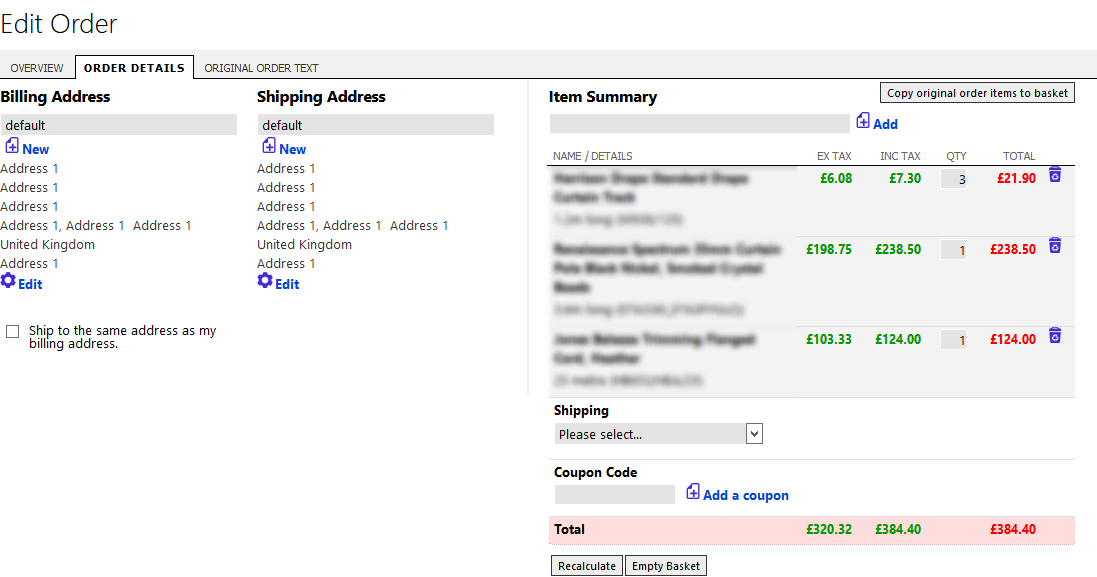
You will need to reselect shipping - you can flick to the original order text tab to see which method was used on the original order. Remember that if you've edited the items in the order, the weight or value of the edited order might mean that the shipping cost is different to before, or even that the method used on the original order is not available.
When you click to save the order, you'll see a confirmation popup.
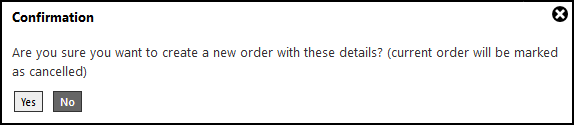
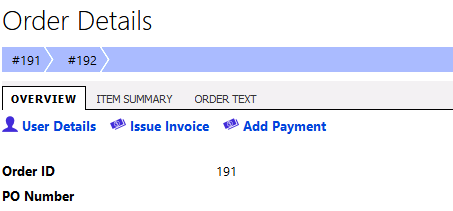
Clicking yes will create a new order from the edited details; the old one gets tagged as cancelled, but both remain linked. When you view either, you will see a breadcrumb trail that links them.
In many cases, if you edit basket items, the order value will change. If the customer has paid already online, you will then either need to collect more from them, or give a partial refund. Once you have done this, you can update the customers account using the payments page (Orders > Payments).
Enter the order number, click 'add' and the system will find the order and the payment required. You don't have to link payments to a specific order, so if you are giving a general account credit, or making some other adjustment, you can do that too.
If the payment is positive, that means you received more money from a customer. If you refunded a customer, show the payment as a negative value.
5.4. Creating new orders
The process is very similar to @5.3. Editing orders, but you start the process from Orders > Create a New Order.
5.5. Invoices and receipts
5.5.1. Issuing invoices
There is an 'Issue Invoice' link from each order. This can be used to view a print version of the invoice for printing if you require a customer be sent a print copy with their order, or by post to request payment. Note that viewing or printing this invoice does not automatically check the 'An invoice for payment has been issued' box. That box must be checked manually by the admin user to confirm that the invoice was sent to the customer.
Customers may view invoices from within their 'My Account' section in a print-ready format so some stores may decide to use this as the primary delivery method for invoices and receipts.
5.5.2. Customizing the invoice apperance
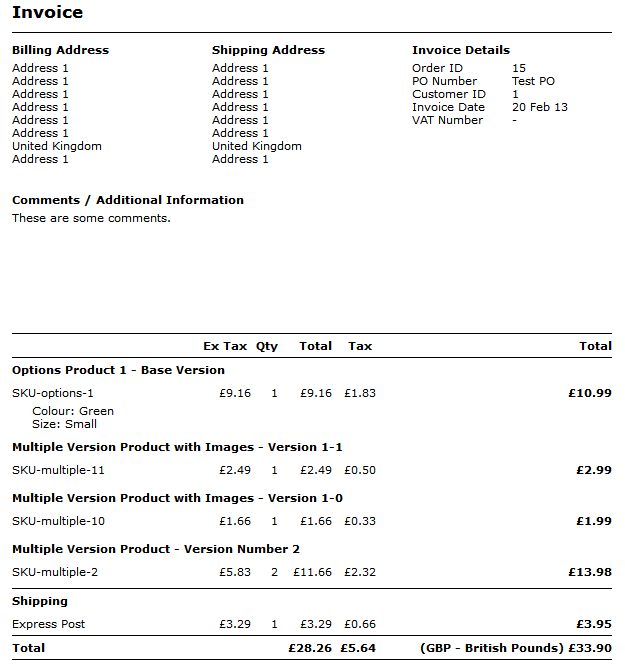
Invoices can be viewed from two places; in the back end (by store admins) and also by customers within the 'My account' section. The back end invoice always uses the Invoice.master template in the Admin skin. The front end invoice display uses an Invoice.master if one is present in the selected front end skin. Otherwise, it defaults to the Invoice.master in the Admin skin. These master pages are the place you need to edit if you wish to add header and footers to the invoice(s), or company logos.
If you need to edit the HTML layout of the invoice itself, for both cases, this uses the following file:
UserControls/General/Invoice.ascx
This is the place to edit if you need to add your VAT number or any other extra fields that will appear on every invoice.
6. Customers
Although we use the term 'customers', the user records created in Kartris can actually be for people who may not have purchased anything on your site. For example, a user can create an account on the system in order to create a wish list, or save baskets, or sign up to the news letter.
If these users decide to purchase at a later date, they will use the same account that they created previously.
By keeping all user data linked to a single account (which is unique for an email address), it is easy for both the store owner and the customers themselves to see order history and access other features of the software.
6.1. Finding customers
You can click through to a customer from any order record in the back end.
On the Customers page ('Customers > List/Find'), you can search by part of the email address, name, company or by the ID number. If you enter a number alone that matches exactly an ID number of a customer in the database, Kartris will take you directly to that customer's user record.
6.2. Customer groups
If you deal with certain types of customers such as retail customers, wholesale customers, preferred customers, etc. you may find it useful to group these customers so that you can easily find all similar customers or apply certain benefits, prices and restrictions to them. The customer group functionality in Kartris can be accessed by going to 'Customers > Groups').
6.2.1. Managing customer groups
The interface
lists all the customer groups, and has special links to 'affiliates'
and 'mailing list', which are special built-in customer
groups.
6.2.2. Restricting access to certain products
One of the common requirements of an online store is to hide certain categories and products from all but specific customers. When editing a category, product or version, you will see a dropdown menu selection for 'Limit by group'. In this way, you can link a category, product and/or version to a specific group. In this case, only customers who are logged in to the front end and are members of the appropriate group will be able to see these items. Other customers will not see them, or be able to find them in searches.
6.2.3. Per-customer group pricing
Although you can set a % discount at customer level, you may find that this does not give you the direct control you need. You may want to individually price certain items for a specific group, so for example it might be $15.00 for retail customers, or $13.25 for wholesale clients.
Kartris has a tab under versions labelled 'Customer Group Prices' where you can override the price of any version for each customer group. Leaving the price at zero for any group will mean that the item for that group will be at normal price (and not zero!).
Of course, this functionality can enable you to have customer-specific prices too - you can create a customer group and assign just one customer to it, and then set prices for that group.
6.3. Customer settings
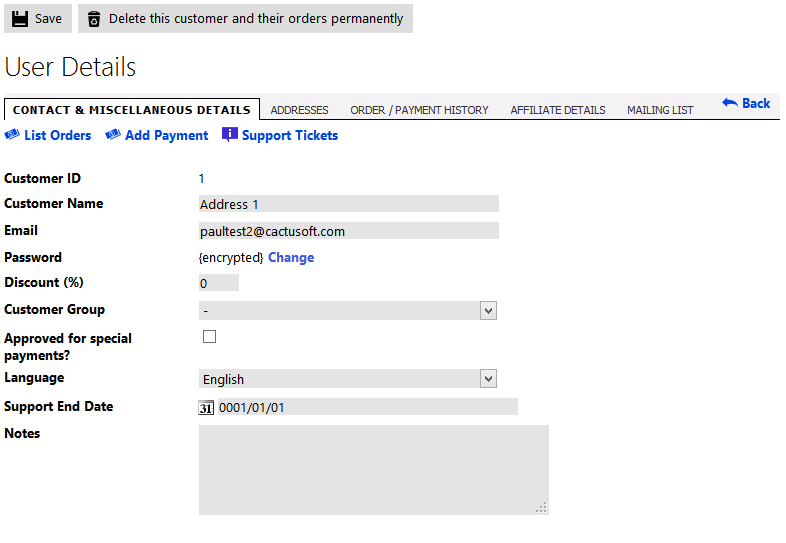
6.3.1. Customer discount
You can set a % discount for each customer if you wish. This will apply a % discount to the value of all items within the order, excluding shipping, handling and any other costs. This is in addition to any customer group discount applied so care should be taken to not give double-discounts inadvertently.
6.3.2. Change customer password
In Kartris, passwords are hashed for additional security. This means that the raw password is not stored in the database; instead, a function called a 'hash' is used to scramble the password, and this scrambled value is stored. When a customer logs in, the password they give is also scrambled and then compared to the stored scrambled password to make sure they match.
Because the raw password is not stored, the system cannot send the password to the customer as a reminder because the hash is not reversible. Similarly, you cannot find the password of a customer or an admin from the back end, or even by looking directly into the database.
Therefore if a customer loses or forgets their password, it must be reset. There are two ways to do this (1) the store owner can change any customer password from the back end (2) the customer can request a password change from the front end.
In the first case above, you should always be careful when customers request a password change on the telephone or by email that you are absolutely 100% sure that the customer is the genuine owner of the account.
In the second case (online request to change password), the customer will be sent a link to the email address of their account that is valid for a limited period (1 hour) and that will allow them to reset their password.
6.3.3. Change customer email address
There is no way for a customer to change their own email address in Kartris. The email address is assumed to be unique, and therefore we use this as the username. To avoid various issues with changing email addresses (including verification of the new account to ensure that its owner accepts the change and the problem of existing accounts), we have made changing email addresses a back-end only feature at present. If a customer needs to change their email address, then their only option is to contact the store owner so that an admin can change it for them.
The Kartris back end will check that the email address is not already in use (you cannot have two accounts with the same email), but it will not check that the owner of the new email address consents to the change (i.e. that the person making the change owns the new account), or that someone requesting the change (by telephone or email) is actually the owner of that account.
For security reasons, you should always be careful when customers request an email address change that you are absolutely 100% sure that the customer is the genuine owner of both email accounts. The best way is to write to both the old and new addresses separately and get a reply from both (a reply that includes your original email text). It is vital that you don't inadvertently hand control of an account to a third party due to lax security procedures. Although they could not access credit card data, they would be able to access personal details such as address and phone number as well as order history.
6.3.4. Approve customer for special payments
Most payment gateways have a setting 'AuthorizedOnly'. If checked, this means that only customers whose accounts have the 'Approve for special payments' box checked will see this payment option at checkout. This is most commonly used for payment methods you may want to restrict to trusted customers, such as 'PO_OfflinePayment' (where a customer can order goods without a credit card and the invoice is sent to them for payment later).
If the 'AuthorizedOnly' box for a payment method is not checked, then this payment option is available to all users.
If the 'AuthorizedOnly' box for a payment method is checked, but the user is not approved for special payments, they will not see this option at checkout.
6.3.5. Language
When an account is created, Kartris will store the current language in the account record so that it can be used for any communications later. It is also useful to know the preferred language in case you need to contact a customer about something.
6.3.6. Affiliate details
6.3.6.1. IsAffiliate?
This determines whether the user has requested to become an affiliate or not (they can do this from a link in the 'my account' section on the front end). You can approve an affiliate by giving them a % commission above zero.
6.3.7. Mailing list
Kartris operates a strict 'opt-in' mailing list. This requires not just that someone sign up to the mailing list (including by clicking a link in the 'my account' section or checking a box during checkout), but also that they respond to the confirmation email that is sent automatically, by clicking the link within it.
6.3.7.1. Mailing list process
Over the years that we have produced e-commerce software, some customers have queried the need for the extra confirmation step, as they feel it reduces the number of sign-ups on the list. While it does indeed do this, the reason is clear: to prevent the addition of addresses by people who don't own those addresses (either accidentally or maliciously).
For example, I could sign up an email address of someone with a very similar email address to mine by accident. But I would not then receive the confirmation link, and so could not click it to confirm the address. Consequently, this bad address would not be added to the mailing list.
Your web host will not tolerate you continuing to mail to a list which has generated spam complaints because some addresses turn out to belong to people who were added without their consent, especially once they find it is because you did not confirm addresses properly. In such cases, the whole list is tainted. While 99% of the addresses might be genuine, you have no way of knowing which ones are not, and will have no choice but to discard the whole list and start again using proper opt-in confirmation.
So there is nothing to be gained from not using opt-in confirmation, because it is only a matter of time before you'd be forced to discard a tainted list and start from scratch with it.
6.3.7.2. Mailing list details
The mailing list details are stored for reference, so that if asked by your host, you can provide the sign-up date/time and IP, and confirmation date/time and IP for any email address. You can also provide proof that your system is coded to ensure only confirmed opt-in can be used.
6.3.7.3. Sending to the mailing list
The mailing list can be exported from Kartris using the 'custom exports' feature - 'Configuration > Database Admin > Data Export > Saved Exports'.
6.4. Affiliates
Affiliates are organizations and individuals who refer customers to the store via a specially coded link. In return, the affiliate will be given commission based on the sales generated by those they refer.
You can disable the affiliate system on your site (so visitors cannot see it and sign up to it) with the frontend.users.myaccount.affiliates.enabled config setting.
6.4.1. Becoming an affiliate
A customer/user record can be an affiliate if two conditions are met:
- The 'IsAffiliate' box is checked – the customer can set this by applying to become an affiliate through the 'my account – affiliate referrals' section, or you can set it manually.
- The affiliate commission is set above 0% - this can only be done by a store admin on the back end of Kartris. In this way, each affiliate must be manually approved by an admin before their relationship with the store is confirmed and active.
6.4.2. Using an affiliate account
One approved as an affiliate, a user can see their status change in the 'my account – affiliate referrals' section. They are presented with a link such as: http://www.demo.xyz/?af=123
The 123 is the customer/user ID number, and can be passed to the home page.
6.4.3. Affiliate commission
When a new customer follows an affiliates link to a store powered by Kartris, the store sees the affiliate ID and records this in the customer's session. A 'hit' is also recorded, indicating that the link resulted in a customer visiting the site.
If the new customer goes on to make a sale, two things happen.
Firstly, the new customer's record is permanently tagged as 'belonging' to the affiliate who referred them.
Secondly, the affiliate will be credited with commission for this order, which will be the % of the total value of the order minus shipping, and any discounts.
6.4.4. Returning customer commission
If a new customer's record was tagged as belonging to a certain affiliate as described above, then if the return at any time in the future to make further orders, the affiliate will receive commission on these too.
If an existing customer who does not belong to any affiliate follows a referral link and subsequently makes a purchase on this visit, they will from that point on 'belong to' the affiliate whose link referred them. The affiliate will receive commission for this sale and any future sales made to the same existing customer.
6.4.5. 'Double' affiliates
It is not possible for a customer to 'belong' to multiple affiliates. Therefore, a customer who 'belongs' to a certain affiliate will remain as such regardless of whether they follow any other affiliate's links in future.
The original affiliate will receive any commissions on sales to a customer who they referred originally, even if that customer has followed another affiliate link on subsequent visits.
This is to ensure that affiliates cannot be 'poached' later to deny the original affiliate credit for a customer they referred.
6.4.6. Using affiliate features to track incoming links
A store owner may have external advertising or links that contribute traffic to his or her site. Advertising networks such as Google Adsense provide fairly detailed information on click-throughs, and even conversions when coupled with Google Analytics. However, sponsored links or forums or blogs may harder to track.
It is therefore possible to use the affiliate system to track such links, but setting up each link as a separate affiliate. This will require either using bogus email addresses, or setting up multiple new addresses. But it will mean that you can then ask your partners to use a specific URL you give them, so all incoming traffic, and the sales generated can be monitored.
6.4.7. Viewing data
Affiliates can view both hits and sales that resulted from their referrals from the 'my account – affiliate referrals' section on the front end.
Store admins can view similar information by going to 'Affiliates > Affiliate Stats'.
6.4.8. Paying commission to affiliates
Payment information to the affiliate can be viewed from the 'Payments' link from the customer record in the customer listing. This will show the affiliate's total commission earned, and the value of any payments made to them.
Any commissions earned that have not been paid yet will be listed. If you pay a commission (or issue a coupon for it instead, if your terms are to pay commissions as discount coupons instead of as cash), you can check the box next to the commissions paid and click the 'Set as Paid' button. A payment for the total amount will appear below, while the commission records will disappear. If you make a mistake, or cancel a coupon/payment, just select 'Mark as Unpaid', and the commissions will be unpaid again.
7. Promotional Tools
Kartris contains a number of features that enable you to draw attention to particular items or provide special prices that will encourage purchases.
7.1. Featured products
Featuring products on the home page is a way to highlight popular or high value items and channel traffic to them. To set a product as 'featured', go to 'Products > Featured Products' in the back end.
Enter some text in the search box, and matching products should appear in the filter list. Click to select one. In the smaller box next to this, you can set a priority value - higher values will rank items higher on the home page. You can set items with the same value if you don't want to determine an order. Values must be more than zero for an item to display.
You can set the maximum number of items to display using the frontend.featuredproducts.display.max config setting. If you have more than this number of items set with featured values above 1, this will limit the number that appear on the site.
You can set which product display format is used for featured products with the frontend.featuredproducts.display.default config setting.
7.2. Promotions
Promotions are special offers that provide some benefit to customers if the order meets certain criteria. Offers such as 'buy one, get one free' are classic examples, though the Kartris system is somewhat more flexible than this.
Promotions can be created and managed by going to 'Products > Promotions' in the back end.
The basic principle of promotions is that they are two-sided. On one hand you have the item or amount required to be purchased or spent in order to trigger the promotion. On the other side, there is the saving or free product(s) that are received.
7.2.1. Limiting the number of promotions
Promotions can rapidly cause major problems when they overlap, as it creates many more possible options as to what rules should be applied.
For example, if you have a buy two 'A' and get 'B' free in a store that also has buy two 'A' and get 'C' free, you are effectively giving both B and C away when the user buys two of 'A'. Other problems can occur when one of the 'free' items (B or C) in the case of the above, also earns some promotion discount. For example, if you had another promotion buy B get D free, then the item B (which is free thanks to one of the promotions above) also results in a free item 'D'. So the purchase of two 'A' now gives B, C and D for free. Probably not was intended when each promotion was created.
To limit the chance of multiple promotions, stores may wish to limit the total number of promotions that can be triggered in a single order. The config setting frontend.promotions.maximum can be set to zero for 'no limit', or any number above to limit promotions.
7.2.2. Creating a promotion

When clicking the 'New' link, the promotion form comes up.
The promotion can be given a name, in multiple languages if you store supports that, and a checkbox can be set to determine if the promotion is 'live' (available) or not.
You can choose a start and finish data and you can also set the maximum number of this promotion that can be applied.
The sort value helps set the priority with which a promotion will be treated if there are multiple overlapping promotions (for example, the conditions of items in the basket triggers two different promotions).
Promotions consist of two sides – the first being what the customer must spend or purchase, and the second being what they receive as a result. We refer to these as part 'A' and part 'B' for simplicity.
On the promotions page, part 'A' is set on the left hand side, and part 'B' on the right hand side.
From the first dropdown menu of part 'A', the type of promotion can be chosen. Once a type is selected, textboxes will appear to let you specify further information. For example, if you select buy [X] of [P] (buy a certain number of a certain product), a textbox appears for the quantity (X). Enter a whole number. A second textbox also appears for the product (P). Enter the name or part of a product name here, and the filtered box will display the options. Select the appropriate one, and it will be entered to the textbox. The last step is to click the 'Add' link to add this new pattern to part 'A'. It will turn into a blue link just below the dropdown menu.
Note that you can add multiple requirements to part 'A'. So you could have a requirement to buy one product D, and spend $10, for example.
The next step is to fill out what the customer receives on part 'B'. The process is similar to that for part 'A'. Again, remember to click 'Add' to register your selection. You can create multiple received items too.
Multiple Requirements: If you enter multiple requirements, e.g.
- Spend X
- Buy 1 item from Category Y
then all requirements will need to be met to unlock the promotion. In other words, it is an AND rather than OR operation. The customer must spend X AND buy 1 item from category Y.
Categories: Category-based promotions are not recursive. This means they only apply to products immediately within a category, not products nested within subcategories of the category.
It is strongly advised that you consider carefully the result of promotions and the possible ways they can potentially work in ways that seem to the detriment of either the store or the customer. The promotions system is extremely complicated, there are infinite possibilities and what might seem logical in one context doesn't in another. Some examples to avoid, or that may be problematic are outlined below.
7.2.3. Promotions to avoid and potential problems
This list is by no means exhaustive, but is a useful guide to the pitfalls and problems that can arise with promotions:
- Cyclical promotions - you should avoid cases where an item can appear on both sides of promotions, as you can have situations where buying one item earns you another for free, and having 'bought' that item then earns you another item for free, and so on. Remember that items can be included in promotions through being in a certain category, as well as by being specifically included.
- Promotions involving items with different prices - for example, let's say you have a buy one get one free promotion on a product that has four differently priced versions. If a user picks two items, you would typically want to give the cheaper one free. However, if they buy 4 items together, and you just give the 2 cheapest free, it may cost them more than if they made two separate purchases of 2 items (where they could get the cheapest and second most expensive items for free instead of the two cheapest). The logic of dealing with such promotions in the fairest way possible is highly complex and dependent on a number of factors; what seems fair in one situation may well not seem fair in another. It is far simpler to have buy one get one free type promotions only on items of the same price.
7.2.4. Adding promotional items to basket
We are often asked why we don't add promotional items automatically to the basket, rather than require customers to do this.
There are several reasons. Firstly, a promotion may not give a free item. It may be buy A get 50% off B. In such cases, the user has to decide whether they want the additional item at that reduced price, or not. We cannot automatically decide for them.
Secondly, the promotion may be buy A get B free, but this 'B' might be a product with several versions or be an options product. So we have no way to know which version a user wants, or what options they might want even if we know the item will be free and so they'll almost certainly want one.
In some cases, a promotion may 'gift' a specific version for free, so there is no doubt that a user would benefit from having this item. But for consistency, we don't add it in such cases. The page where the item is, as well as the basket will highlight the promotions that are available on these items, but the ultimate decision to add items to the basket is for the customer, just as it would be in a regular supermarket. If an item is buy one, get one free, a nice cashier (if you can still find a human) might let you know about it if you only have one in your basket. But it's still up to you to go get it - they won't keep them under the till in order to add it for you.
7.2.5. Full list of promotion types
For reference, these are the types of promotion components available:
Part 'A':
Buy [X] of version [V] – e.g. buy 2 barbecue beans, small size
Buy [X] of items from category [C] – e.g. buy 5 items from 'books'
Buy [X] of product [P] – e.g. 1 barbecue beans (any size)
Spend [£][X]
Part 'B':
Get [X] of [V] for free – e.g. get 1 barbecue beans (small size) free
Get [X]% off [V] – e.g. get 10% off barbecue beans (small size)
Get [£][X] off – e.g. get £5 off
Get [X] of [P] for free – e.g. get 1 floor mat (any colour) free
Get [X]% off [P] – e.g. get 5% off 1 floor mat (any colour)
Get [X]% off items from category [C] – e.g. get 15% off any book
Key:
[X] = a whole number
[V] = a specific version of a product
[P] = a product (any version)
[C] = a category
[£] = the default currency (£, $, etc. depending on your store)
7.2.6. Linking promotions with a coupon
From Kartris v1.4 onwards, it is possible to combine the coupons functionality with promotions. You create a promotion in the standard way, but the 'Active?' checkbox must be unchecked (so the promotion is not live, otherwise it would be available to any user already).
You then create a new coupon, and select 'Promotion' from the value menu. The value textbox changes to another dropdown menu. From here you can select the promotion you wish to link this coupon to.
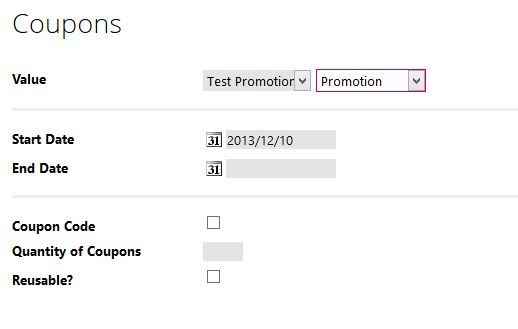
7.3. Related products
Cross-selling means being able to sell an additional product or service to an existing customer. One powerful way to do this is targeted links between certain products that might appeal to similar buyers, or are related. For example, if you sell electronic items, you might wish to link through to the appropriate batteries or carry case.
7.3.1. How relationships work
Related product links are one-way in that if you create a link from product 'A' to product 'B', there will be no link from product 'B' to product 'A' (unless you create this separately of course). The logic is probably obvious – in the case above regarding batteries, you would not want to visit the battery page and see links to every single electronic item that links to this type of battery.
Single direction links gives you more control and choice than bi-directional links; you can always achieve bi-directional links by adding relationships on both items, if you wish.
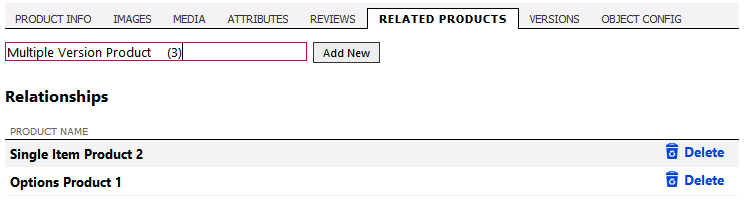
7.3.2. Creating relationships
Navigate to a product page and click the 'Related Products' tab.
In the text box, start to type the name, or part of the name of the product you wish to create a link to.
A list of products will appear – select the correct one. Then click 'Add New' and it will appear below. You can repeat the same process to relate more products with this one.
You can delete any relationships from the list too.
Don't forget to click 'Save' to store the changes.
7.4. Coupons
Coupons are special codes that can be entered by a customer before checkout to obtain some kind of discount (fixed or percentage). They can also unlock promotions too.
Coupons can have various restrictions on use; from the time period during which there are valid to the number of times they can be used. A fixed value coupon, if used on an order of lower value, will not give change or retain the unused value.
7.4.1. Creating a coupon
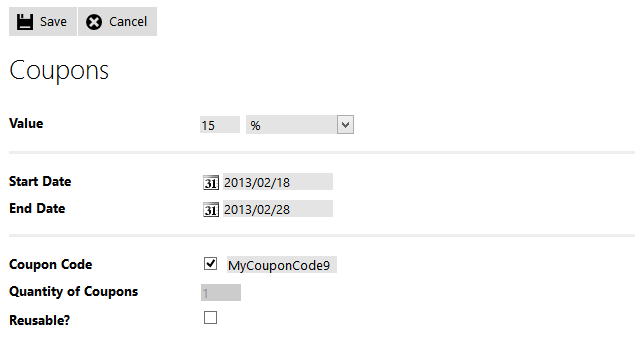
Navigate to 'Miscellaneous > Coupons' – you will see a list of previously created coupons (if any), and a link to create new ones.
You can choose the value of coupon discount (fixed amount or percentage), or you can select to link the coupon to any non-live promotion, which will be available only to customers who use the coupon (see @7.2.6. Linking promotions with a coupon for more details). You can also specify the start and finish date of the coupon, and whether the coupon is reusable or not. Coupons that are not reusable will expire when used.
The 'coupon code' checkbox lets you choose whether to enter the coupon code yourself. This way, you can choose something short, memorable and easy to type. This is useful if you create multiple use coupon codes to publish in and advertisement for example.
If you want to create multiple coupons of the same kind in one go, then the store will name them with pseudo-random codes.
You can disable and re-enable any coupons from the listing.
You can delete coupons only if they have not been used. Any coupon that was used for an order is protected from deletion, so the record of it will always remain.
7.4.2. Accounting for coupons
7.5. Customer discounts
7.6. Customer group discounts
7.7. Quantity discounts
It is a common feature of many transactions to provide discounts for quantity to encourage bulk purchases. Sometimes this is referred to as 'price breaks'.
Kartris has a flexible quantity discounts system that allows unlimited price breaks for any quantities specified. This is set at version level (since it is the version that holds the price info).
Simply click to edit a version, and then click the 'Quantity Discount' tab.
Enter the quantity break point, and the price for purchases of that number or more. Note that the price you must enter is per item, so prices should go DOWN as the quantity goes up.
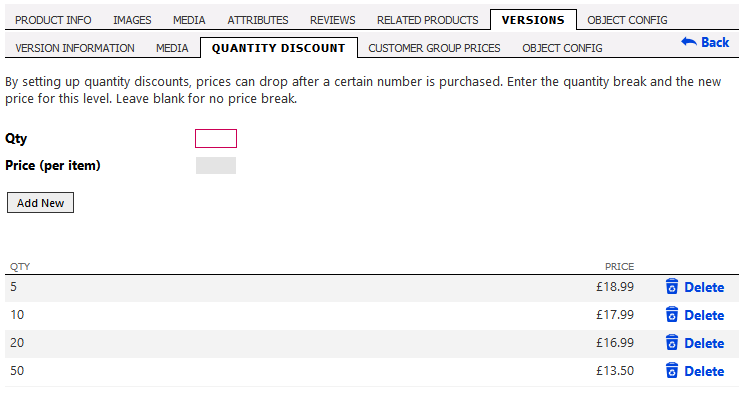
Make sure you enter the discounted price PER ITEM, and not for the total number of items.
If quantity discounts are available, the user will see a link for quantity discounts on the front end when viewing the product.
If a user adds 5 items into the basket (below the price discount level) and then later adds a further 6, the system will automatically pool these together and apply the discount from that point on. Similarly, if a user adds 10 items (with discount) and then removes one from the basket, they will immediately be recalculated at the normal price.
7.8. Product reviews
Product reviews can provide a valuable way to encourage customer interaction. Good reviews can help reinforce the reasoning for new customers to purchase, but even negative ones can help build trust in the web site, and also give you an opportunity to address customer concerns.
7.8.1. Settings
There are a number of config settings relating to reviews which control how the system works.
frontend.reviews.autopostreviews
Whether to automatically set 'reviews' to live on the site. If 'n', then reviews must first be checked on the backend and set manually to live. It is highly recommended that you don't turn this feature on, in order to prevent spam or malicious postings.
frontend.reviews.dateformat
The format to use for displaying the date of a review on the front-end. You can see a full list of the formats you can use here: Microsoft Docs: Custom Date and Time
frontend.reviews.emailnotification
Whether to send the store owner an email when a new review is submitted. New reviews will show up in the 'to do list', but it can be nice to get an email alert as soon as a new review comes in if you want to ensure you can check and approve them quickly.
frontend.reviews.enabled
Site-wide change of whether to enable customer reviews - If turned on (y), this can be customized on a per-product basis.
frontend.reviews.limit
Limits the number of reviews to show on each product - e.g. 3 will only show the 3 latest reviews. Set to 0 for no limit. This is useful if your site receives a huge number of reviews, but in most cases, 0 (no limit) should work fine.
frontend.reviews.permission
Set who is allowed to add reviews to products. 'All' allows all site users to add a review; 'customersonly' only allows logged in customers; 'purchasersonly' only allows logged in customers who have purchased the product via your store.
frontend.reviews.ratings.enabled
Whether to enable customers to add rating with product reviews - 'y' to allow, 'n' to turn off, and 'r' to make them a required field (in which case there is no 'no rating' option to customers).
frontend.reviews.ratings.maxvalue
Maximum on rating scale for reviews (e.g. 5 will give the user a 1-5 selection). Unless your site is a Spinal Tap-themed amplifier store, there will be no obvious reason to change this. You should also not change this once your site has reviews, as the scores users gave will no longer make sense against a new maximum value.
frontend.reviews.title
Whether to enable customers to add a title/summary on product reviews - 'yes' to allow, 'no' to turn off titles, and 'required' for titles required (customer must enter a title).
7.8.2. Moderating and publishing reviews
7.8.2.1. From the 'to do list'
When new reviews are added, they will generally (if you use recommended settings) be 'awaiting authorization' until you approve them. These will show up in the 'to do list':


The review listing accessible from the 'to do list' will only show reviews that are awaiting authorization.
7.8.2.2. From the product
Each product will have a reviews tab listing all reviews (of any status - awaiting authorization, live or disabled).
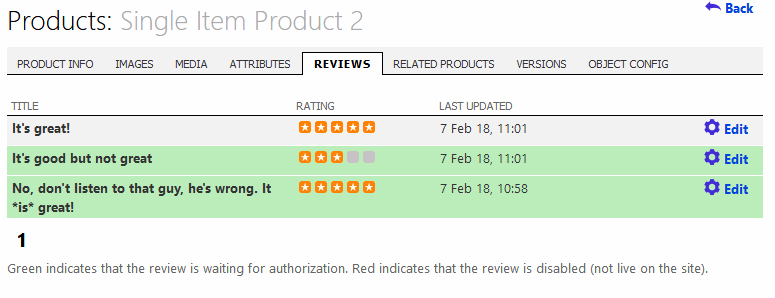
8. Custom Pages - Basic CMS
8.1. Creating a custom page
Navigate to 'Miscellaneous > Custom Pages'. A list will appear with existing custom pages. Click the 'New' link. A form appears into which you can enter your content.
The 'ID' field is a unique text-based ID for the page. This will form part of its URL, and it is also what appears as the name of the page when listing custom pages in the back end. So a good descriptive ID is best. The ID cannot contain spaces and special characters should be avoid. Hyphens (dashes) should be used in place of spaces. For example, these would be appropriate IDs:
Privacy-Policy
About-Us
Frequently-Asked-Questions
The text is the content of the page. HTML can be entered here too, using the HTML editor button to the bottom right of the text field. Don't forget to save the content after editing (the save button on the toolbar above).
The 'Title' field is used within the breadcrumb trail. Originally we used the page ID here, and replaced the dashes with spaces. But this means page titles cannot include dashes or other characters, and furthermore are not language specific. Hence we created a specific field for this.
SEO fields are also available to be populated.
8.2. The 'Default' page
You can also use the SEO fields for the Default custom page too, which will control the values used on the home page of your web site.
8.3. Breadcrumb trail & parent pages
The breadcrumb trail, as on other pages, is created automatically. The page name in this comes from the 'Title' field of the custom page.
In some cases, you will want to nest content, and have the breadcrumb trail indicate this. To do this, you can select another custom page from the 'Parent Page' control. For example, you might want the breadcrumb trail for a particular page to appear like this:
Home > Services > Repairs
I this case, you'd have to first create a page called 'Services'. You can then create 'Repairs' and select 'Services' as the parent page.
The breadcrumb trail for products, categories and custom pages is created dynamically from database data. However, pages such as the Basket, Customer Account and so on are included from the web_breadcrumb.sitemap file. If you add new physical pages (aspx files) to your site, and want them to use the breadcrumb trail, you will need to ensure references for these new pages are added to the web_breadcrumb.sitemap.
See @14.1. Adding new pages for more information.
8.4. Site menus
Links to custom pages will not automatically appear on the web site. You must add them to menus manually, or create links in your skin to them.
If you look at our demo, you will see a light grey coloured menu which is triggered by the hamburger button (top left of page). The content for this comes from the web_menu.sitemap file which is in the root of Kartris. You can edit this XML file manually to create the menu structure you require.
Kartris will probably need to be restarted for changes to take effect.
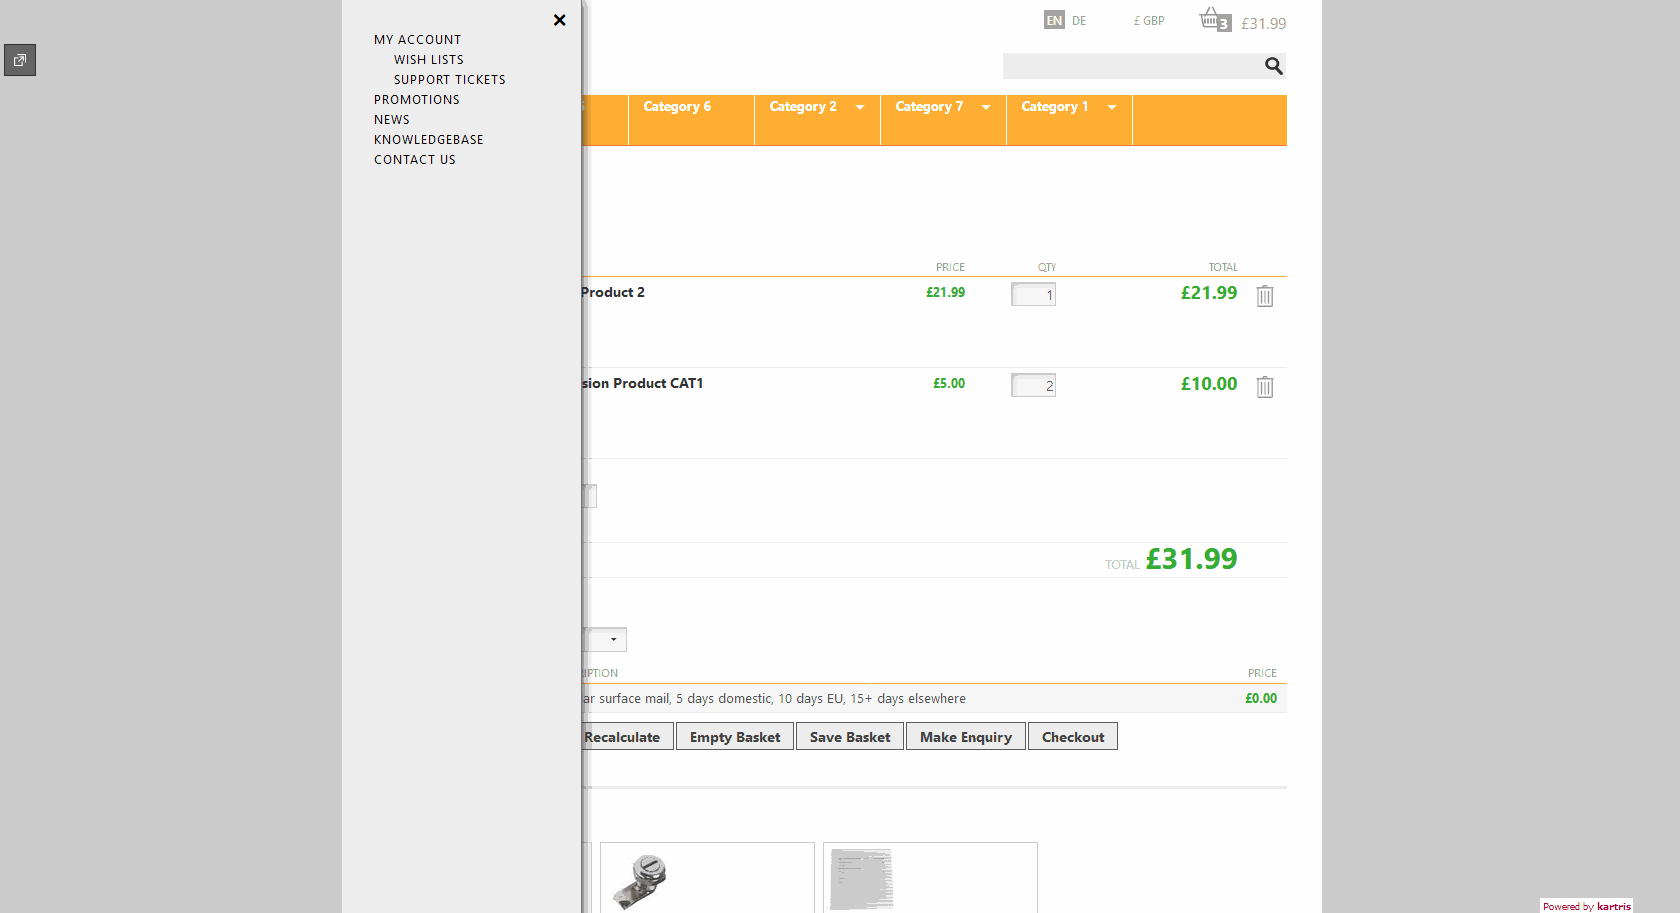
We strongly recommend you back up the web_menu.sitemap file before modifying it. When modifying it, take careful note of the structure of tags, and whether a tag is self-closing or not. If you have two or more links to the same page, ASP.NET may generate an error because they are not unique. You can overcome this by appending an unused parameter to the URL, for example ?x=1, ?x=2, etc.
You can also add Hyperlink controls to the .master file to provide links to your custom pages, such as those we have in the footer. We recommend using ASP.NET Hyperlink controls rather than standard HTML <a> tags, because URLs can be specified relative to the app root using the ~/t-Sample.aspx format. These will work correctly from any friendly URL page, and whether the site is running in a subfolder of localhost, or on the root of a fully-qualified domain.
8.4.1. XML structure
The default web_menu.sitemap file code looks like this:
<?xml version="1.0" encoding="utf-8" ?>
<siteMap xmlns="http://schemas.microsoft.com/AspNet/SiteMap-File-1.0" enableLocalization="true" >
	<siteMapNode url="~/Default.aspx" title="$resources:Kartris,ContentText_Home"  description="$resources:Kartris,ContentText_Home"  >

		<siteMapNode url="~/Customer.aspx" title="$resources:Kartris,PageTitle_MyAccount"  description="$resources:Kartris,PageTitle_MyAccount" value="myaccount">
			<siteMapNode url="~/Wishlist.aspx" title="$resources:Kartris,PageTitle_WishListLogin"  description="$resources:Kartris,PageTitle_WishListLogin" value="wishlist" />
			<siteMapNode url="~/CustomerTickets.aspx?" title="$resources:Tickets,PageTitle_SupportTickets"  description="$resources:Tickets,PageTitle_SupportTickets" value="supporttickets" />
		</siteMapNode>

		<siteMapNode url="~/News.aspx" title="$resources:News,PageTitle_SiteNews"  description="$resources:News,PageTitle_SiteNews" value="news" />

		<siteMapNode url="~/Knowledgebase.aspx" title="$resources:Knowledgebase,PageTitle_Knowledgebase"  description="$resources:Knowledgebase,PageTitle_Knowledgebase" value="knowledgebase" />

		<siteMapNode url="~/Contact.aspx" title="$resources:Kartris,PageTitle_ContactUs"  description="$resources:Kartris,PageTitle_ContactUs" />

		</siteMapNode>
</siteMap>
Note carefully the structure; siteMapNodes with children such as ~/Customer.aspx are not self-closing - they have a separate close tag after the children. Child nodes like ~/Wishlist.aspx are self-closing (they have a / before the closing of the tag).
The $resources refer to language strings (see @15.2. Language strings). If your site only uses a single language, you can add links that have hardcoded text instead of references to language strings, for example:
<siteMapNode url="~/MyPage.aspx" title="MyPageTitle" description="Title of My Page" />9. Exporting Data
9.1. Data export
9.1.1. The customer/order export
You can choose to export orders between certain dates or certain order ID numbers.
The field delimiter is the character that will be used in the exported file to separate data. In 'CSV' (comma-separated values) this will be a comma, but you can override this.
The string delimiter is the character that will surround string (text) values in the exported data. The default is a single-quote, but if you find some of the data columns are misformatted when you open in Excel or another program, you can try overriding this.
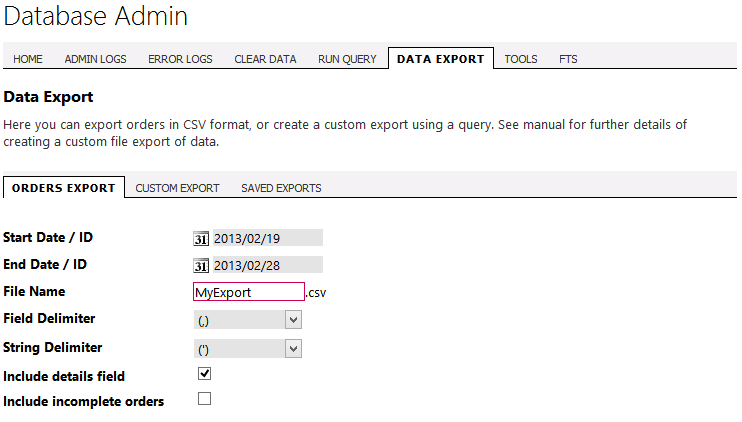
9.1.2. Custom exports
The essential part of a custom data export is the SQL query that specifies the data to be retrieved from your Kartris database. Defining this requires some technical knowledge and a basic understanding of databases, as well as some knowledge of the Kartris database (although a competent database admin should be able to figure this out). SQL is a standard language, similar versions of which are used on most relational databases from Microsoft's Access and MS SQL to Oracle and MySQL. A tutorial in SQL is beyond the scope of this user guide, but there are many such resources available on the web.
Once you have a query, you can name a custom export, choose the field and string delimiters and then save it with the save button on the toolbar. You can also run exports directly from here with the export button on the toolbar.
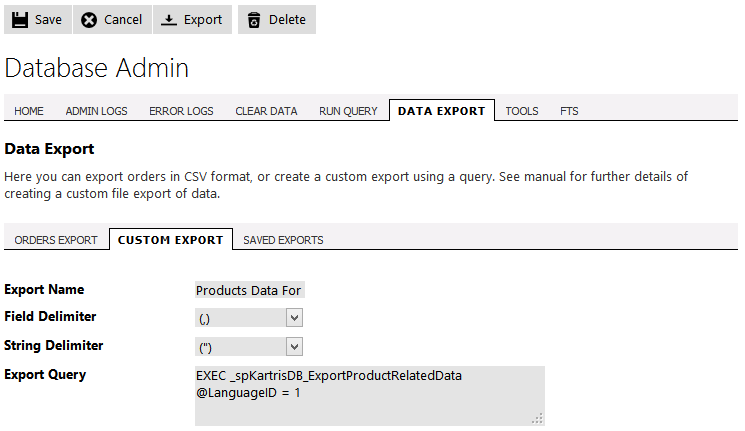
9.1.3. Saved exports
You can run exports direct from the listing of custom exports, or you can edit an existing export (if for example you need to set a date or some other value in the export before running it).
There is no limit to how many saved exports you can have. There is also no limit to what data can be exported in this way, with a suitable SQL query.
10. The Data Tool
The Data Tool is presently a free download from our web site.
10.1. Overview

10.2. Getting started
10.3. Importing data
The basic principle of data imports is to have a source and destination, and copy information from one to the other. In this way, imports and upgrades do not damage or change the original database.
The import dialogs will typically walk you through step-by-step, and give information if there are problems.
10.3.1. Formatting spreadsheet/CSV data for import
The Data Tool requires CSV or spreadsheet data to be suitably formatted for import. A sample spreadsheet with some correctly formatted data is included in the data tool zip, or you can download it below.
Downloadable Content: "Example Excel Spreadsheet for importing with the Kartris data tool"
This download is available at: https://tome.host:443/Downloads/2071__fs_1519051679_8531.xls/
10.3.1.1. Categories
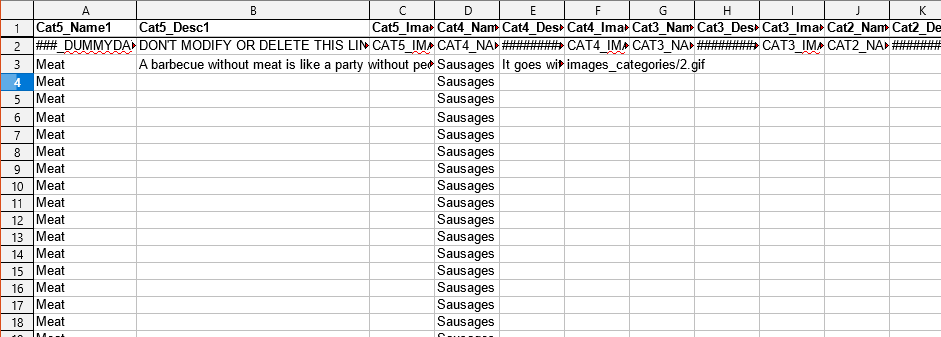
The spreadsheet can contain categories nested up to FIVE levels deep. The first column, Cat5_Name1, holds a top level category name. The Cat4_Name1 field on the same line would hold a subcategory of this, and so on down to Cat1_Name1.
Since each product must have at least one parent category, every row of your spreadsheet should have a Cat5_Name1 value, but not necessarily any subcategories.
10.3.1.2. Products
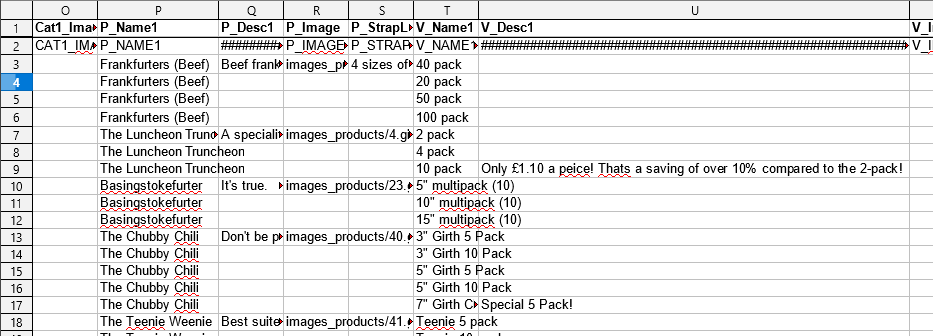
The P_Name1 field (product name) holds the name of the product. Product name is used by the data tool as the key for a product, therefore you should not have multiple products with the same name in a data tool spreadsheet (if you do, they will be assumed to be the same product). However, the product name will appear on multiple rows if a product has multiple versions.
10.3.1.3. Product images
You can enter a single image name, or you can add multiple image locations, separated with either a comma or semi-colon.
image1.jpg
image1.jpg,image2.jpg,image3.jpg
image1.jpg;image2.jpg;image3.jpg
You can also get the data tool to retrieve web images, if you have a full URL. In this case, the data tool will still need a 'source' folder, but will retrieve the web image, copy it to this source folder and then process it and position it in the destination folder. For example:
http://www.site.xyz/images/image1.jpg
http://www.site.xyz/images/image1.jpg,http://www.site.xyz/images/image2.jpg
http://www.site.xyz/images/image1.jpg;http://www.site.xyz/images/image2.jpg
10.3.1.4. Versions

The V_CodeNumber (the SKU) is the unique key for versions and must be unique.
V_Price and V_Weight should all be numerical values with no currency or weight units.
V_Type can be 'c' for combination, 'b' for base version (the base of an options product) or 'v' for version. The field is not required, if blank, 'v' will be assumed.
10.3.1.5. Tax rates
The T_TaxRate field for EU sites, and others using a VAT model (UK, NZ) should hold the % rate of VAT that applies. The T_TaxRate2 field should have zero.
For Canadian sites, it will hold the GST value, while the T_TaxRate2 field would hold the PST value.
10.3.1.6. Supplier
The supplier field should hold the name of the supplier.
10.3.1.7. Attributes
Attributes for each item can be formatted within a single field, using the following structure:
Energy {{4500kcal}} || Animal {{Cow}}You can have multiple attributes. Each attribute contains a name, with the corresponding value after it (space separator) enclosed in double curly brackets.
Each name-value pair should be separated from the next with two vertical pipes, and spaces.
10.3.1.8. Options
Options products can be imported into Kartris using the data tool and a spreadsheet, but the formatting is a little more complex. First, you must format the options available on the second worksheet of the spreadsheet. Each OptionGroup_Name is unique, so if you have multiple different sets called 'Colour' for example, you should rename these to avoid them all merging during import.
Because options requires a second worksheet, it's not possible to use CSV format. You must use an Excel spreadsheet format.

The options for each product should then be formatted within the regular data page of the spreadsheet in name-value pairs, similar to the format used for attributes above.
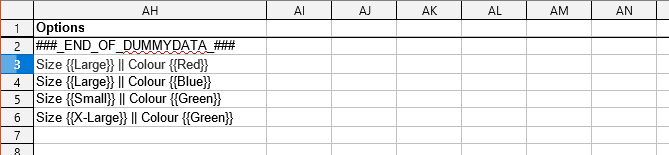
Both the names and values (for example, "Size" and "Large") must match up with options detailed in the second worksheet, the OptionGroup_Name and Option_Name respectively.
10.3.2. Importing from CactuShop
The Kartris data tool will preserve the product, category and version database IDs from CactuShop in the new Kartris site. This is extremely valuable for search engine purposes as it ensures that requests to old CactuShop URLs can be mapped by Kartris to the equivalent new page URL. Your existing pages in search engines will therefore not return a 404 to visitors or search engine spiders; both will get a 301-redirect (permanent redirect) and land on the same product in the new Kartris site. Search engines will update their indexes relatively quickly with the new URLs, but old links that users may have posted in forums and so on will continue to drive traffic to the correct page in your new site.
The image storage in CactuShop worked a bit differently to the structure used in Kartris. Therefore, when importing data from CactuShop to Kartris, you can select the 'Uploads' folder within the CactuShop web, and the 'Images' folder of your new Kartris site (or you can create a local 'Images' folder on your desktop, and copy it to the Kartris site later), and Kartris will copy and file the images correctly into this folder to work with Kartris. Because Kartris does not need smaller thumbnail images, only larger ones (as it thumbnails dynamically where required), it will look first for large images to import for a product, and only go down to normal sized ones if no large image is found.
Order IDs are also maintained, and historical orders from CactuShop can be imported with customer data into Kartris for a seamless upgrade. In fact, orders placed in CactuShop and still awaiting processing in the back end will be upgraded and can be processed and closed off with Kartris after upgrading. Customer accounts will retain the same username and password, and will retain historical order history.
10.3.3. Data tool caveats
In order to import bulk data from a spreadsheet, the Data Tool needs to make some assumptions.
- The SKU (version code) for every item must be unique. You cannot have two items in Kartris with the same SKU; if Kartris finds duplicate SKUs, it will either ignore or replace the existing item with the same SKU (depending on settings).
- All products must have unique names, because products don't have any SKU (these belong to versions). It is possible to have a product with multiple versions, therefore each line in this case will repeat the product name, but have a different SKU and version name. The Data Tool will assume that any row with a repeated product name is the same product.
- All categories must have unique names - the reasoning is similar to the point above regarding products.
Because of the reasons given above, at present the Data Tool cannot handle cases where multiple products have the same name, or where a products and/or categories have multiple parents.
10.3.4. Importing from other databases
10.3.5. Exporting and reimporting data
The images fields will be output as blank; you can run in data without these and it won't wipe images, as the images are stored in the 'Images' folder on the site, and the data tool will only update the database content.
10.3.6. Import options
The Data Tool can be used both to populate a brand new store with product data and to update an existing store. In cases where you are updating a store, there are three options as to how you handle existing data already in the store:
- Add imported data to existing data and ignore duplicates - do this if your site database data is the 'master' version, and you've made corrections and changes to it, or are just confident existing data is already perfect
- Add imported data to existing data and update duplicates - in this case, any duplicates in the destination will be updated from the source data
- Reset database and import - this will clear existing data, and then import the data so you retain no previous data
10.3.7. Post import processing
Fortunately the Data Tool has a built in method for doing this. Within the KDT_Resources folder, there is an .sql file called 'kartrisSQL_Update.sql'. This SQL gets run against the database after an import is complete. This mainly fixes null values and other such issues, but you can add your own SQL code to this if required.
This SQL file gets run after both data file or CactuShop data imports, both using the GUI or in command line mode.
10.3.8. Command line support
Using a .vbs file (or some other scripting system), you can call the Data Tool, pass parameters and so on, without having to manually operate it or write your own SQL code to update Kartris.
PARAMETERS:

/MODE:[ignore|update|deleteall]   -> what to do with existing product data

/FILE:[csv_or_xls_file]

/DATASHEET:[worksheet_name_of_data_in_xls_file] (XLS only)
/OPTIONSSHEET:[options_sheet_name_for_Kartris_v1.4] (XLS only)

/DBSERVER:[servername]
/USEWINDOWSAUTH (optional)
/DBUSER:[username]
/DBPASS:[password]
/DBNAME:[databasename]

/HELP (optional)

/OUTPUT:[logfile(default)|display] (optional)
/SOURCEIMAGESFOLDER:[folderpath] (optional, can use full image path in spreadsheet)
/KARTRISIMAGESFOLDER:[folderpath] (optional)
/TEST (optional) (no processing - just check if parameters are all correct)

/HASH:[hashsalt_value_from_web_config_of_site]C:\Data Tool\KartrisDataTool.exe /mode:update /file:"c:\user\desktop\exampledata.xls" /dbserver:localhost\sqlexpress /usewindowsauth /dbname:kartrisSQLIf you have spaces in the names or paths of files submitted through command line arguments, you will need to enclose the path in double quotes. Alternatively, try to position files close to the root in a folder without spaces in the name.
10.4. Importing language packs
10.4.1. Importing a language pack
Next, within the Data Tool, choose the database of your Kartris site, specify which language you're importing the strings to, and select the .xls file that holds the strings. Then import and restart Kartris to see the new language content.
10.4.2. Exporting a language pack
For minor language tweaks, it will be easier to use the Kartris back end.
10.5. Execute an SQL script
10.6. Resetting your admin password
However, this is not a feature of the back end admin password system.
To reset the admin password, if you forget it, you can use the Data Tool feature. You will need to have a copy of the site's web.config file as well as a connection to the MS SQL database. The web.config file is required, because it contains some of the information that is used to hash (scramble) the passwords, which the Data Tool can read from this file.
11. Web API
This feature is intended for use by developers and experienced programmers who need to integrate third party systems with Kartris (such as EPOS or accounts systems) or add/update/remove/read data within Kartris remotely and programmatically.
11.1. Activating the web API
To activate the web API you have to set a couple of things in your site's web.config file:
- Web API secret key - KartrisWebAPISecretKey App Setting
- Service base address - baseAddresses entry
<appSettings>
   <add key="KartrisWebAPISecretKey" value="[YourSecretKeyHere]" />
</appSettings>
...
<baseAddresses>
   <add baseAddress="[YourWebShopURLHere]Protected/KartrisWebAPI.svc" />
</baseAddresses>11.2. Using the web API
Once you have activated and configured the web API, you can access it as follows:
[YourWebShopURLHere]Protected/KartrisWebAPI.svc
The web service contains a single method called 'Execute' with two parameters:
- strMethod
- strParametersXML
'''<summary>
'''Execute Kartris method
'''</summary>
'''<param name="strMethod">Name of the method that you want to execute (fully
'''qualified name, case-sensitive) e.g. CKartrisBLL.WebShopURL </param>
'''<param name="strParametersXML">XML parameter array for the specified method</param>
'''<returns>XML Serialized Object</returns>
'''<remarks></remarks>
Public Function Execute(ByVal strMethod As String, ByVal strParametersXML As String) As Stringset xmlhttp = WScript.CreateObject("MSXML2.ServerXMLHTTP.6.0")
xmlhttp.Open "POST", "[YourWebShopURLHere]Protected/KartrisWebAPI.svc", False
xmlhttp.setRequestHeader "Authorization", [YourSecretKeyHere]
xmlhttp.setRequestHeader "Content-Type", "text/xml"
xmlhttp.setRequestHeader "SOAPAction", "http://tempuri.org/IKartrisWebAPI/Execute"
xmlhttp.send requestDoc.xml <s:Envelope xmlns:s='http://schemas.xmlsoap.org/soap/envelope/'>
<s:Body>
<Execute xmlns='http://tempuri.org/'>
<strMethod>TaxBLL.GetTaxRate</strMethod>
<strParametersXML>
<?xml version="1.0" encoding="utf-8" ?>
<KartrisWebAPI>
<Parameters>
<Parameter Name="numTaxID" Type="Byte">
<Value>2</Value>
</Parameter>
</Parameters>
</KartrisWebAPI>
</strParametersXML>
</Execute>
</s:Body>
</s:Envelope> <s:Envelope xmlns:s="http://schemas.xmlsoap.org/soap/envelope/">
<s:Body>
<ExecuteResponse xmlns="http://tempuri.org/">
<ExecuteResult>
<?xml version="1.0" encoding="utf-16"?>
<double>20</double>
</ExecuteResult>
</ExecuteResponse>
</s:Body>
</s:Envelope><?xml version="1.0" encoding="utf-8" ?>
<double>20</double>11.3. Sample code
/Protected/KartrisWebAPISample.vbs
Obviously you don't have to use VBscript. This is a SOAP interface, so you can use .NET, php, Javascript, Java, or whatever.
A Kartris developer POLYCHROME has also kindly donated some sample extension code, 'helper' classes which may be useful to help illustrate how to extend Kartris's BLL for use via the web API for your specific application.
Downloadable Content: "Kartris Web API Extensions Sample Code"
This download is available at: https://tome.host:443/Downloads/2071__fs_1541760152_8548.zip/
12. Skins and Visual Design
This sections contains a lot of information intended for developers using the Kartris software. While it is possible for users who are relatively tech savvy (familiar with HTML and CSS) to skin their own site, the majority of end users will benefit from hiring a web developer to do this for them.
A developer should not necessarily require either specialist Kartris or ASP.NET knowledge to develop a skin for Kartris, though use of, or access to a Windows computer with Kartris installed and running is essential in order to test the skin with Kartris.
12.1. Setting a skin

If you leave either selection blank, Kartris will use the defaults (which are the skin 'Kartris' and the 'Template.master' template file).
This menu automatically picks up any new folders added to the /Skins folder within a Kartris site. So all you have to do to import or create a new skin is to place the new folder there and then select it from this menu.
Rather than modify the default Kartris skin, we suggest you clone it, and then select your new skin's name and develop from there.
12.2. Responsive interface and mobile/tablet support
Kartris v2.5 and above features a responsive interface.
The number of users accessing the web on mobile devices is increasing all the time. Although most devices have browsers which can handle web sites designed for bigger screens, the user experience is less than ideal. Kartris incorporates support for 'responsive' design, which enables a web site to dynamically reformat pages to better fit small screens, as well as optimizations for use on touch screens.
12.2.1. Overview of the responsive approach
The original approach to providing support for mobile devices was to create a separate interface, and have the web site check the user-agent of the device requesting the page to decide which version of a page to send. But with the rise of smartphones as perhaps the most common web accessible device, and the increase in power allowing them to run full web browsers with javascript and web standards support, the responsive approach has become the norm.
A responsive web site sends exactly the same pages to all devices - mobile, tablet, laptop and desktop. It is the device itself which decides how to display the page, based on rules and code that is embedded within the page.
The advantages of this approach are:
- Single set of interface code to create and maintain
- Richer experience - full feature set (since not using a separate cut-down interface) and same styling and feel as the main site (because they are essentially the same site with some minor tweaks)
- The interface can be adjusted for a variety of devices of various sizes; for example, tablets can use the chunkier touch-enabled navigation menus while still formatting pages for the larger screen space
- Same URLs for mobile and desktop - since all clients get the same page, there are no separate URLs for the mobile site; this has search engine benefits and also benefits customers who sync bookmarks between their desktop and mobile browsers (because the same URL will work from both devices, but the pages will format appropriately for each device)

12.2.2. The Foundation framework
For more information see http://foundation.zurb.com/
Because Foundation is integrated into Kartris, you can use all its built-in features in your content without needing to fiddle with any javascript. For example, you can easily create lightboxes, slideshows, hover buttons, dropdown menus, tooltips, sticky navigation in either your skins, or your site content, with just some simple HTML. And because Foundation is designed to be responsive, your content will automatically be mobile-friendly.
For an overview of the various Foundation features, see the documentation: http://foundation.zurb.com/docs/
12.2.3. Designing a responsive skin
12.2.3.1. From scratch
12.2.3.2. Modifying an older Kartris skin to be responsive
This is a little more complicated. It's best to use our Template.master as a guide, but we'd strongly recommend starting with a cloned copy of our default skin, and working from there.
First, you will need to add in the extra CSS files; make sure they are in the right order (we tend to put the Foundation and associated files in first, and then override them where needed in custom.css):
<link href="foundation.css" rel="stylesheet" type="text/css" />
<link href="normalize.css" rel="stylesheet" type="text/css" /><link href="custom.css" rel="stylesheet" type="text/css" /><meta name="viewport" content="width=device-width" />http://foundation.zurb.com/docs/components/grid.html
<!DOCTYPE html>
<!--[if IE 8]><html class="no-js lt-ie9" lang="en" ><![endif]-->
<!--[if gt IE 8]><!-->
<html class="no-js" lang="en">
<!--<![endif]--><asp:Literal runat="server" ID="litZeptoJquery"></asp:Literal>
<script>
$(function () {
$(document).foundation();
})
</script>'Add zepto/jquery tag at end of page,
'this is part of the responsive layout
Dim strWebShopFolder As String = CkartrisBLL.WebShopFolder()
litZeptoJquery.Text = "<script>" & vbCrLf & _
"document.write('<script src=JavaScript/'" & vbCrLf & _
"+ ('__proto__' in {} ? 'zepto' : 'jquery')" & vbCrLf & _
"+ '.js><\/script>');" & vbCrLf & _
"</script><script src=JavaScript/foundation.js></script>"
12.2.3.3. Old IE support
Because there are still a number of users stuck on older versions of Internet Explorer, we have built in support to deliver a non-responsive version of the site to them.
To create a non-responsive version of your skin for users on IE8 and earlier, it should be called the same as your main skin, but with 'NonResponsive' added to the name. For example, we ship Kartris with a default skin called 'Kartris', and the non-responsive version of this is therefore called 'KartrisNonResponsive'.
If you're upgrading a site to the responsive version of Kartris, you could keep your old skin and rename it to be used as the non-responsive skin.
From January 2016, Microsoft will only support the latest version of its browser available on each platform, which effectively means IE8 is no longer supported (as Vista can run IE9). From this date, the requirement to service older browsers should cease as they are no longer supported with security fixes, and every browser vendor will be delivering regular browser updates automatically by default.
12.3. Required skins
If you wish to support browsers below IE8, and have a modern responsive skin on your site, you can also add a non-responsive skin for older browsers. Please see @13.2.3.3. Old IE support.
12.4. Skin components
HomePage.master is an optional file. If present in a skin, the home page of the site (Default.aspx) will use this template instead of the main Template.master file. It is quite common for sites to have a different layout on the home page to that used throughout the rest of the site, hence this feature. It is however possible to use different templates for various other parts of the site too. More details later in this section.
The .css files are cascading-stylesheet files. These control the styling of the various page elements that make up a Kartris page, such as fonts, colours, the position of the various layout columns, the width of the page and so on. CSS is a web standard way of formatting web pages, it isn't proprietary to Kartris. There is a vast amount of information on the web about using CSS. In our skins, we tend to divide the CSS up into several files:
- template.css
- controls the position of various page elements within the
Template.master
page
- general.css
- sets the appearance of fonts, form controls and various other elements
used throughout
Kartris
- sections.css
- controls the appearance and layout of various elements used in
particular parts of Kartris, such as the layout of products and the
checkout
- menus.css
- controls the appearance of menu systems such as the dropdown
navigation menu and the categories
menu.
The Images
folder holds images used within the CSS (background images) as
well as the site logo and any other images embedded within your
.master templates.
12.4.1. The 'Templates' folder
In order to handle this, HTML templates can be added here. Kartris will look for these automatically in the live skin, based on the following naming criteria:
Callback_[name].html
Where [name] is the name of the payment system's folder in the /Plugins folder of Kartris. Not all payment systems can return HTML from the callback to the customer, so this feature only works where the payment system supports it.
A simple callback template will look as follows:
<html>
<head>
 <title>Order Confirmation</title>
</head>
<body>
[orderdetails]
</body>
</html>12.4.2. Invoice.master
12.5. Skin config file
This can be done through a Skins.config file added into the /Skins folder. It looks something like this:
<?xml version="1.0" encoding="utf-8" ?>
<configuration>
 <CustomerSkinRules>
  <Customer ID="123" SkinName="DifferentSkin"/>
 </CustomerSkinRules>
 <CustomerGroupSkinRules>
  <CustomerGroup ID="456" SkinName="AnotherSkin"/>
 </CustomerGroupSkinRules>
 <ProductSkinRules>
  <Product ID="789" SkinName="SkinNumber3"/>
 </ProductSkinRules>
 <CategorySkinRules>
  <Category ID="100" SkinName="BlackAndOrange"/>
 </CategorySkinRules>
 <ScriptSkinRules>
  <Script Name="Basket.aspx" SkinName="BasketSkin"/>
 </ScriptSkinRules>
</configuration>
Note: The tags in the Skins.config are case sensitive. If settings are not working as expected, check the case of tags carefully to ensure tag names and values match those above.
12.6. Setting a page's masterpage
<%@ Page Language="VB" AutoEventWireup="true" MasterPageFile="~/Skins/Kartris/Template.master"
CodeFile="Product.aspx.vb" Inherits="Product" %>12.7. Menus
12.7.1. Product categories
<user:CategoryMenu ID="UC_CategoryMenuCSSFoldout"
  runat="server" EnableViewState="False"
  Visible="True" />

<user:CategoryMenuAccordion ID="UC_CategoryMenuAccordion"
  runat="server" EnableViewState="False"
  Visible="True" />

<user:CategoryMenuDropDownSelect ID="UC_CategoryMenuDropDownSelect"
  runat="server" EnableViewState="False"
Visible="True" /><user:CategoryMenu ID="UC_CategoryMenuCSSFoldout"
runat="server" EnableViewState="False"
RootCategoryID="1" Visible="True" />
<user:CategoryMenu ID="UC_CategoryMenuCSSFoldout2"
runat="server" EnableViewState="False"
RootCategoryID="2" Visible="True" />12.7.2. General navigation
13. Search
13.1. Search Engine Optimization (SEO)
There is no magic wand, and anyone promising miraculous increases in traffic with minor tweaks to the format of pages or URLs should be regarded with some skepticism.
13.1.1. Domain forwarding
Kartris is designed to run on a single domain. If multiple domains are mapped to the same web, Kartris will 301-redirect any requests to the domain set in the general.webshopurl config setting. This helps channel page rank and links towards the preferred domain.
For example, many sites have both domain.xyz and www.domain.xyz pointing to their site. Kartris will redirect to the preferred one of these if someone uses the other one where necessary. While this has no real impact from an SEO point of view (there really aren't the duplicate content issues as we'll cover later), it does ensure that all users are using the same domain always, which is important for cookies.
For more information on config settings see @3.4. Config settings.
13.1.2. Meta-tags
Meta-tags are three common HTML tags that appear in the 'HEAD' section of the HTML code of most pages:
<meta name="description" content="Content Here" />
<meta name="keywords" content="Content Here" />
<title>Content Here</title>
The 'title' tag contains the text that will display at the very top window bar when the page is open in a browser. It is also the page title that a search engine will typically show as the main hyperlink in its search results.
The meta tag for 'description' gives a summary of what the page contains. Typically this will be the additional test just under the hyperlink in a search engine result.
The meta tag for 'keywords' contains extra keywords that are relevant to the page but is not displayed in search results, and is not read by Google and most search engines. So we tend to leave this blank.
Because Kartris forms pages around a standard template, these tags are not present in the template; instead the tags are created dynamically by Kartris for every page.
13.1.2.1. Default values
You can set the Kartris defaults for the meta-tags using the following language strings:
ContentText_DefaultMetaDescription
ContentText_DefaultMetaKeywords
In places where no other data is available, Kartris will fall back on the values here. But in most cases, it will find more page-specific data to use if possible. As mentioned earlier, the meta-keywords tag is not read by Google and most major search engines, so is probably best left blank so as not to increase page sizes unnecessarily.
13.1.2.2. Overriding default meta tag values
Kartris will do a fairly good job of filling meta-tags and page title for pages automatically. For example, on a product page, it will use the product name in the title tag, and fill the description with a truncated section of text from the product description. The keywords will generally use the ContentText_DefaultMetaKeywords value.
But you can override these default values in many cases.
For example, when creating or editing a product, category, knowledgebase article or custom page, you can open extra fields with the [+]SEO link. This allows you to override the default values that Kartris will insert, and specify the exact text you want to appear.
This can be useful if you want to keep the product or category name short and concise, but have the page title itself longer and with more keywords to help improve page indexing.
You don't need to duplicate your product names and descriptions in these SEO fields. Only use these fields if you want those meta tags to be different to the actual product name and description.
13.1.2.3. Overriding default URLs
Kartris can format 'friendly' URLs. You may wish to optimize the text/name part of the URL for products and categories using the URL Name box. This allows you to replace the default value (normally the item name) with whatever text you prefer to use.
You should only enter keywords or text here, not full URLs. The values entered are used for the text part of the URL. But the numeric part and file extension are required and cannot be removed.
13.1.3. The canonical tag
One frequent point that SEOs raise is the so-called 'duplicate content penalty'. The claim is that having a page accessible with multiple URLs will harm search engine ranking, or even (according to some SEOs) have you booted from Google for spamming.
In reality, as the official Google blog makes clear (see link below), you will not be penalized for this. In fact, Google will even do a good job of recognizing multiple URLs that point to the same page, pooling them and their page rank.
http://googlewebmastercentral.blogspot.com/2008/09/demystifying-duplicate-content-penalty.html
But in order to eliminate any doubt, Google, Microsoft (Bing) and Yahoo all now recognize the 'canonical' tag. This lets you specify within the source of a page which URL that page should be indexed as. So even if it is reachable through multiple navigation routes, you will tell Google the preferred URL to use. Kartris forms canonical links automatically within pages, so you don't need to activate anything in this regard.
Google's official position is that it takes the canonical tag as a strong hint, rather than obeying it absolutely.
13.1.3.1. Why doesn't Kartris use 301-redirects instead?
301-redirects were commonly used as a method of getting the preferred URL indexed by search engines prior to the canonical tag being introduced. The problem with using 301-redirects is that it loses 'location awareness' in a URL. For example, a product 'laptop' can be in multiple categories, and the folder hierarchy in the URL will be different for the same item depending on the route you use to navigate to it.
Using 301-redirects means that end users, as well as search engines, only get to see a single URL, and therefore lose location awareness through the hierarchy and breadcrumb trail.
Using the canonical tag is better because it allows us to pass location specific information through the URL, giving users a clear idea of where the product lies within the category structure, while at the same time notifying search engines that it is a single page, with a preferred URL.
13.1.4. 'Friendly' URLs
On database driven applications like Kartris, a single page such as Product.aspx is used to display every single product in the store. Since extra information needs to be passed to it to tell it which product to display, the URLs (web addresses) typically contain extra parameters and values passed to the page.
For example:
http://www.demo.xyz/Product.aspx?ProductID=10
As more information is passed, the URL can become longer and messier.
To overcome this, Kartris at default creates 'friendly' URLs, which appear like static page addresses (rather than a single page with dynamic information passed to it as parameters). When properly configured, this will make the site appear (both to users and search engines) as a collection of 'static' pages in a folder hierarchy, just as if every product was on its very own page and these pages were sorted into folders.
Despite what many SEOs believe, there is little if any evidence that the format of the URL has any influence on search results (though it may well have done many years ago). Google's official blog says that it doesn't, and even goes as far as to suggest not rewriting URLs.
The format of Kartris's 'friendly' URLs still includes numbers, just before the .aspx at the end. It is not possible to remove this as the numbers are used by the system to locate the content. This is very similar to the URL format used by Amazon and the BBC, that uses numbers within a static format of URL.
13.1.4.1. Turning off 'friendly' URLs
You can turn friendly URLs on or off from the general.seofriendlyurls.enabled config setting.
13.1.5. XML Sitemap
13.1.6. Google Product Feed
Kartris contains a tool to generate this feed automatically in the back end. Navigate to Miscellaneous > Generate Feeds and then click to to generate the Google Products feed file. The recommended format is RSS (XML). The page will tell you the location of the file produced so that you can submit it to Google.
It is important to note that Google Products has a number of required attributes. The required values are detailed here:
Google Product Feed Specification
By default, Kartris will create the following attributes in the feed:
<g:id>[the version code / SKU]</g:id>
<title>[the version or product name]</title>
<description>[the product description]</description>
<g:price>[the item price]</g:price>
<link>[the canonical URL of the item]</link>
<g:image_link>[link to the full size image file for the item]</g:image_link>
<g:condition>[value set in the dropdown when generating the feed]</g:condition>Because attributes are created at product level, if you have items with multiple versions that require different custom attributes to be sent to Google, these would have to be separated out to be single version products at present.
13.2. Kartris Site Search
13.2.1. Overview
The stored procedure responsible is spKartrisDB_Search. It is fairly complex due to the manipulation of results it does. But the basic principle is that for any search phrase (multiple words) entered, results containing the exact phrase are scored highest. Those containing all or most of the words (though not necessarily together as an exact phrase) will come next, and those containing fewer of the words will come lower. Also, the presence of the search term or words in certain fields such as product name, will score higher than for other fields. There is also a special routine to search version codes (SKUs). Once each result is scored, a temporary table is used to sort them, highest scoring first. This methodology allows keyword-relevance-sorted results even where full-text search is not available.
13.2.2. Full-text search
The process of activating FTS also creates a new stored procedure - spKartrisDB_SearchFTS (and a corresponding back end one called _spKartrisDB_AdminSearchFTS). These are used in place of the normal search stored procedures on sites where FTS is enabled.
The benefits of FTS are really felt on a large site with more than 10,000 products. For sites upwards of this, FTS is almost essential as conventional searching will become slower and slower the more data there is.
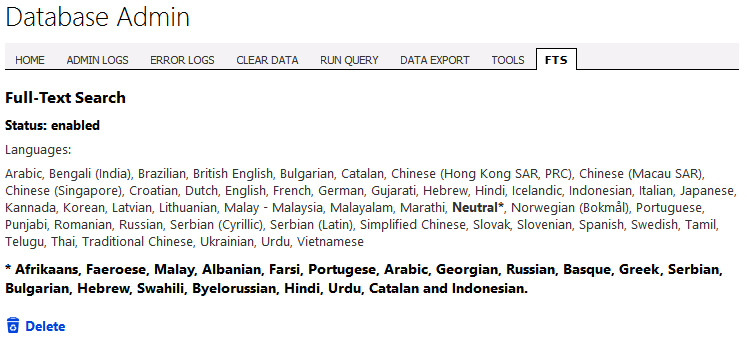
13.2.3. Advanced search
13.2.4. Searching product attributes
14. Custom Development
14.1. Adding new pages
One of the most common modifications developers might want to make to extend Kartris is to add new pages. For simple text pages, there is the built in CMS system (see @8. Custom Pages - Basic CMS). But if you need to add a functional page that contains some programming logic, you will need to add actual .aspx pages to the site.
In order to integrate properly into your Kartris site, you'd want the new page to inherit the Kartris skin and features such as the basket and menus. You will want the new page to appear on menus, and also in the breadcrumb trail.
Here is a guide to adding a new page, which we will call 'Test'.
First, create a new page in your root called Test.aspx, with a code behind (Test.aspx.vb). The aspx page content will be as follows:
<%@ Page Language="VB" MasterPageFile="~/Skins/Kartris/Template.master" AutoEventWireup="false"
    CodeFile="Test.aspx.vb" Inherits="Test" %>

<asp:Content ID="cntMain" ContentPlaceHolderID="cntMain" runat="Server">
    <user:BreadCrumbTrail ID="UC_BreadCrumbTrail" runat="server" EnableViewState="False" />
    Your new content can go here
</asp:Content>
The code behind is even simpler, and will look like this:
Partial Class Test
    Inherits PageBaseClass
End Class
Note that this page inherits from PageBaseClass rather than the standard System.Web.UI.Page class. This ensures it picks up all the special Kartris page features, and employs Kartris security. So for example, if your site is set to require people to login to be able to view pages, this page will enforce that rule too.
To get your pages to appear in the navigation menu, and the breadcrumb trail, you will need to add references to them in a couple of places. Firstly, the web_menu.sitemap file (see @8.4. Site menus).
For the breadcrumb trail, you will need to add references for your new page in web_breadcrumb.sitemap (also located in the root of the web).
14.2. The object config system
14.2.1. Adding settings
There is no Kartris GUI for adding these values; it needs to be done manually within SQL Management Studio. However, it's not something that will be done routinely, and even then only by developers, so it's not something that we'd really want to have a back end page to handle doing anyway.
14.2.2. Reading settings
Dim strSampleValue As String = ObjectConfigBLL.GetValue("K:product.myobjectname", numProductID)You should of course replace K:product.myobjectname with the actual name of your object config setting.
14.3. Custom product controls
14.3.1. When to use custom product controls
Instead, a far more manageable solution would be for pricing to be obtained from a lookup table or a formula.
Situations where a highly customized product interface is also required or where a client side configuration system has already been created may lend themselves to custom product controls. For example, a client side tool that lets you design a t-shirt and add text and/or images, then buy the item.
14.3.2. Creating custom product controls
For example, you could have a control that has textboxes for the width and height of curtains, a dropdown menu of different lining types and then some other checkboxes for some further options. Prices could be looked up in an Excel spreadsheet with a table of curtain costs. This not only allows very fine control of pricing, but also makes it easy to change or update pricing by editing prices in the spreadsheet.
Engineering applications such as industrial fans could use either a 'black box' software component from the manufacturer or a web service to look up pricing based on various performance requirements, and return the fan specification as the item description, as well as the price.
14.3.3. Hooking up custom product controls
Next, create a new single version product. Give it an appropriate name, but price is not important as that will come later from the custom control.
Finally, edit the product and go to the object config tab. Enter the name of the control in the K:product.customcontrolname object config setting. For example: 'SampleCustomControl.ascx' (the .vb part will be linked in automatically).
When you view this product on the front end, you should now see your custom control providing most of the interface.
14.3.4. Further information
You can have as many custom controls as you need, so you can for example configure curtains and blinds using different custom controls within the same site, and of course mix in standard Kartris product types too.
As you can see from this simple overview, the custom product control support is extremely flexible and can cope with virtually any scenario.
15. Localization
15.1. Languages and email setup
15.2. Language strings
Having the system database-driven makes it far easier to search for, edit and update the string values, essential because of the volume of text in Kartris which can be customized in this way. This system is used in both the front and back end, and so there are several thousand strings for each language. The values pulled out are also cached for performance reasons.
15.2.1. Finding the appropriate string to edit
If you navigate to the language strings page, you have more powerful search tools. Go to 'Regional Settings > Language Strings'. You can filter the search to a particular language, or to only search for the submitted text within the value, name or class. You can also filter by whether a string is used on the front or back end of Kartris.

15.2.2. Editing language strings
15.2.3. Caching of language strings
Being database-driven, the Kartris language provider is very efficient. However, to improve performance even more, language strings are cached because in most cases they change very rarely. If you change a language string, you may find that the change does not appear immediately, even if you rebuild the caches with the button above the left hand category menu. In this case, you can force the language strings to be rebuilt by restarting the site. This can be done from the back end home page.
15.2.4. Language string translation
The easiest way to add a new language is to import it through the Data Tool. See @10.4. Importing language packs for more information.
If you later upgrade Kartris, you may find that new English language strings were added, but that your other languages lack these records. This can be addressed through the languages page - see @15.1. Languages and email setup
Once you have 'fixed' the other languages so that they have the same number of strings, you may need to translate those new English strings into the desired language. This can be done from this section. You can choose the target langauges, and filter records to find the strings you need to translate, then enter the new values.
15.3. Localizing skins
If you need to have specific localization such as logos, or for languages such as Chinese which have their own unique fonts, or even Arabic and Hebrew which may have special CSS markup to handle RtL (right-to-left) text, you can do this from the languages section too. See @12.1. Setting a skin for more information.
16. Multi-Site Functionality
From version 3.0 onwards, Kartris introduces multi-site functionality. This lets you set up sub sites based on a subset of data from your Kartris installation, or you can build a new set of categories and products solely for these sub sites, but share a common checkout and order processing channel.
More information on this coming soon.
17. Payment Systems
17.1. Overview
Payment systems are used by Kartris to accept payment (or in some cases, a promise of payment) through the store.
Kartris supports a number of different payment systems and has a flexible open plugin architecture that allows more to be added in future. There are four broad types:
- Remote – e.g. RBS Worldpay, SagePay VSP Form – these redirect customers to a secure page at the payment gateway's site, with the successful payment being communicated back to Kartris via some kind of 'callback'.
- Local – e.g. SagePay VSP Direct – the customer enters card details directly into Kartris and Kartris then communicates with the payment system server-to-server. Since card details are entered through Kartris itself, SSL is obligatory.
- Alternative Checkout – e.g. Google Checkout (now no longer available) – the customer is routed to the payment system's web at the start of the checkout and stays there for the entire process, with information such as pricing and shipping options, as well as payment success/failure communicated between the payment system and Kartris using server-to-server communication. Although the card details are not entered directly into Kartris, Google Checkout still requires that all communication between Kartris and the payment system be done under SSL.
- Special – this typically describes certain payment methods through Kartris that don't require a third party payment system. For example, payment by 'PO' (purchase order – to take an order where actual payment will be invoiced or made offline).
17.1.1. Payment Gateway - Common Settings
17.1.1.1. Status
This lets you switch the operation of the payment system as follows:
- ON – the payment system is active and is available for customers to select for payment
- OFF – the payment system is disabled
- TEST – the payment system is set in test mode; it will only be visible at checkout if you are logged in as a store admin. Orders will be passed with a 'test' flag so cards will not be billed.
- FAKE – an additional test setting; this simulates an order callback without sending anything to the payment gateway. It is a useful way to test the settings and see what happens with successful orders but without having to repeatedly go through the payment stage on the remote site.
17.1.1.2. Process currency
Most payment systems have a process currency. If you leave this blank, Kartris will pass orders to the payment system in whatever currency the user selects on your site. For that to work, your payment system provider must support multiple currencies, and your account with them must permit orders in all the currencies available on your site.
You should set the process currency from blank, if:
- Your payment system account only supports one currency
- Your store offers customers a choice of at least one currency that your payment system account does not support
- Your payment system provider provides very poor currency conversion rates, so you prefer to pass all orders in a single currency as customers will get better conversion rates from their credit card providers.
The process currency (if not blank) should be a three-letter ISO code for the appropriate currency.
Customers will be alerted at the last step of the checkout that the actual amount they will pay will be converted, and they will be shown the converted amount in that currency, as well as the order total in their preferred currency. This conversion will be done at the rate in your currency settings.
17.1.1.3. Encrypting the settings file
17.1.2. Installing Further Payment Systems
Unzip the files and copy the folder for the payment system to the 'Plugins' folder in the Kartris web. Then go to 'Configuration > Payment and Shipping Gateways'.
Click the 'Refresh' link and Kartris should find the new payment system. Once in the list, you can click 'Edit' to change its settings. Each payment system has its own settings, which vary from system to system. This information is not stored in the database; instead it is stored as XML within the payment system itself. This makes installation simpler since you don't need to add new database records for each new payment system.
If you receive an error when you try to save changes to the settings of a payment system, it is most likely caused by there not being 'write' permission to the 'Plugins' folder. You will need to adjust this from the 'properties' dialog in Windows Explorer, or (if on shared hosting) contact your host's technical support team.
17.2. 2Checkout
17.2.1. Setup within Kartris
- Go to Configuration > Payment and Shipping Gateways and click to edit 2Checkout.
- For 'friendly name', you can enter '2Checkout', or just simply 'Credit Card'. This is just the name of the payment method that customers will get to choose on the web site during checkout if you have multiple payment methods.
- Change the status from 'OFF' to 'ON' (for live orders) or 'TEST' or 'FAKE' for testing. 'TEST' invokes a demo order, allowing you to test the full integration and pass multiple orders at zero cost without needing to do refunds. 'FAKE' means that Kartris will skip the 2Checkout site and instead format a post back itself to the callback page of Kartris. This is useful for testing that the callback process works, triggers the appropriate emails and so on without keep having to keep going through the 2Checkout payment process.
- Set your 'SID', which is the vendor number assigned to you by 2Checkout.
17.2.2. Setup within 2Checkout
In order to ensure that 2Checkout calls back your Kartris site to notify it that a payment for a particular order was made so that confirmation mails can be sent and the order can be tagged as 'paid', you need to set up a few things within your 2Checkout account.
- Login to 2Checkout and go to Account > Site Management.
- The 'Approved URL' will be http://www.mysite.xyz/Callback-2checkout.aspx and the 'Direct Return' should be set to 'Immediately return to my web site'.
2Checkout should now be set up and working. We would advise that you always test a site in live mode when you first open it (status = 'ON') even if all the test modes checked out ok. This confirms that everything is working with Kartris and that your account with 2Checkout is live and working. The best way is to create a low value product of a dollar which you can purchase.
17.2.3. Currencies
To avoid losses in currency conversion, we recommend only using US Dollars for 2checkout - encourage your customers to pay in USD (their credit card company will convert at a better rate than the one 2Checkout would present to them) and have 2Checkout wire the money to you in USD, for your bank to convert to local currency.
17.3. AffordItNow
Coming soon.
17.4. AuthorizeNet AIM
17.4.1. Setup within Kartris
- Go to Configuration > Payment and Shipping Gateways and click to edit AuthorizeNet AIM.
- For the 'friendly name', enter the name you want this payment system to be referred to on the front of your site where customers select it, for example 'Pay by credit card with AuthorizeNet'.
- Change the status from 'OFF' to 'ON' (for live orders) or 'TEST' or 'FAKE' for testing. 'TEST' means that a test order will be passed, allowing you to test the full integration and pass multiple orders and no cost without needed to do refunds. 'FAKE' means that Kartris will skip the AuthorizeNet payment process and instead format a post back itself to the callback page of Kartris. This is useful for testing that the callback process works, triggers the appropriate emails and so on without keep having to keep going through the test payment process.
- ProcessCurrency - Typically AuthorizeNet accounts are single-currency, so you should enter this as a three-letter ISO code, for example 'USD'.
- Test URL
- (for test orders) should
be:
https://test.authorize.net/gateway/transact.dll - Post
URL - (for live orders) should
be:
https://secure.authorize.net/gateway/transact.dll - TransactionKey - This is the transaction key which is generated on the AuthorizeNet back end system. It is used in the generation of the MD5 hash. If this does not match the one on the back end of AuthorizeNet, transactions will not be accepted by AuthorizeNet.
- LoginID - Should be provided to you with your AuthorizeNet account details.
- TransactionType - One of the following
(see AuthorizeNet documentation for further details): AUTH_CAPTURE,
AUTH_ONLY, PRIOR_AUTH_CAPTURE, CAPTURE_ONLY, CREDIT,
VOID
17.4.2. Setup within AuthorizeNet
https://secure.authorize.net
Go to 'Settings and Profile', under 'Security', select 'obtain transaction key'. Enter your secret answer to obtain your key. This key must be entered in the TransactionKey setting (see @17.4.1. Setup within Kartris).
17.5. AuthorizeNet SIM
17.5.1. Setup within Kartris
- Go to Configuration > Payment and Shipping Gateways and click to edit AuthorizeNet SIM.
- For the 'friendly name', enter the name you want this payment system to be referred to on the front of your site where customers select it, for example 'Pay by credit card with AuthorizeNet'.
- Change the status from 'OFF' to 'ON' (for live orders) or 'TEST' or 'FAKE' for testing. 'TEST' means that a test order will be passed, allowing you to test the full integration and pass multiple orders and no cost without needed to do refunds. 'FAKE' means that Kartris will skip the AuthorizeNet payment process and instead format a post back itself to the callback page of Kartris. This is useful for testing that the callback process works, triggers the appropriate emails and so on without keep having to keep going through the test payment process.
- ProcessCurrency - Typically AuthorizeNet accounts are single-currency, so you should enter this as a three-letter ISO code, for example 'USD'.
- Test URL
- (for test orders) should
be:
https://test.authorize.net/gateway/transact.dll - Post
URL - (for live orders) should
be:
https://secure.authorize.net/gateway/transact.dll - TransactionKey - This is the transaction key which is generated on the AuthorizeNet back end system. It is used in the generation of the MD5 hash. If this does not match the one on the back end of AuthorizeNet, transactions will not be accepted by AuthorizeNet.
- LoginID - Should be provided to you with your AuthorizeNet account details
17.5.2. Setup within AuthorizeNet
Some configuration to your account must be done at Authorize.Net's Web site (Authorize.Net will have supplied you with access details). This is referred to as Authorize.Net's Merchant Management System. Login at:
- Go to 'Settings and Profile' and select 'Relay Response'. Change this to the callback URL of your site, i.e. http://www.sitename.xyz.com/callback.aspx?g=authorizenetsim.
- Click on 'Receipt page' and 'receipt method'. This sets the page on your site that a user is returned to after finishing a transaction (normally should be http://www.sitename.xyz.com/checkoutcomplete.aspx)
- Set the receipt method to 'Link', and text to "Click here to return to the store", or something similar.
- Go to 'Settings and Profile', under 'Security', select 'obtain transaction key'. Enter your secret answer to obtain your key. This key must be entered in the TransactionKey setting (see 7. above).
17.6. Bitcoin
Bitcoin payments require simply a bitcoin alpha-numeric address; this makes them very simple to conduct, unlike credit card payments which typically require card number, expiry date, CVV codes, name, street address and so on. Kartris takes advantage of this by opening up the possibility to take 'anonymous' orders when Bitcoin is used for downloadable or digital content. Essentially, customers need not provide identifying details other than an email address (and it's easy to set up free email addresses) - it's possible to transact in the kind private way one might traditionally only be able to do in a bricks and mortar store while paying cash.
17.6.1. Basic overview
Because each order generates its own payment address, it's easier to tie up incoming payments with the corresponding order. A .vbs script which can be run on a schedule checks to see what pending Bitcoin orders are in Kartris, and whether the required number of confirmations have been made yet. If they have, the script calls back Kartris to notify it. The order status is then automatically updated as 'paid'.
17.6.2. Pre-requisites to run Bitcoin support
The Bitcoin client can be downloaded here:
http://bitcoin.org/en/download
We use the command-line JSON support in this client, so you must use this rather than third party clients or the cut-down versions.
The Bitcoin client must be installed on the web server where your web site is hosted, so this rules out shared hosting - you must really have your own server or virtual server.
17.6.3. Setting up the Bitcoin client
You will then need to locate the Bitcoin settings folder. This should be located here by default:
C:\Users\[username]\AppData\Roaming\Bitcoin
(where [username] is the Windows user account name)
Within this folder, there may be a file called bitcoin.conf. If there isn't you can create one and paste the following into it:
# bitcoin.conf configuration file. Lines beginning with # are comments.


 # Network-related settings:

 # Run on the test network instead of the real bitcoin network.
 #testnet=0

 # Connect via a socks4 proxy
 #proxy=127.0.0.1:9050

 ##############################################################
 ##            Quick Primer on addnode vs connect            ##
 ##  Let's say for instance you use addnode=4.2.2.4          ##
 ##  addnode will connect you to and tell you about the      ##
 ##    nodes connected to 4.2.2.4.  In addition it will tell ##
 ##    the other nodes connected to it that you exist so     ##
 ##    they can connect to you.                              ##
 ##  connect will not do the above when you 'connect' to it. ##
 ##    It will *only* connect you to 4.2.2.4 and no one else.##
 ##                                                          ##
 ##  So if you're behind a firewall, or have other problems  ##
 ##  finding nodes, add some using 'addnode'.                ##
 ##                                                          ##
 ##  If you want to stay private, use 'connect' to only      ##
 ##  connect to "trusted" nodes.                             ##
 ##                                                          ##
 ##  If you run multiple nodes on a LAN, there's no need for ##
 ##  all of them to open lots of connections.  Instead       ##
 ##  'connect' them all to one node that is port forwarded   ##
 ##  and has lots of connections.                            ##
 ##       Thanks goes to [Noodle] on Freenode.               ##
 ##############################################################

 # Use as many addnode= settings as you like to connect to specific peers
 #addnode=69.164.218.197
 #addnode=10.0.0.2:8333

 # ... or use as many connect= settings as you like to connect ONLY
 # to specific peers:
 #connect=69.164.218.197
 #connect=10.0.0.1:8333


 # Maximum number of inbound+outbound connections.
 #maxconnections=


 # JSON-RPC options (for controlling a running Bitcoin/bitcoind process)

server=1 tells Bitcoin-QT to accept JSON-RPC commands.
 #server=0

 # You must set rpcuser and rpcpassword to secure the JSON-RPC api
 rpcuser=Kartris
 rpcpassword=ThisShouldBeSecureAndNotThisDefaultOrYouWillGetRobbed

 # How many seconds bitcoin will wait for a complete RPC HTTP request.
 # after the HTTP connection is established.
 #rpctimeout=30

 # By default, only RPC connections from localhost are allowed.  Specify
 # as many rpcallowip= settings as you like to allow connections from
 # other hosts (and you may use * as a wildcard character).
 # NOTE: opening up the RPC port to hosts outside your local
 # trusted network is NOT RECOMMENDED, because the rpcpassword
 # is transmitted over the network unencrypted.
 #rpcallowip=10.1.1.34
 #rpcallowip=192.168.1.*

 # Listen for RPC connections on this TCP port:
 rpcport=8332

 # You can use Bitcoin or bitcoind to send commands to Bitcoin/bitcoind
 # running on another host using this option:
 rpcconnect=127.0.0.1

 # Use Secure Sockets Layer (also known as TLS or HTTPS) to communicate
 # with Bitcoin -server or bitcoind
 #rpcssl=1

 # OpenSSL settings used when rpcssl=1
 #rpcsslciphers=TLSv1+HIGH:!SSLv2:!aNULL:!eNULL:!AH:!3DES:@STRENGTH
 #rpcsslcertificatechainfile=server.cert
 #rpcsslprivatekeyfile=server.pem


 # Miscellaneous options

 # Set gen=1 to attempt to generate bitcoins
 #gen=0

 # Pre-generate this many public/private key pairs, so wallet backups will be valid for
 # both prior transactions and several dozen future transactions.
 #keypool=100

 # Pay an optional transaction fee every time you send bitcoins.  Transactions with fees
 # are more likely than free transactions to be included in generated blocks, so may
 # be validated sooner.
 #paytxfee=0.00

 # Allow direct connections for the 'pay via IP address' feature.
 #allowreceivebyip=1

 # User interface options

 # Start Bitcoin minimized
 min=1

 # Minimize to the system tray
minimizetotray=1https://en.bitcoin.it/wiki/Running_Bitcoin#Bitcoin.conf_Configuration_File
You can see that the majority is commented out, but the relevant lines that you need active in your file are as follows:
- server=1 - this turns on the JSON support in the client, so Kartris can communicate with it
- rpcport=8332 - this defines the port that will be used for remote communication
- rpcconnect=127.0.0.1 - this defines the address at which the client is running; 127.0.0.1 is the default local network address
- rpcuser=Kartris - a username (you can choose your own)
- rpcpassword=ThisShouldBeSecureAndNotThisDefaultOrYouWillGetRobbed - you should define your own password here, don't use our default!!!
- min=1 - this is not essential, it just tells the Bitcoin client to start minimized, preferably if running on your server
- minimizetotray=1 -
again, not essential, but preferable as the client starts up whenever
the server reboots
17.6.4. Set up within Kartris
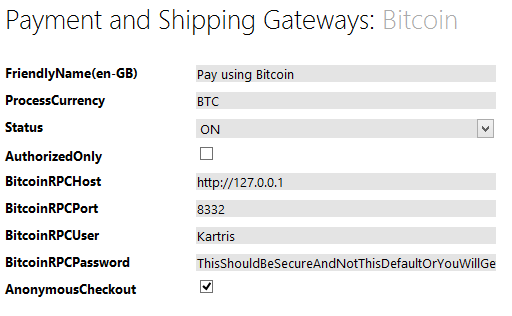
BitcoinRPCHost, BitcoinRPCPort, BitcoinRPCUser and BitcoinRPCPassword should all match the ones you configured in the Bitcoin.conf file, see @17.6.3. Setting up the Bitcoin client
17.6.5. Setting up the VBS - notifying Kartris of payment
There are a number of settings within this that will need to be set. You can edit it in notepad or a similar plain text editor. A typical file might look like this:
'====================
'Kartris Database
'====================
strKartrisDBName = "k25008_test"
strKartrisDBServerName = "localhost\SQLExpress"
blnUseWindowsAuth = true
strKartrisDBUserName = "sa"
strKartrisDBPassword = "sa"
strKartrisDBPort = 1433

'====================
'Bitcoin Client - Should match with your Bitcoin payment gateway settings in Kartris
'====================
strBitcoinHost = "http://localhost"
strBitcoinPort = "8332"
strBitcoinUsername = "Kartris"
strBitcoinPassword = "ThisShouldBeSecureAndNotThisDefaultOrYouWillGetRobbed"

'=======================
'REQUIRED CONFIRMATIONS
'Number of confirmations for bitcoin payments to be considered 'paid'
'=======================
intRequiredConfirmation = "1"

'====================
'WORKING FOLDER PATH
'Folder where the log files will be saved to
'====================
'--don't forget to put backslash at the end (\)
strWorkingFolderPath = "C:\Users\TestUser\Desktop\"
'Whether to only log confirmed payments, will not log queries for addresses that returns 0.
'*True = smaller log file size but with less details.
blnLogConfirmedPaymentsOnly = True

'====================
'Other Settings
'====================
numCursorType = 1 'for SQL Server
strEmailMethod = "off"
strMailServer = "localhost"
strEmailFromAddress = "no_reply@mysite.xyz"
strEmailSubject = "Summary"The Bitcoin client details should match those configured in the bitcoin.conf file, and the Kartris back end (see @17.6.3. Setting up the Bitcoin client and @17.6.4. Set up within Kartris above).
We have set the intRequiredConfirmation to "1". This is the number of confirmations the Bitcoin client should receive before an order is considered as successfully paid. Most Bitcoin documentation suggests waiting for 3-6 confirmations before considering a transaction as successful and irreversible, but the downside is that this will take longer. We'd suggest you start with a higher number (e.g. 6) and only reduce it if the delay becomes an issue (for most mail order items, waiting up to an hour, but normally less isn't going to make any real difference as to how quickly the customer will get their order.
You should set up a scheduled task in Windows to run this .vbs on a regular basis, we suggest every 10 minutes.
17.6.6. Currency rates
17.6.7. Process from a customer perspective
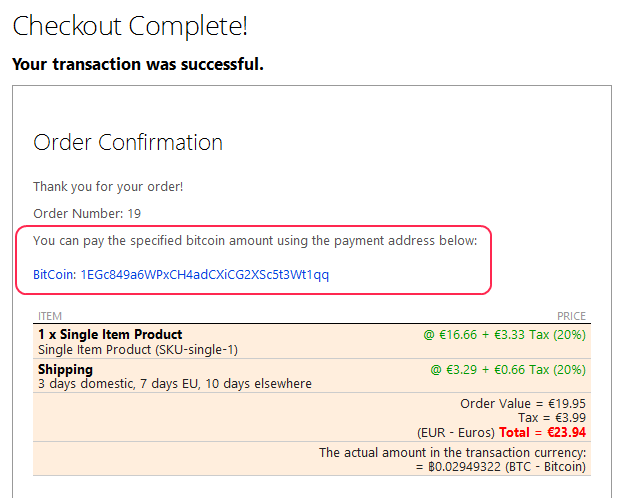
17.6.8. Process from a store owner perspective
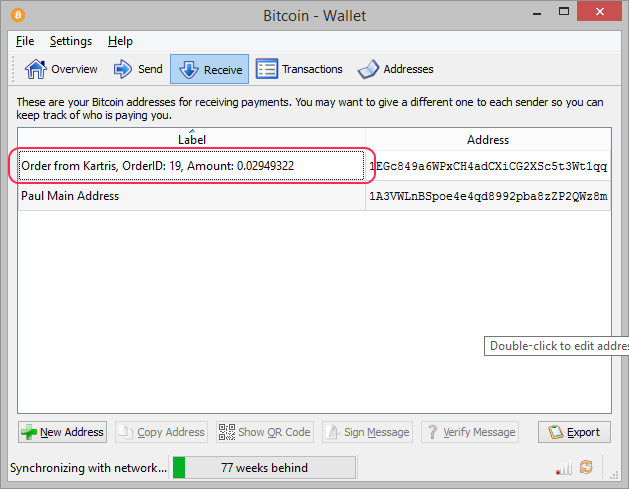
17.7. Docdata
17.7.1. Setup within Kartris
- Go to Configuration > Payment and Shipping Gateways and click to edit Docdata.
- For the 'friendly name', enter the name you want this payment system to be referred to on the front of your site where customers select it, for example 'Pay by credit card, bank transfer or iDeal'.
- Change the status from 'OFF' to 'ON' (for live orders) or 'TEST' or 'FAKE' for testing. 'TEST' means that a test order will be passed, allowing you to test the full integration and pass multiple orders and no cost without needed to do refunds. 'FAKE' means that Kartris will skip the Docdata payment process and instead format a post back itself to the callback page of Kartris. This is useful for testing that the callback process works, triggers the appropriate emails and so on without keep having to keep going through the test payment process.
- ProcessCurrency - if left blank, payments
will be sent to Docdata and processed in the customer's selected
currency. If you would prefer to only process Euros, you can enter
EUR, and all orders will be converted to EUR at the rate set in your
store at checkout before going to the payment
system.
- PostURL_Test - (for test orders)
should
be:
https://test.docdatapayments.com/ps/com.tripledeal.paymentservice.servlets.PaymentService - PostURL_Live
- (for live orders) should
be:
https://www.tripledeal.com/ps/com.tripledeal.paymentservice.servlets.PaymentService - MerchantPassword
- This is the api key password, not the
password you use to login to Docdata's
panel.
- MerchantName - The account name
Docdata provide to you.
17.7.2. Setup within Docdata
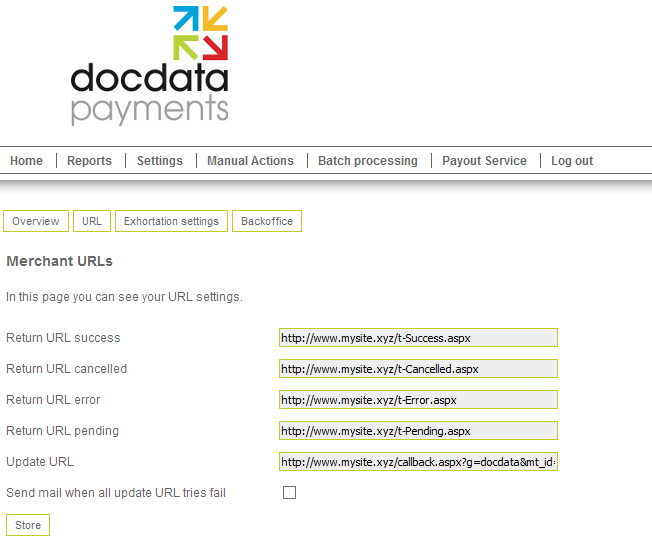
http://www.mysite.xyz/callback.aspx?g=docdata&mt_id=
It's important that you leave the mt_id= at the end; Docdata will append the order ID number to this. This URL is not called in a user's browser, rather it is called directly by Docdata each time the order status is updated.
The other settings control where a user is sent immediately after payment. We suggest you create custom pages in Kartris for each, so you can design the message to show to customers. For example create pages called:
Success
Cancelled
Error
Pending
These will have the URLs as follows:
http://www.mysite.xyz/t-Success.aspx
http://www.mysite.xyz/t-Cancelled.aspx
http://www.mysite.xyz/t-Error.aspx
http://www.mysite.xyz/t-Pending.aspx
17.7.3. Implementation and important setup info
So there are a couple of things you need to ensure when setting up your site. Firstly, that the Docdata plugin folder is full permissions for the web site account, in order that it can write data to the Access db. Secondly, the site needs to run 32-bit, as it relies on 32-bit Access drivers. You can set this from IIS; find the application pool that the site is running in, view the Advanced Settings for it, and set 'Enable 32-bit Applications' to TRUE.
17.8. GP Webpay
17.8.1. Setup within GP Webpay
17.8.2. Setup within Kartris
- Go to Configuration > Payment and Shipping Gateways and click to edit GP Webpay.
- Change the status from 'OFF' to 'ON' (for live orders) or 'TEST' or 'FAKE' for testing. 'TEST' means that a transaction will be sent to the alternative 'test' processing URL, which behaves the same as the main production URL but does not actually bill the card. 'FAKE' is another mode to aid setup and testing, Kartris itself formats an appropriate callback to itself, simulating what the remote side should pass back. It is useful for checking order emails, for example.
- Most of the settings will correspond to named settings provided to you by GP Webpay.
- The CertPFXLocalPath setting is the full local path to the .pfx file created as part of the GP Webpay account setup. If this is located on your web site somewhere, you can find the local path of the root of your Kartris installation from Database Admin > Tools. This path value should end with the name of your .pfx file.
- The CerfPFXPassword is the password associated with this .pfx file, not your account or any other password.
- The
CertCerGPWebPayPublicLocalPath
is the
local path to the .cer file that contains
GP Webpay's public
cert. There is a production (live) cert, and one for the test server.
Both files are included in the
GP Webpay plugin
folder for Kartris. You just need to find and enter the actual local
path to the right file (muzo.signing_prod.cer for
live transactions, muzo.signing_test.cer for test
transactions to the test
server).
- The
ProcessCurrency can be left blank if you want
Kartris to use whatever currency the user has chosen on the web site.
Alternatively, you can set a 3 letter ISO code such as GBP or USD to
force orders to be converted into that currency before processing.
IMPORTANT: Although GP Webpay uses numeric currency codes, Kartris will convert to these from the three-letter ISO codes. So you should NOT enter numeric values here, only recognized three letter currency codes. Setting the process currency is useful if your merchant account only supports one currency, or if your site has currencies available to users that your merchant account cannot handle. GP Webpay itself supports these currencies (though your merchant account may not): CZK, EUR, GBP, HUF, PLN, RUB, USD.
17.8.2.1. Further setup
Typically Kartris allocates order IDs as numbers, sequentially as orders go into the tblKartrisOrders table (which happens before orders are paid, hence actual paid order numbers might have gaps between them where orders allocated some IDs don't end up paid and finished). If you run multiple sites, these will all start numbering from 1, hence you'll have multiple sites creating IDs which might be duplicates. This will be an issue when these orders are sent to GP Webpay, as it requires all orders have a unique ID. If another of your sites previously used the same ID, GP Webpay will reject it.
The fix is relatively simple. You should adjust the 'seed' value on the O_ID field of the tblKartrisOrders table (don't from within SQL Server Management Studio), so instead of being '1' (starting numbering at 1), it is some higher value. For example, if you had three web sites, you could start one at '1' another at '1000000' and another at '2000000'. Put the numbers far enough apart that each is never likely to reach where the next starts numbering, and you should avoid your sites ever issuing the same order IDs as each other.
17.8.3. Setup on IIS
- go to IIS Manager
- go to the application pool instance
- click advanced settings
- Under Process model, set Load User Profile to true
17.9. Netbanx
17.9.1. Setup within Kartris
- Go to Configuration > Payment and Shipping Gateways and click to edit Netbanx.
- For 'friendly name', you can enter 'Netbanx', or just simply 'Credit Card'. This is just the name of the payment method that customers will get to choose on the web site during checkout if you have multiple payment methods.
- Change the status from 'OFF' to 'ON' (for live orders) or 'TEST' or 'FAKE' for testing. 'TEST' invokes a demo order, allowing you to test the full integration and pass multiple orders at zero cost without needing to do refunds. 'FAKE' means that Kartris will skip the Netbanx payment page and instead format a post back itself to the callback page of Kartris. This is useful for testing that the callback process works, triggers the appropriate emails and so on without keep having to keep going through the Netbanx payment process.
- Rather than having an account ID
to identify your orders to Netbanx, it has customized payment URLs
that include your site or company name. There are both test and live
URLs, with the format as
follows:
https://pay.netbanx.com/OPsite-name-upp
https://pay.test.netbanx.com/OPsite-name-upp
Kartris will decide which one to use based on the STATUS setting for this gateway.
17.9.2. Setup within Netbanx
The callback also needs to be set up at Netbanx - this tells Netbanx the page to send payment success or failure messages to, so that Kartris can update the order status to show it was paid, and send confirmation mails. This should be set to:
http://www.yoursite.xyz/Callback-Netbanx.aspx
17.10. Ogone
17.11. Opayo VSP Form
Opayo (formerly called 'Sagepay') is one of the most popular credit card payment providers in the UK.
VSP Form is a remote-type payment system, where customers are sent to a secure page on Opayo's servers to conduct the card transaction.
The system is simple to set up, but is unusual compared to most remote type payment systems in that the 'callback' (relaying information on a successful payment back to the store) is achieved by redirecting the user's browser back to the store. Most payment systems make the callback themselves (their server calls the store's callback page directly), even if they subsequently send the user back to the store after payment. In theory, payments might not be notified back to your store if a user closes their browser immediately after the payment was made, but in practice, we rarely see this and the system seems stable and reliable.
17.11.1. Setup within Kartris
- Go to Configuration > Payment and Shipping Gateways and click to edit SagePay VSP Form.
- For the 'friendly name', enter the name you want this payment system to be referred to on the front of your site where customers select it, for example 'Pay by credit card with SagePay'.
- Change the status from 'OFF' to 'ON' (for live orders) or 'TEST' or 'FAKE' for testing. 'TEST' means that a test order will be passed, allowing you to test the full integration and pass multiple orders and no cost without needed to do refunds. 'FAKE' means that Kartris will skip the Opayo payment process and instead format a post back itself to the callback page of Kartris. This is useful for testing that the callback process works, triggers the appropriate emails and so on without keep having to keep going through the Opayo test payment process.
- ProcessCurrency - if your store supports some currencies that your Opayo account cannot process, you should set this with a three-letter ISO code to convert all orders to this currency prior to sending users to the payment pages.
- Test URL - (for test orders) should be:
https://sandbox.opayo.eu.elavon.com/gateway/service/vspform-register.vsp - Post URL - (for live orders) should be:
https://live.opayo.eu.elavon.com/gateway/service/vspform-register.vsp - VSPProtocol - Opayo uses a versioning system so that when a newer version of their system is introduced, you can continue to process orders with the older version (at least for some period). The Kartris Opayo support is designed for 'Protocol 3.00', so you should not change this number unless your Kartris payment system is upgraded at some point in the future.
- The other various Opayo settings required should be supplied to you by Opayo.
17.11.2. Setup within Opayo
All the required information to process an order and direct the callback back to your store is actually posted through to Opayo with the order, so no further setup is required at their end. However, you should ensure with Opayo's support that your account is live before you start processing orders.
17.11.3. Common issues
17.11.3.1. The VendorTxCode has been used before
Orders passed through your Opayo account must have unique IDs. If you experience this error when trying to checkout, it means the order ID that is being passed has been used before on your account. This can happen if you've switched to Kartris from another store system, so IDs are starting from a low level. It can also happen if you restored a older backup of your Kartris database for some reason.
17.12. Pay360
Coming soon.
17.13. PaymentSense
PaymentSense is a UK-based payment system that provides credit card payment services primarily to smaller merchants. Kartris includes a plugin for the PaymentSense 'Hosted Integration' method. This is a remote-type payment system where the transaction occurs on the payment vendor's own secure gateway pages, and a POST is made back to your Kartris site to notify it of the result.
17.13.1. Setup within Kartris
Go to Configuration > Payment and Shipping Gateways and click to edit PaymentSense.
Enter the various acccount details given to you by PaymentSense. You may have both test and live account details, so ensure you don't mix these up. We suggest first configuring the test details, setting the status to 'test' in Kartris (this will only show the payment option for PaymentSense at checkout if you are logged in to the site as an admin) and then running through some tests with the test card details available from PaymentSense.
In older installations (up until Kartris v2.9012), the hashmethod was hardcoded into the plugin as MD5. From v2.9013 onwards, the default is SHA1, though this is changeable through a new setting called HashMethod, within the PaymentSense settings in the Kartris back end.
The PostURL may be different depending on which processor you signed up from. This is the location of the payment form on the vendor's site where the user is redirected in order to make payment.
17.13.2. Setup with PaymentSense
See PaymentSense's own documentation regarding setup within their admin area.
Make sure that the hashing type matches the Kartris plugin version you are using. You can check the version of the DLL you have by navigating to it in Windows explorer, right-clicking and choosing 'properties', then viewing the details tab. Newer versions of Kartris also show this DLL version number within the list of payment systems.
If it's the older DLL (v1.x), then you should use MD5. If it's the newer v2.x DLL (introduced in Kartris v2.9013) then use SHA1 (if using this version, your Kartris should have a 'HashMethod' setting withing the PaymentSense settings).
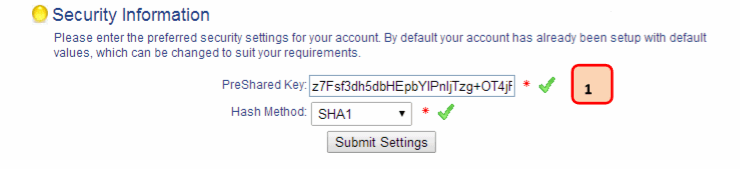
17.14. Paypal
17.14.1. Setup within Kartris
- Go to Configuration > Payment and Shipping Gateways and click to edit PayPal.
- For the 'business', enter the email address of your Paypal account - this is effectively your PayPal user ID.
- Change the status from 'OFF' to 'ON' (for live orders) or 'TEST' or 'FAKE' for testing. 'TEST' means that transactions will be sent to PayPal's sandbox server. 'FAKE' means that Kartris will skip the PayPal site and instead format a post back itself to the callback page of Kartris. This is useful for testing that the callback process works, triggers the appropriate emails and so on without keep having to keep going through the PayPal payment process.
- If you have Kartris v2.9 or above, it
will automatically determine whether to post to the live or sandbox
Paypal server. If you have an earlier version of Kartris (or a Paypal
DLL in Kartris earlier than 1.1.0.0) you will need to change the URL
setting to the appropriate one for LIVE or test orders.
For live orders:
https://www.paypal.com/cgi-bin/webscr
For test orders:
https://www.sandbox.paypal.com/cgi-bin/webscr
17.14.2. Setup within Paypal
In order to ensure that PayPal calls back your Kartris site, to notify it that a payment for a particular order was made so that confirmation mails can be sent and the order can be tagged as 'paid', you need to set up a few things within your PayPal account.
- Login to PayPal and go to My Account > Profile. Then click to view My Selling Preferences (left hand side) and then a bit over half way down, click the 'update' link by 'Instant payment notifications'.
- The Notification URL should be http://www.mysite.xyz/Callback-PayPal.aspx. The 'Receive IPN messages' radio button should be checked.
- Back on the My Selling Preferences page, click the 'update' link by 'Website preferences'. Turn 'Auto Return' on, and enter http://www.mysite.xyz/CheckoutComplete.aspx as the 'Return URL'. This will redirect the user back to your site after they complete a payment on PayPal. But it is important to note that the order itself is called back immediately after payment by PayPal's server calling the Callback.aspx page of your site (see 2. immediately above).
- Set 'Payment Data Transfer' off - we don't need this as we send info via the IPN step in 2. above.
You may find that orders where data submitted contains non-English characters (such as French or German accented characters) generate an INVALID response at PayPal. To fix this:
- Log into PayPal
- Go to My Selling Preferences (see above)
- Click 'Paypal Button Language Encoding' link at foot of page, and then click the 'more options' button
- Set 'Encoding' to 'UTF-8'
- Set 'Do you want to use the same encoding for data sent from paypal to you?' to 'Yes'.
- Click 'Save'
We advise doing this even if you're in the US or UK, as it's quite possible you'll have customers with names and/or addresses either domestically or overseas that contain non-English accented characters.
17.14.3. Google Analytics
Google Analytics ecommerce tracking requires that a client side javascript is run the user's browser when they complete an order. This happens in Kartris on the CheckoutComplete.aspx page right after returning from the payment gateway (see 3. above).
It cannot be done on the callback because that is called by PayPal, not the customer's browser. Unfortunately PayPal puts in a 5-second delay after a completed payment before returning the customer to the store. This inevitably results in some customers dropping out after a successful payment but before they have been redirected back to your site, and hence not being logged by Google Analytics as completed sales. There is no workaround for this; the Google Analytics code can only run on the user's browser; it must run after the payment is complete (otherwise you will log sales as successful that don't complete payment) and PayPal apparently has no way to reduce or eliminate the 5-second delay). This is not a Kartris issue alone; it is an issue with all carts that support Google Analytics when they are set up to use PayPal Web Site Payments Standard.
17.15. Paypoint (formerly SecPay)
17.16. PO - Offline Payment
17.16.1. AuthorizedOnly
See also .
We would advise that even if not using the PO option on your store, you keep it set to ON but then set it as AuthorizedOnly, which will prevent the public from using it unless you specifically allow them to. This is because orders of zero value (which can occur either if some items are free, or if a coupon is used for the full value of the order) will use the PO checkout route. If you turn the PO option off, you will effectively prevent the store bypassing the payment system for zero value orders.
17.17. QuickPay
QuickPay is a payment provider launched in 2004 and based in Denmark. Kartris uses the "QuickPay Form" integration method.
17.17.1. Setup at QuickPay
In order to configure Kartris, some values will need to be obtained from QuickPay. These are
- Merchant ID (a general ID applicable to the customer's QuickPay account)
- Agreement ID (an ID for the specific agreement within the QuickPay account - a merchant may have several)
- Agreement API Key (a key used for hashing values for each agreement, for security)
- Private Key (a key used to hash values to verify the integrity of the callback from QuickPay)
These can be obtained by logging into the QuickPay account control panel as detailed below.
17.17.1.1. Merchant ID
This is stated at the top left of the control panel under the customer name
17.17.1.2. Agreement ID and Agreement API Key
Using the left hand menu navigate to settings / users and then under system users click to select Payment Window.
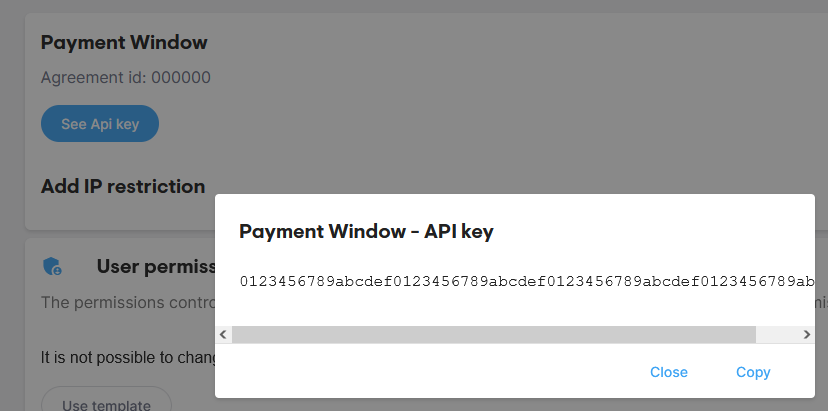
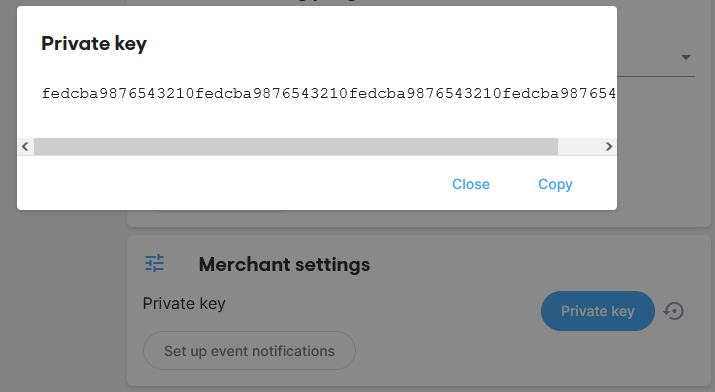
17.17.1.4. Enable Test Transactions
To enable test transactions while testing the integration the required setting must be changed on QuickPay. Navigate to settings / integrations and ensure the setting for allow test transactions is set to yes
17.17.2. Setup in Kartris
- Go to Configuration > Payment and Shipping Gateways and click to edit QuickPay.
- For the 'friendly name', enter the name you want this payment system to be referred to on the front of your site where customers select it, for example 'Pay by credit card with QuickPay'.
- ProcessCurrency - If your QuickPay account can process orders in all the currencies you have available for customers to use on the site, then you can leave this blank to process the order in whatever currency the customer is using. If you cannot process all the currencies available, you can convert all orders to a specified currency at checkout. The total will be shown to the user in both currencies, with an explanation. For example, setting this to 'GBP' will convert all orders to British Pounds at checkout.
- PostURL should be set to https://payment.quickpay.net
- Version should be left as defaulted (most likely v10)
- Change the Status from 'OFF' to 'ON' (for live orders) or 'TEST' or 'FAKE' for testing. 'TEST' means that a test order will be passed, allowing you to test the full integration and pass multiple orders and no cost without needed to do refunds. 'FAKE' means that Kartris will skip the QuickPay payment process and instead format a post back itself to the callback page of Kartris. This is useful for testing that the callback process works, triggers the appropriate emails and so on without keep having to keep going through the QuickPay test payment process.
- MerchantID should be the setting for this field you obtained from QuickPay in @17.17.1.1. Merchant ID
- AgreementID and AgreementAPIKey should be the settings you obtained from QuickPay in @17.17.1.2. Agreement ID and Agreement API Key
- PrivateKey should be set to the value obtained from QuickPay in @17.17.1.3. Private Key
- CallbackURL should be set to [your site URL]/callback.aspx
- ContinueURL should be set to [your site URL]/checkoutcomplex.aspx
- CancelURL should be set to [your site URL]/basket.aspx
17.18. Realex
17.18.1. Setup within Kartris
- Go to Configuration > Payment and Shipping Gateways and click to edit Realex.
- MerchantID - supplied by Realex. This is not the merchant number supplied by your bank.
- SharedSecret - This is supplied by Realex. It is used in the generation of the SHA1 hash. If this does not match the one on Realex, transactions will not be accepted by the gateway.
- ProcessCurrency - You must set this config setting to the 3 letter ISO currency code of your Realex account. For example, if your account processes Euros, this setting must be set to ‘EUR’. Setting this config setting correctly ensures that all orders will be converted to Euros prior to passing over to Realex. If you don’t set this (and your store supports multiple currencies), you will pass orders in GBP or USD to the Realex gateway, but it assume these amounts are in Euros.
- AutoSettleFlag - Used to signify whether or not you wish the transaction to be captured in the next batch or not. If '1', then all the transactions will automatically be settled in the next batch. If '0' it means that you will manually settle transactions after the goods have been shipped.
- URL - address of the secure payment page on the Realex site.
- ReturnTSS - Use to signify whether or not you want to use Realex’s Transaction Suitability Score. If this is '1', six additional fields will also be supplied to Realex in every transaction (shipping code, shipping country, billing code, billing country, customer id, customer email). Otherwise, set to '0'.
17.18.2. Setup within Realex
Before you can use Realex’s Realauth Redirect, you must first provide Realex with the URL of your callback page. This should be:
http://www.demo.xyz/Callback-Realex.aspx
(this is URL-mapped to the Callback.aspx file by Kartris)
The response URL is to be mailed to support@realexpayments.com. You can also have an HTML template uploaded to the Realex Payment servers so that the redirection should resemble the rest of the shopping experience (or else it will use Realex’s default template). You can send your template to them via same email address. For further info, check the Realex developer's guide.
In case Realauth is unable to contact your callback page, you can set a static success/failure message. This can be done at Realex's administration web site (Realex will have supplied you with access details).
17.18.3. Custom response template
The response to Realex from Kartris is formatted using a file which should be placed here on your site:
/Skins/[your skin]/templates/Callback_Realex.html
17.19. Secure Trading
IMPORTANT: Secure Trading is no longer accepting customers on this particular implementation. We are maintaining it for legacy reasons. New customers therefore should not choose to setup an account with Secure Trading as Kartris is not compatible with the version they will require you to run.
17.19.1. Setup within Kartris
- Go to Configuration > Payment and Shipping Gateways and click to edit Secure Trading.
- For 'friendly name', you can enter 'Secure Trading', or just simply 'Credit Card'. This is just the name of the payment method that customers will get to choose on the web site during checkout if you have multiple payment methods.
- Change the status from 'OFF' to 'ON' (for live orders) or 'TEST' or 'FAKE' for testing. 'TEST' invokes a demo order, allowing you to test the full integration and pass multiple orders at zero cost without needing to do refunds. 'FAKE' means that Kartris will skip the Secure Trading site and instead format a post back itself to the callback page of Kartris. This is useful for testing that the callback process works, triggers the appropriate emails and so on without keep having to keep going through the Secure Trading payment process.
- 'Required Fields' should be set to 'name,email'.
- 'CallbackID' should be set
to 1 if you only have a single web site. If you use your Secure
Trading account with multiple web sites, you can number each of
them.
- 'SiteReferenceID' should be set to the values provided by Secure Trading.
- 'Password'
is an arbitrary password you use to protect the callback process; it
should match the one set up in the callback.txt file (see @17.19.2. Setup within Secure Trading).
17.19.2. Setup within Secure Trading
method1 POST
url1 http://www.mydomainnamegoeshere.com/callback.aspx?g=securetrading&p=stpassword
fields1 orderref, streference, email, amount, stresultIf you have multiple online stores using the same Secure Trading account, you can copy these three lines of text and paste them below. The 'CallbackID' in @17.19.1. Setup within Kartris will be '1' for the site covered by the first three lines of the file, '2' for the next three lines and so on.
Remember, our callback.txt file is different to the standard one available from Secure Trading. You must use our version or your callbacks will fail.
These files are templates for the pages displayed to a customer when making an order. These must be static HTML files, do not change them to .asp or .aspx or other active pages because the Secure Trading server will not run these.
This is the HTML template used for the credit card form that Secure Trading displays to your customers. Be very careful when editing this that you do not change any field names, remove required fields or otherwise break the form.
If you experience problems with Secure Trading, please ensure that you revert files to the ones we provide with Kartris. The most common issues we see are bugs introduced by edits to the various template files, or use of default files provided by Secure Trading.
17.20. Stripe Checkout
Stripe is a popular payment solution that supports many countries and provides a number of integration routes. Kartris implements "Stripe Checkout". Stripe support was added to Kartris with v3.3001. There are some small changes to the Checkout, CheckoutProcess, CheckoutComplete and Callback to handle it. Also, the Stripe.net library needs to be added to the bin folder too.
If you have v3.3001 or later installed, Stripe will be available in the payment gateways list already.
17.20.1. Setup within Kartris
In addition to the general settings most gateways have, Stripe requires these particular ones:
17.20.1.1. ApiKeyPublishable
This is the "publishable" API key that Stripe will generate for you inside your account. This key is used by Kartris when formatting the javascript that forwards user sessions over to Stripe for the payment. It will generally start with the letters "pk_". It is called "publishable" since this is used in client-side code so can be visible to users.
17.20.1.2. ApiKeySecret
This is the key that Kartris uses server-side to communicate with the Stripe servers. This will not be visible to the user's browser in any way during the process, and as such is "secret". It will generally start with the letters "sk_".
17.20.1.3. WebhookEndpointSecret
Webhooks are setup in Stripe to post information back to web sites when certain events happen. In our case, we're interested in getting notification when checkout sessions are completed (i.e. customer completes payment). More detail on setting these up below. But a secret value is used to secure these, and that should be entered here.
See @17.20.2. Setup within Stripe for more details.
17.20.1.4. StripeJSSourceURL
A client-side javascript library is used to format javascript to redirect user sessions from Kartris over to Stripe's payment pages. This is the path to that library. In future, Stripe may require we link to newer libraries, hence we have this URL in the settings so it can be changed easily.
17.20.1.5. OrderDescription
For simplicity, we format the order as a single item with a value to send to Stripe. When users checkout, they will see this item on the left of the page with its value. The name shown to users will be [OrderDescription][OrderID]. You can change the OrderDescription part here to customize the order description to your own site's name.
17.20.2. Setup within Stripe
To receive notifications from Stripe to your Kartris store, a webhook is required. You should configure this point to [yoursiteURL]/callback-stripe.aspx
You will have to associate at least one event. You should choose "Checkout" followed by checking the box for checkout.session.completed
A webhook endpoint secret will be generated, and you should ensure you add this into your Stripe settings in Kartris. See @17.20.1.3. WebhookEndpointSecret for more details.
This will be called "Signing secret" but you will have to click to reveal it. It should begin "whsec_".
17.20.2.1. Stripe API version
Stripe let's you choose the version of its API that you use. We have tested our integration with both these versions (which were default, and latest, at the time of writing) and both work fine.
2022-11-15
2020-08-27
17.20.3. Development and testing
If you are developing and testing locally, Stripe provides a useful tool in the shape of the CLI (Command Line Interface). At time of writing, the latest version is here: https://github.com/stripe/stripe-cli/releases/tag/v1.13.6
Copy the Stripe.exe file to your local machine, and then use a command prompt to navigate to it. If you run your Kartris on Visual Studio's built in server, you can get Stripe's CLI to listen for webhooks and forward them to your local development site's callback page (Kartris will map requests to callback-stripe.aspx to callback.aspx?g=stripe, which tells Kartris which gateway DLL to use for processing the callback). For example, something like this:
stripe listen --forward-to http://localhost:4242/callback-stripe.aspxThe CLI will give you the webhook endpoint secret to use. You need to add this in your settings, see @17.20.1.3. WebhookEndpointSecret
Once this is set, you can move through your checkout process, select Stripe as payment method, and go through to pay. If you have Stripe set to TEST mode, you will see some dev info on the page before you go to Stripe, and have a checkout button to push. This way, you can view the page source if you need to see what is being posted during development. This page does not show in LIVE mode, Kartris will format the javascript silently and submit it immediately.
You should see the order details to the left, and a payment form to the right. Use the following test card details:
4242 4242 4242 4242
any name
a date in the future
any three digit security code
Stripe should show the transaction as complete and forward you back to your development site.
You should see the order showing as paid in your back end, with the event ID added as the reference code. In the CLI window, you should see some indication that the webhook was triggered and received a 200 ok response.
The full CLI reference is here: https://stripe.com/docs/cli
17.21. WorldPay
The WorldPlay plugin was updated in Nov 2023 to add the MD5 hashed signature field. If you are activating or updating WorldPay, please ensure you get the plugin DLL from the latest Kartris release. You will also have to add the new MD5Secret section from the .config file to your existing WorldPay.dll.config file.
17.21.1. Setup within Kartris
- Go to Configuration > Payment and Shipping Gateways and click to edit WorldPay.
- For the 'friendly name', enter the name you want this payment system to be referred to on the front of your site where customers select it, for example 'Pay by credit card with WorldPay'.
- Change the status from 'OFF' to 'ON' (for live orders) or 'TEST' or 'FAKE' for testing. 'TEST' means that a test order will be passed, allowing you to test the full integration and pass multiple orders and no cost without needed to do refunds. 'FAKE' means that Kartris will skip the WorldPay payment process and instead format a post back itself to the callback page of Kartris. This is useful for testing that the callback process works, triggers the appropriate emails and so on without keep having to keep going through the WorldPay test payment process.
- ProcessCurrency - If your WorldPay account can process orders in all the currencies you have available for customers to use on the site, then you can leave this blank to process the order in whatever currency the customer is using. If you cannot process all the currencies available, you can convert all orders to a specified currency at checkout. The total will be shown to the user in both currencies, with an explanation. For example, setting this to 'GBP' will convert all orders to British Pounds at checkout.
- Test URL - (for test orders) should be:
https://secure-test.worldpay.com/wcc/purchase - Post URL - (for live orders) should be:
https://secure.worldpay.com/wcc/purchase - AuthMode - This should be set to 'A' to authorize and bill transactions or 'E' to just authorize and hold funds (useful if you wish to do further fraud screening before accepting the payment). You will need to contact your WorldPay representative to set this facility up. Transactions can only be held unbilled for a few days before they lapse - see WorldPay’s documentation for further information. If you just hold transactions, you must login to your WorldPay admin area and manually choose to bill a transaction.
- InstallID - WorldPay will give you a unique number for your installation, which needs to go here.
- CallbackPassword - This value should match the password you set within your WorldPay account (see below)
- MD5Secret - text between 20 and 30 chars, including at least one upper case letter, one lower case letter, a number and a special character, but no spaces (despite what the WP documentation says!). This needs to match the same specified in your WorldPay account.
17.21.2. Setup within WorldPay
- Check the 'Payment Response Enabled' box.
- Enter the 'Payment Response URL' as http://www.yoursite.xyz/callback-worldpay.aspx
- Check the 'Enable Shopper Response' box. This will show a text version of the order on WP.
- Enter a callback password. This should match the one you specify in your Kartris back end.
- MD5 secret - this should match the value entered in your WorldPay account.
- Signature fields - enter instId:amount:currency:cartId
- If you want to have a standard looking WorldPay confirmation page, uncheck the 'Enable Shopper Response' box. You can then customize the page returned using resultY.html and resultC.htm pages.
http://www.worldpay.com/support/kb/bg/customisingadvanced/custa7105.html
17.21.3. Templating the WorldPay response
For security reasons, WorldPay restricts the HTML tags that can be used in the template. Javascript and embedded objects are banned. You should refer to WorldPay documentation for more details.
The response to WorldPay from Kartris is formatted using a file which should be placed here on your site:
/Skins/[your skin]/templates/Callback_RBSWorldPay.html
17.21.4. Adding the new MD5 support
If you are updating an existing Worldpay installation, you will need to do the following.
17.21.4.1. Add the new Worldpay payment DLL
You may need to stop the web site in IIS first to unlock the existing DLL. Then copy the new Worldpay.dll file from the latest Kartris zip (/Kartris/Plugins/Worldpay folder) into your web, overwriting the existing file. Then you can restart the web site in IIS.
17.21.4.2. Add the new setting to your Kartris site
Find the Worldpay.dll.config file in the same folder as the Worldpay.dll you just changed. Open this in notepad for editing and add this new section into the settings, ideally between the CallbackPassword and InstallID ones. The new section looks like this:
<setting name="MD5Secret" serializeAs="String">
     <value />
</setting>
Now, we need to add a value to this setting. Go to your Kartris back end, Configuration > Payment and Shipping Gateways and you should see Worldpay near bottom. The verson should show as 2.1.0.1 (or above). Click to edit Worldpay.
You should see the new MD5Secret field. Add a value - this should be text, between 20 and 30 characters, no spaces. It must contain at least one number, one lowercase letter, one uppercase letter and one special character. Copy this value as you'll need it in the next step.
17.21.4.3. Add the setting into the Worldpay admin panel
You need to login to Worldpay, find the live account settings for the correct install ID and update a couple of fields.
First, the MD5 Secret. You should copy exactly the same value into the new MD5Secret field you just added into your Kartris back end.
You will also need to add the following to the Signature fields: instId:amount:currency:cartId
Save the settings. If there are errors reported with your MD5 Secret value, fix them, but ensure that you copy any changes back into Kartris, so your MD5 secrets in both places match.
18. Security
18.1. SSL / TLS for incoming connections
When the browser uses a URL starting with https, rather than http, the connection is encrypted. These days, this is done using a protocol called TLS (transport layer security) although the term SSL (which was the predecessor protocol) is still widely used to refer to secure connections.
18.1.1. Checking for HTTPS support
The first step is to check your web site has HTTPS enabled. To do this, simply go to the front page of your site and then edit the address in the browser so it uses HTTPS instead of HTTP. For example,
https://www.demo.xyz/
If you see an error in your browser that the site is untrusted, or that the connection was interrupted, or any other browser error, then SSL is NOT running properly on your site. You should contact the host or your developer if you believe it should be.
Only once you have verified that HTTPS support is setup and working should you attempt to activate the SSL/TLS support within Kartris.
18.1.2. Activating Kartris's SSL / TLS support
Once logged in to the back end, find the general.security.ssl config setting. There are four possible settings ('always on' SSL was introduced in Kartris v2.7000, 'external' was introduced in Kartris v2.9008).
- 'n' = off
- 'y' = on for pages where sensitive data is transferred (login, checkout, back end, any page when user is logged in)
- 'a' = always on, SSL for all pages
- 'e' = external SSL, applied by a platform like Cloudflare, see @18.1.3. External SSL
Scope of HTTPS
Using HTTPS puts an additional overhead on a web server and a user's browser, and so originally was used only in places where sensitive data is transferred, especially for credit card transactions. There was seen as little point applying it to all traffic such as when a casual visitor is browsing the site, or a search engine is spidering it.
However, in recent years, HTTPS has become more widespread. Many web sites such as Google use it by default, and the revelations by Edward Snowden of pervasive internet surveillance by security agencies have further highlighted the issues of eavesdropping and user-privacy. In summer 2014, Google indicated that it would start to give slight preference in its results to sites running HTTPS, which has led to a surge in the take up of 'always on' HTTPS.
With the arrival of services such as Let's Encrypt and Cloudflare, both of which can provide a free route to HTTPS, there is no reason these days not to implement it.
18.1.3. External SSL
This is the simplest way to add SSL to your web site. You register and set up your domain with Cloudflare.com (or a similar service), then set the nameservers for your domain to point to the ones Cloudflare tells you.
We'd recommend going into the Cloudflare settings and hitting 'pause' so Cloudflare will only serve DNS for the site at first. This will ensure the site continues to work as before (without SSL) until you decide to do the switch. Leave it a day or two, and check that Cloudflare has issued the required secure certificate for your site.
Once it has, you can activate Cloudflare to handle requests for your web site. We suggest for most sites using the 'flexible' SSL setting in Cloudflare, so you can run your web server with just http, which doen't require a secure certificate, and let Cloudflare add the SSL to the front end for you.
Then in the back end of Kartris, you should set the 'general.security.ssl' config setting to 'e' (for external).
Because Kartris will no longer be able to check programmatically if a page is being called with http or https (it will actually think everything is running http, because there is no SSL at the web server itself), you need to add some page rules into Cloudflare to ensure that appropriate redirection occurs. The ones shown below will redirect http requests to https, and also requests to kartris.com to www.kartris.com. The first request bypasses Cloudflare's cache for payment gateway callbacks to Kartris. This is a good precaution to avoid any unexpected behaviour on those such as redirections, which can prevent them working properly.
18.2. Outgoing TLS connections
Not to be confused with the security applied to the pages of your web site, Kartris must also at times call URLs securely. For example, Kartris connects to the changelog feed, shows the latest Kartris version available, the news and so on. But most importantly, some payment systems require Kartris to connect to them using TLS, and real time shipping systems like UPS and USPS also use secure connections.
In 2018, many different payment systems will be dropping support for older protocols, and will only support TLS 1.2 or above. In order for your web site to continue to be able to connect to remote systems using secure connections, you must ensure that your web site is ready.
18.2.1. Server support
The first step is to ensure your server has support for TLS 1.2, outgoing, as well as incoming. If you are on a shared server, you should check with your web host. If you have your own server, you will need to check and may have to make registry changes yourself. We found that Windows Server 2008 R2, for example, even with all up-to-date patches on, does not have TLS 1.2 support by default and requires registry changes.
Check the following article for further details:
Enabling TLS 1.2 on Windows Server 2008 R2
18.2.2. Run site as ASP.NET 4.6 or above
From ASP.NET 4.6 onwards, TLS 1.2 is the default. This means if your server has been kept up to date with patches and .NET updates when they've become available, and (if required) has the necessary registry changes (see @18.2.1. Server support above) then it should make outgoing secure connections using TLS 1.2 by default. The easiest way to test this is to simply try switching the web site to ASP.NET 4.6 and then test that it works. To do this, open the web.config file (in the root of the web) and find this code:
<compilation debug="false" batch="false" targetFramework="4.5">and simply change the target framework to 4.6:
<compilation debug="false" batch="false" targetFramework="4.6">Then reload the web site. It will take a few seconds as changes to the web.config will cause the web site code to rebuild. But you should see the web site load up and it should work exactly like it did before the change. If some page error appears, and you're sure the change you made above was done correctly, restore the original web.config file, as it seems your server does not have .NET 4.6.
You can try adding this (or check with your host if on a shared server), and then try the process above again. This avoids any code changes in Kartris.
18.2.3. ASP.NET 4.5 solution
If you are on a server where you cannot install the newer .NET versions, then you may be restricted to ASP.NET 4.5. This does support TLS 1.2, but it is not used by default. You can force this by adding this code within the Application_Start event in the Global.asax file in the root of the web:
Try
    System.Net.ServicePointManager.SecurityProtocol = System.Net.SecurityProtocolType.Tls12
Catch
End Try
18.2.4. Older ASP.NET versions
If you are running older versions of Kartris that are still on the ASP.NET 2.x branch (up to 3.5), then it seems Microsoft is rolling out support to these. However, we're no longer providing all payment plugins compiled for this branch, and are not supporting these older sites with updates, so we'd strongly recommend upgrading to the latest version of Kartris.
TLS 1.2 support, including for older ASP.NET versions
18.3. IP Restrictions
Since the number of admin users is typically quite small, and they will normally access from one or two locations (e.g. office or home), then it is possible to apply extra security to the back end in the form of an IP address restriction. For this to work, you must have a fixed IP (or one within a relatively narrow range).
Open up the web.config file in the root of the web, and find this tag:
<add key="BackEndIpLock" value=""></add>000.000.000.000,111.111.111
(the first number is a single IP address, the second is a partial IP address)
In IIS 6, the ability to limit access by IP is built in. In IIS 7, you might have to activate this feature separately.
Using IIS to enforce security in this way adds an additional level of security because it is completely independent of Kartris. Anyone trying to access the Kartris back end will be turned away unless their IP address matches one of those you have expressly authorized. Kartris pages won't even get run.
You can also ban particular IP addresses and ranges (although it is far better from a security perspective to 'deny all' and then allow specific addresses rather than try to ban problem IPs and ranges).
PLEASE NOTE: When Cloudflare or a similar system is turned on (with config setting general.security.ssl set to "e") the site would generally see Cloudflare IPs rather than the end user IP. This would stop the BackEndIpLock from working, as all requests come from Cloudflare IPs.
However, we have considered this and adapted the functionality. When your site is using Cloudflare, we instead check user IPs in the HTTP_CF_CONNECTING_IP or HTTP_X_FORWARDED_FOR server variables that Cloudflare passes through with each request, rather than the actual IP.
What this means is that you can use Cloudflare to protect your site, and still use this IP block feature in your web.config to allow access to the back end only by permitted IPs or ranges.
18.4. Password security
For security, passwords for both admin accounts and front end users (customers) are salted and hashed before being stored in the database.
For the salting, we use two separate salt values. The first is a global value, typically set during installation of Kartris, and is stored in the web.config file of the site. For example:
<add key="HashSalt" value="9e3cdce4-a52e-47e6-ba12-697e64760ce9" />The second salt value is generated per-user, and stored with the user record. It's generated at the time a user record is created, or if the password is changed.
It is stored in the U_SaltValue field of the tblKartrisUsers table, or for back end admins, the LOGIN_SaltValue field of the tblKartrisLogins table.
Before hashing user and login passwords, the first salt string is appended to the front, and the second to the end of the user's chosen password. This whole string is then hashed using sha-256, and the result stored in the database (U_Password in the tblKartrisUsers table and LOGIN_Password in the tblKartrisLogins table).
Salting the passwords prior to hashing ensures that rainbow tables or similar methods cannot be used to brute force the passwords from the database, if it was ever obtained by an attacker. Or to put it another way, if two or more users choose an identical password, these will result in entirely different values being stored in the password field of the database (because both will have different per-user salt text appended before hashing).
Furthermore, the use of two salt strings, one which is stored in the database record and one that is stored in the web.config file adds an additional level of security, as there are two separate elements in different storage locations that would need to be obtained.
When a user logs into the site, the password they enter has the global and per-user hashes applied, the resulting string is hashed with sha-256 and compared to the stored value in the database. If they match, the password entered is correct, if they don't match, it is not and the user is not granted access.
19. Other Features
19.1. Support systems
Kartris contains built-in facilities to handle customer support through your web site.
These include a searchable knowledgebase system that you can load up with articles relating to specific products or technical issues, and a support ticket system that allows you to handle support from customers in a managed way, instead of via a slew of emails.
19.1.1. Knowledgebase
The knowledgebase features can be turned off (so they are hidden on the front end of your site) using the frontend.knowledgebase.enabled config setting.
To access the knowledgebase features in the back end, go to 'Support > Knowledgebase'.
19.1.1.1. Keywords
Articles can be created with just a name (display title), text (details) and page-title tag (for search engines). It is also suggested to use keywords; as well as populating the meta-keywords tag on the page, these keywords are also searched as part of the knowledgebase search on the front end. It is useful to add alternative spellings or names for certain things, or common misspellings, to ensure that articles have the best chance of being found with the knowledgebase search.
19.1.2. Support tickets
19.1.2.1. Why not use email?
The Kartris support ticket system provides a web-based alternative for dealing with technical and sales support that has a number of advantages.
- Tickets go into a pool, with any member of staff being able to take them from the back end. Even staff in multiple offices can provide support.
- If a customer is in discussion with a member of staff who is absent or unavailable, another staff member can easily take over the ticket and ensure that support continues to be provided, unlike email where it may be problematic to access an absent staff member's email.
- The ticket system keeps the original support request and subsequent replies from staff and the customer in a chronological thread.
- The support ticket system is based around the same customer records that order history and other account-related features are linked to. It allows you to access further customer information easily from the support ticket. It also means that the customer's ability to post tickets can be linked to their account status. The system effectively controls access to support, so only those entitled to it are given it.
- Having support issues all contained within the database creates scope to monitor performance, as well as search for similar issues. Kartris keeps track of the time taken in responding each time, so a total time for each ticket and customer can be calculated.
19.1.2.2. Dealing with support
Support tickets opened by customers will show up in yellow in the back end support tickets view when they are still unassigned to a staff member. Once a site admin views the ticket and assigns it to themselves (the simplest way is using the 'Me' link next to the 'Assigned to' menu), they can reply to it.
The customer will receive an email when the ticket is updated. They should enter any follow up comments through the web site rather than by responding to the email, to ensure all comments are linked to the thread. The ticket will show as light grey in the listing.
Once a customer has replied, the admin responsible for the ticket will receive an email notification. The ticket will show again as yellow, meaning that action is required.
Once an issue has been resolved, the ticket can be closed. At this point it will change colour to dark grey.
The status can also be set as 'not sure' or 'unresolved'. Tickets will generally be set to this when you wish to highlight them for future attention rather than immediate attention.
19.1.2.3. Statistics
Kartris shows a number of statistics on each ticket, including the number of tickets raised by this customer, the total number of messages and the total time taken on tickets for this customer (in addition to the time taken for this ticket, which is under the ticket details on the left hand side).
19.2. Quickbooks integration
19.2.1. QuickBooks Web Connector
http://marketplace.intuit.com/webconnector/
The QBWC runs on the same computer on which QuickBooks is installed, and acts as middleware between QuickBooks and a special web service on your Kartris web site.
The QBWC supports a wide range of different QuickBooks versions, including the different country versions. For this reason, you don't need a specialized version of the QBWC for your specific version of QuickBooks. Check Intuit's documentation if you are not sure whether your version of QuickBooks is supported by the QBWC.
19.2.1.1. Installing the QBWC
Ensure that you have QuickBooks running, the QBWC running and that your Kartris web site is accessible and running.
In QuickBooks, go to chart of accounts, and add a new account called 'Kartris Store' – make it an 'income' account.
Then add a new non-stock inventory item called 'Kartris Order Item', and set it to belong to this account.
Now, in Kartris, go to 'Configuration > QuickBooks Integration'. In the QBWC Password field, enter your choice of password (this can be anything, but the longer the better for security purposes). Hit the update button to set this config setting.
Then you can enter a Poll Interval too – in minutes. The QBWC will check for new orders or information on this schedule.
The final step on Kartris is to click the button to generate a .qwc file and save this to your computer. In the QBWC interface, push the 'Add an Application' button at the bottom and browse to the .qwc file you just made.
Some confirmation screens will popup up – accepting these should create the link between Kartris and QuickBooks.
19.2.2. SSL support
The QBWC will work however with any URL that contains 'localhost', presumably so that developers can test using a local web site. We have therefore coded Kartris to append an unused parameter 'localhost' to URLs, in order to permit operation on a live web site that does not have SSL – for testing purposes for example.
While this means that Kartris/QuickBooks integration will work on a live site without SSL, we would urge store owners to consider the benefits of SSL and not to risk using the feature without SSL. Intuit have hardcoded the use of SSL in for a reason after all.
19.3. Stock notifications
19.3.1. Configuring your site for stock notifications
frontend.orders.allowpurchaseoutofstock = y
general.stocknotification.enabled = y
Even then, only versions that have stock tracking turned on will use this feature (i.e. for the notify button to show for an item, in addition to the correct config settings, the version in question will need to have a stock qty of zero and a warn level above zero).
19.3.2. Technical implementation
When we send a notification, we can use the language ID to pull the appropriate mail template and we can pull the product name and the link to the page directly from the notification record - we don't need to look these things up separately.
We also add a new field V_BulkUpdateTimeStamp to the tblKartrisVersions table. The sprocs that modify and update version records are modified so that this parameter can be passed in, but will default to NULL if not. If a NULL value occurs, the current time and date will be added by the sproc to that field. Versions that are updated through the Kartris back end (i.e. the BLL functions) will pass in 1900/1/1 as the date. In this way, versions that are updated by the Data Tool will end up with a recent date in the V_BulkUpdateTimeStamp field, while items updated via the Data Tool will end up with either a NULL value or 1900/1/1. Because the BLL version update functions will run stock notification checks when they update a version, we can use the V_BulkUpdateTimeStamp field to identify versions that have not had this stock notification check after being updated (i.e. those updated via the Data Tool).
If there are versions that were updated by the Data Tool and so have not had stock notification checks, a new item will appear in the task list showing the number of such versions. Clicking the 'Stock Notifications' link will go to a page which shows pending notification requests (any stock notification sign ups from users), as well as completed (sent) ones in a second list.
If there are versions to be checked, this page will also have a button to run those checks. Clicking it will loop through versions with a V_BulkUpdateTimeStamp date of after 1901. When a version is checked, it's V_BulkUpdateTimeStamp date is reset to 1900/1/1.
When a stock notification is sent, the stock notification record is updated so the SNR_DateSettled field has the date and time added to it, and the 'status' field changes from 'w' (waiting) to 's' (settled).
19.4. Android and Windows push notifications
19.4.1. System requirements
19.4.2. Setting up push notifications within Kartris
Push notifications are set up per-user, so you need to first go to the logins page in the Kartris back end - you must have full admin permissions for this:
Configuration > Logins
Click 'Edit' by the user that you want to set up the notifications for. At the bottom of the page, you will see the heading 'Push notifications'. Click the 'New' link to the right hand side of the page.
Name - this is any name you want to give; typically best to name it after the device you are setting the notifications up for, such as 'Derek's Android Phone' or 'Tiffany's Windows 8 Laptop'.
Device ID - this is a unique code that the app on your device creates. Simple enter it here, and your device will be linked to your user account. To make life a little easier, the code can be emailed or saved as a text file (e.g. to Dropbox).
19.4.3. Further information
The push system is specifically designed NOT to send privileged or private information. Although all push notifications must be first routed via our server which in turn sends them on to Microsoft or Google, and then to your device,, Kartris only sends notification that there was an order or new ticket, together with the pending totals for orders and tickets. No information about the content of any order or ticket, the person who made it, the value or any other information is sent. For more information, see our Privacy Policy.
If you do not enable the push notifications from the config setting, no information on orders or tickets whatsoever is sent to our servers.
19.4.4. Windows 8 app - watch orders
The Kartris Notifications app for Windows 8 includes a 'watch orders' feature. This is configurable, and polls a web service on your web site directly to retrieve information on pending orders, creating an almost real-time overview of order progress.
<appSettings>
    <!-- other settings here -->
    <add key="com.kartris.livetile.Service1" value="http://livetile.kartris.com/KartrisNotificationServer.svc" />
    <add key="KartrisWebAPISecretKey" value="dxuIyFt992As" />
    <add key="KartrisWebAPIIPLock" value="" />
</appSettings><system.serviceModel>
<services>
<service behaviorConfiguration="DefaultBehavior" name="KartrisWebAPI">
<endpoint address="" binding="basicHttpBinding" bindingConfiguration="DefaultHttpBinding" contract="IKartrisWebAPI"></endpoint>
<endpoint address="mex" binding="mexHttpBinding" contract="IMetadataExchange"></endpoint>
<host>
<baseAddresses>
<add baseAddress="https://www.kartris.com/protected/KartrisWebAPI.svc"></add>
</baseAddresses>
</host>
</service>
</services>
</system.serviceModel>The 'baseAddress' should of course contain the path to your own site's web API.
You can test if the web API is working by calling it as follows (obviously with your own domain rather than ours):
https://www.kartris.com/Protected/KartrisWebApi.svc?wsdl
19.5. Postcode lookup
To use this, you will need to setup an account with http://www.postcodes4u.co.uk/ and purchase lookup credits. From within your account there, you can create a key to go with your username. These two values can then be added to the following Kartris config settings in order to activate the postcode lookup feature.
general.services.postcodes4u.key
general.services.postcodes4u.username
When entering addresses, UK customers will get the option of entering a postcode, from this, a list of address choices is displayed, and clicking one will pre-fill the details into the regular address form. This saves significant time for the customer, and is especially useful for mobile users where typing address details is the most time-consuming and laborious part of the checkout process.
19.6. MailChimp integration
MailChimp is a popular online service for running mailing lists and authoring messages to subscribers. The service is free for lists under 2000 users, and the ecommerce integration available through the v3 API is now also available to free users.
This feature requires Kartris v2.9010 or later.
19.6.1. Setup
19.6.1.1. Setting up API access in MailChimp
First, you will need a MailChimp account. Login at https://login.mailchimp.com, or create an account if you don't have one.
Click on your username on the Right side of the Side and access the Account Menu.
Navigate to "Extras > API Keys"
Create an API Key if you don't have already one and note it down somewhere like a blank text file.
19.6.1.2. Creating a list for ecommerce users
On the upper menu click "Lists" and "Create a List"
Select the created list.
Go to the "List Settings > List name and defaults"
Find and copy the List Id from the screen, it should be top of the right hand column, and look something like this: 783d4b1dda.
19.6.1.3. Set up in backend of Kartris
Login to your Kartris back end.
Navigate to the Config Settings, then enter 'mailchimp' in the search box and click the search button. You should see the required config settings listed:
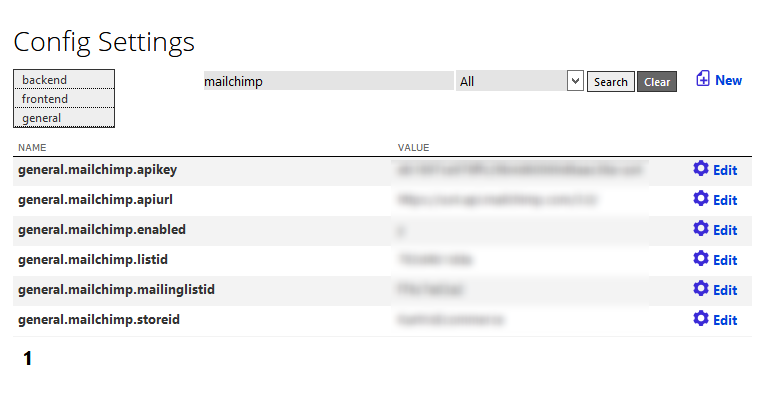
general.mailchimp.apikey - this is the API key you created or copied from the MailChimp back end in @19.6.1.1. Setting up API access in MailChimp
general.mailchimp.apiurl - This is the URL of the MailChimp API. This varies by account. For example, https://us4.api.mailchimp.com/3.0/ is the one we use, but the 'us4' part depends on the data centre of your account. You can tell this from the URL in the address bar of your browser when logged into MailChimp. The data centre is the first part of the URL, for example, ours shows https://us4.admin.mailchimp.com, hence the 'us4' for the API URL.
general.mailchimp.enabled - this one is simple enough. Needs to be 'y' to activate the MailChimp integration.
general.mailchimp.listid - this is the List ID you got in @19.6.1.2. Creating a list for ecommerce users
general.mailchimp.mailinglistid - Kartris can also use MailChimp to subscribe users to a general mailing list in MailChimp. This separates users who sign up to your newsletter, from ecommerce customers who purchase things through the site. Set up a list using the same steps as in @19.6.1.2. Creating a list for ecommerce users, or use an existing mailing list if you have one already.
general.mailchimp.storeid - Each 'store' in MailChimp needs a name. You can choose this, for example 'Kartris Ecommerce'. It will be registered through the API later.
19.6.1.4. Finishing off
Now you have all the settings and preparation done, the final step is to connect to MailChimp and create the new integration. In the Kartris back end, go to "Miscelleneous > MailChimp". This page should show the relevant MailChimp settings you've entered. You can name the store, enter your store's domain and your email address and then push the 'Create MailChimp Store' button.
This sends a request through to the MailChimp API which actually creates the new store record there.
You should see a confirmation of the result. If you get a message saying the Id already exists, that suggests that you already created this store previously.
19.6.2. Operation
Once the integration is setup, MailChimp should start recording ecommerce data. You can also set MailChimp to perform other tasks with the data.
19.6.2.1. Abandoned cart emails
One common use for MailChimp is to send abandoned cart emails. These follow up potential customers who got all the way to the checkout and through to payment, but did not complete for whatever reason. These can provide a rich source of potentially untapped sales.
Access MailChimp, login and Select "Automation" from the Top menu.
Select "Add Automation".
Find "Abandoned Cart Series" and Select "Add Automation". You could also use "Abandoned Cart Email", but the series option is more flexible, and can send either one or several follow up emails.
The minimum period after which a mail can be sent is an hour. This should allow plenty of time for an order to be completed; a completed purchase should cancel any pending abandoned cart email.
19.7. GDPR features
GDPR, the 'General Data Protection Regulation' is a new pan-EU law that will protect the private data of citizens across the continent. It will take effect from 25 May 2018. For more information see the official GDPR home page.
It's important that businesses who deal with EU citizen's data are compliant; it does not just affect companies and organizations within the EU, but all those who process the data or, or deal with EU citizens.
In Kartris v2.9012 (released 16 March 2019), we have included a number of features for compliance with the GDPR regulations, and to ease the process of delivering some of the rights under GDPR.
19.7.1. Customer account opt-in
When a customer creates an account on Kartris, we now have an extra checkbox signifying acceptance of the terms and conditions. This helps ensure that any time a record for a user is created, there is an explicit confirmation of terms and conditions.
This feature can be turned on or off using the config setting general.gdpr.enabled, though we would recommend it remains on whether you are EU based or not.
19.7.2. Mailing list explicit approval
The aspect of GDPR that has perhaps been given the most publicity, is that users must explicitly opt-in to receive marketing information. It is no longer considered acceptable to imply consent because a user places an order or creates an account on a web site.
Kartris has always employed best practice with regard to adding users to mailing lists; an email confirmation is sent which the user must respond to by clicking a link, in order to confirm their addition to the mailing list. We have never considered it an acceptable practice to add users to mailing lists other that with an explicit approval, and an email verification to ensure consent is gained from the owner of the email address for this purpose. It also ensures that email addresses cannot be added to the mailing list by third parties, either maliciously, or accidentally (e.g. a typo).
The mailing list approval emails that Kartris sends are formatted using an email template, which you can find in the templates folder of a skin (see the Kartris default skin, if your own skin lacks this). Therefore, we would recommend expanding the text within this template to explain that clicking the confirmation link will give explicity consent to add your email address to the mailing list.
19.7.2.1. Mailchimp mailing lists
As well as maintaining its own internal mailing list, Kartris can also insert email addresses to Mailchimp. See @19.6. MailChimp integration for further details.
In this case, Mailchimp should handle the GDPR aspects.
19.7.3. Customer data GDPR export
EU data privacy regulations have for many years given the public the right to request a copy of all the data an organization holds on them. The organization was allowed to charge a reasonable fee for this service, typically £10 in the UK or a similar amount in Euros. The nominal fee was in most cases not enough to cover the real cost of providing the data, but was at least a deterrent to spurious and unnecessary requests.
However, the GDPR requires that organizations provide the full data held on an individual free of charge, and within 28 days. This aspect may in time be the most onerous on businesses, though at present it is not getting much attention. While there will undoubtedly be an increase in legitimate, well intentioned requests, it's also possible that requesting data could also become a practice to test or inconvenience companies that consumers may have a dispute or disagreement with. Regardless, the company is compelled to respond.
To make this process as simple as possible from Kartris, we've created a data export button on the customer edit page. If a member of the public requests data, you can extract this from Kartris by simply finding the users record in Kartris with an email search, and then using the 'GDPR export' button.
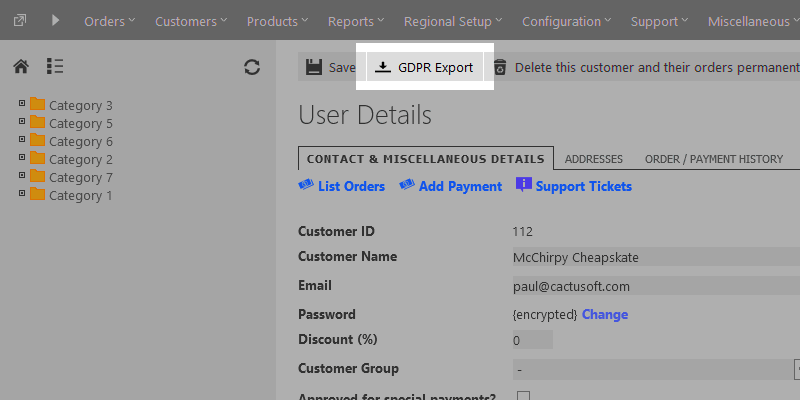
This will format a plain text file containing all data linked to that email address:
- Customer data
- Street address records
- Details of all orders, including the items purchased in each
- Copies of all reviews submitted by the user
- All wishlists created by the user
- All saved baskets created by the user
- All support tickets created by the user, including full thread discussion
The data is formatted in a fairly raw state, with the database field name (in square brackets) followed by the value. This is to ensure that the user receives the full set of data and no fields are emitted.
The GDPR export feature can only export data held within your Kartris store. It cannot export email correspondence, accounting software records or other data you may hold on the individual.
While it may not provide a complete solution to GDPR requests, it will significantly reduce the work required. What would previously have required direct database access and perhaps an hour or so of work, can be accomplished with a single button click.
19.8. Popup tomehost help
Kartris is a complex piece of software, and we have always aimed to provide extensive documentation. While developers may be used to consulting technical documentation when working with software, many end users aren't.
In 2017, we switched the Kartris technical documentation to this new tomehost platform. This improved the general speed and performance of the documentation, and also made it easier to write and publish content ourselves.
From Kartris v2.9012 onwards, we have also integrated tomehost documentation directly into the back end of Kartris. There are 'help' links near many features - an orange circle around a question mark. Clicking these will bring up a new popup window that links through to the relevant section or subsection of the Kartris documentation.
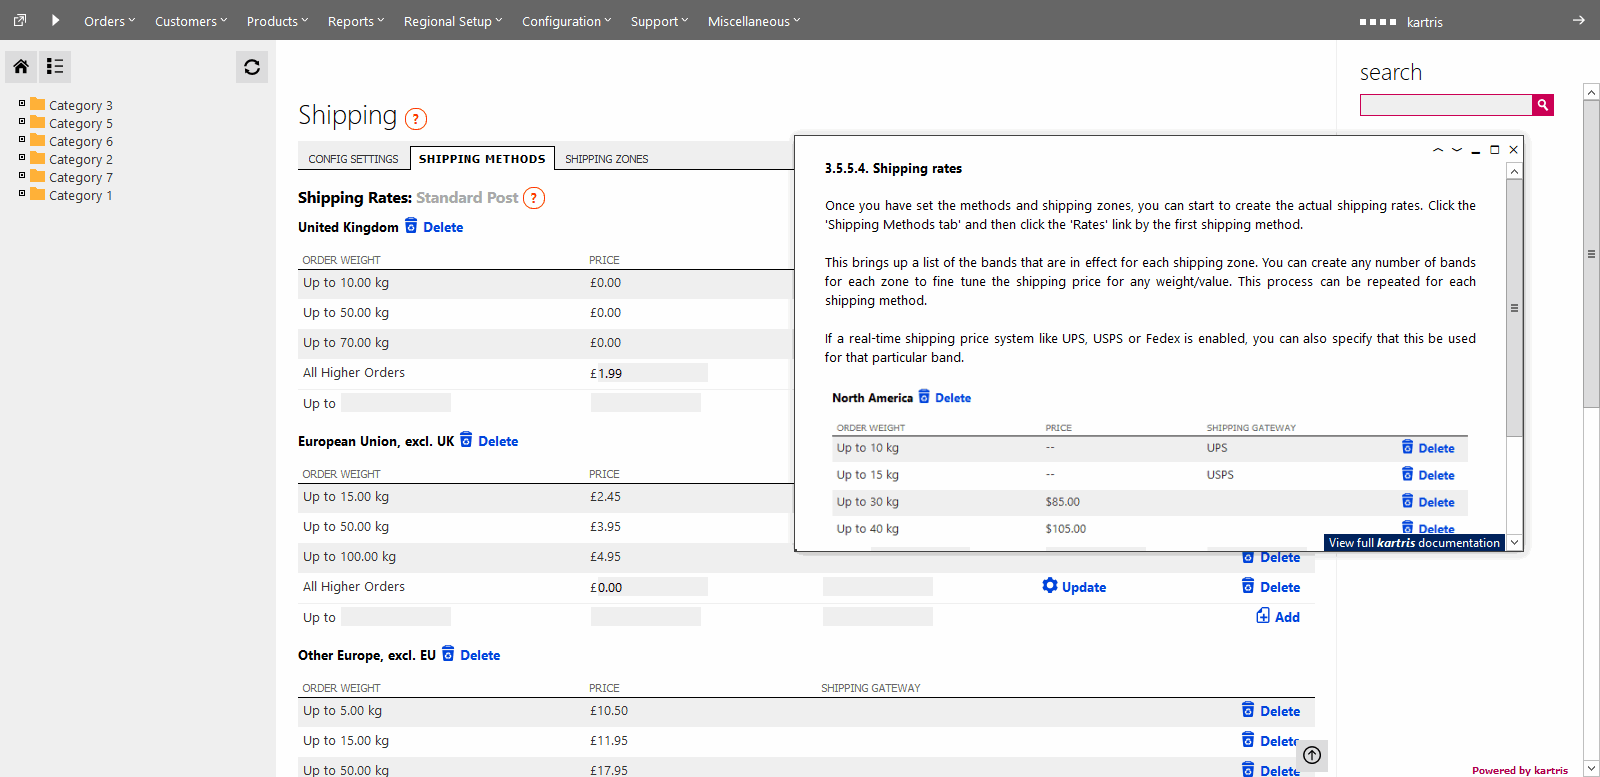
These popup help windows are not modal, so you can continue to access the other parts of the page and work on them, while reading through the documentation. You can also drag the window to another location, resize it or minimize or expand it to full screen.
There is a link in the foot of the window that will open up the full Kartris tome in a new browser window, with this section selected. This makes it possible to navigate up to the section parent, or view other parts of the documentation. We hope this feature will help users access the Kartris documentation more easily, and in particular, access the relevant parts, without having to leave the Kartris and hunt through the documentation for the relevant section.
20. Kartris PowerPack

20.1. Installation
Copy the PowerPackBLL.vb file into the /App_Code/BLL/ folder, replacing the place-holder file there of the same name.
Run the SQL update script on your database. If you are installing the PowerPack for the first time, use the version of the SQL file named for a single version of the PowerPack, e.g. PowerpackScript_1.002.sql.
If you are updating the PowerPack on your site from an older version, you will have to run the .SQL files for each step from your current version to the latest version. For example, to upgrade your PowerPack from v1.001 to v1.004, you'd run these files:
PowerpackScript_1.001_to_1.002.sql
PowerpackScript_1.002_to_1.003.sql
PowerpackScript_1.003_to_1.004.sql
You may get warnings in the SQL console that some language string records already exist. Ignore these; it only means the required records are already in there, so everything is ok.
The PowerPack is now installed.
20.2. PowerPack Overview
- Product filtering and sorting within categories
- Search suggestions that appear in real-time as you type within the search box that is on all pages
The features can be turned on/off individually after installation with the following config settings:
powerpack.filters.enable
powerpack.searchsuggest.enable
20.3. Product Filters
20.3.1. Configuration
Creating filters is simple. Navigate to the category in the back end and click to edit it. You should see a tab 'CATEGORY FILTERS'. This holds a text area. There is a small refresh button next to this; clicking it will auto-generate XML configuration for the filters. This looks at which attributes are used by products in the category, and the prices of these products.
You can opt to SAVE this default configuration, or you can manually edit it before saving. This gives you the flexibility to cut particular filters you feel you don't need, adjust price ranges and so on.
If there is no data in this field, the filters won't show. Therefore you can remove filters from a category which has them by simply removing everything from the field and saving it.

20.3.2. The Front End
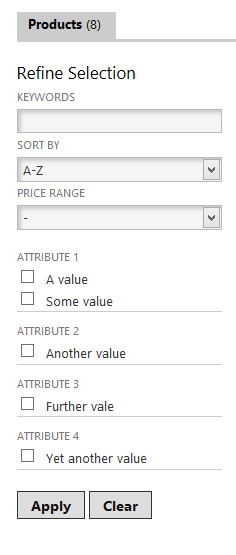
<div class="small-12 large-3 columns filterbar"><div class="small-12 large-9 columns">The filter system works with products displayed in shortened, normal and extended format. However, a little consideration should be given to the number of items per page in shortened view. Normally you may have 4 items per line (depending on your design), but with the filters there, this would generally reduce that number to 3 per line. Therefore, you should try to pick a setting for frontend.products.display.shortened.pagesize appropriately so that you get full rows in both cases (we'd suggest 12 in this case - on categories with no filters, you get 3 rows of 4, on categories with filters, you get 4 rows of 3).
CSS for the filters is based on the 'filterbar' class, and sample code can be found within our default Kartris skin, in sections.css. We have also put this in a self-contained powerpack.css file, though it is not used within the default Kartris skin. If adding the PowerPack to an existing site, you may prefer to just add in a new reference to the powerpack.css file instead.
/*
========================================================================
CATEGORY FILTERS - if you have the PowerPack installed
========================================================================
*/
.page_category #filterbar_pad           { padding: 3px 10px 10px 0; background: #fff; }
.page_category #customprice             { padding: 5px 0; }
.page_category .filterattributes        { padding: 15px 0 10px 0; }
.page_category .shorttext               { display: inline-block; }
.page_category select,
.page_category input                    { margin: 1px 0 3px 0; }
.page_category label,
.page_category span.attribute_title     { font-size: 11px; text-transform: uppercase; display: inline-block; letter-spacing: 0px; color: #777; margin-bottom: 3px; font-weight: normal; vertical-align: top; }
.page_category table                    { margin: 0 0 10px 0; background: none; border-bottom: solid 1px #ccc; }
.page_category table tr td              { background: #fff; padding: 1px; border: none; }
.page_category table tr td label        { color: #333; text-transform: none; font-size: 100%; }
20.4. Search Suggest
This functionality is not a replacement for the full Kartris search which occurs when you submit a search term in the box. That search is more sophisticated; it will search more fields and rank results based on relevance (see @13.2. Kartris Site Search. This suggestion feature finds products where the name contains the search text entered, or where any versions that belong to it has an SKU or name which contains the text - but in many cases these results will be sufficient.
21. Licenses
21.1. GNU General Public License v2
Kartris 2.0 and onwards are licensed by default with the GNU General Public License v2 (normally abbreviated to GPL v2). This is a free open-source license. Please read the license terms carefully - in particular, the license requires you to ensure that you do not remove code that displays copyright and warranty information to users. So the 'powered by' link at the foot of pages must be retained under this license.