
3. The Back End
The back end is the admin section for Kartris. In some cases the terms 'back end' and 'admin section' may be used interchangeably.
3.1. Logging in
[your site domain]/Admin/
You will need your username and password. Note that if you forget these details, it is not possible for anyone to recover them, since they are 'hashed' for security. Instead, they can only be reset.
If you have another user who has 'config' permissions in the back end, they can edit your login and create a new password for you. If you are the only admin, then you must either using the Data Tool to do the reset, or force your site to run the setup routine again, see @2.7. Forcing the install routine to run again.
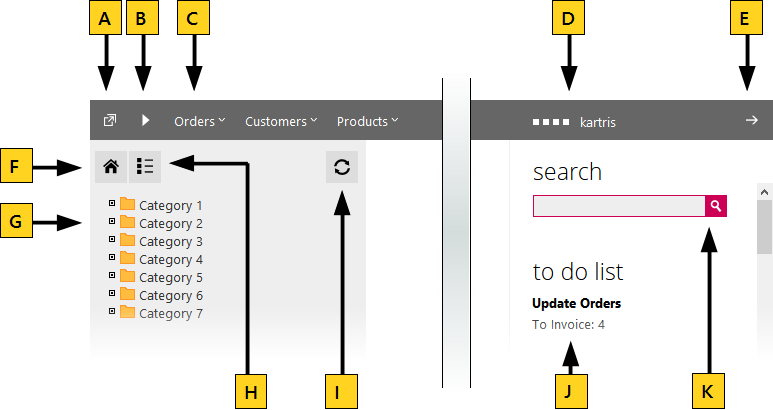
3.2. Navigation and toolbar buttons
3.3. Creating and managing logins
3.3.1. Creating logins
The primary login accounts for Kartris don't have any 'delete' option and the permissions for these accounts cannot be changed. This ensures that the main admin accounts are always valid, and that you cannot inadvertently lock yourself out of control by removing the primary accounts or reducing their access level.
Note that anyone with config permissions can create new users with any permissions they wish, or edit their own permissions to give themselves any permissions they choose. Bear this in mind if you grant configuration permissions to a user but deny them 'orders' permission, for example. The user would be able to edit their own permissions to give themselves 'order' permissions if they wanted.
3.3.2. Setting permissions
User accounts can be restricted using the permissions checkboxes so that they can only access certain areas in the back end. The back end is divided into four broad areas:
- Configuration permissions - user can change config values, shipping, tax, countries and other setup details
- Product permissions - user can view/edit categories, products and versions
- Orders permissions - user can view/change customers, orders, affiliates and coupons
- Support permissions - user can view/change support tickets and knowledgebase articles
This permissions structure serves two purposes. Firstly it allows you to prevent certain users from being able to make major changes to site settings, or products, for example, while allowing them to process orders. Secondly, it simplifies the back end somewhat by removing extraneous menus for users who do not need them.
3.4. Config settings
The config settings should not be confused with the web.config, which is a file on the site holding basic configuration for the site including the database connection. Config settings control all kinds of things relating to the functioning of your store, from the sizes of various images to the availability of certain features to users.
Values are stored in the database (in the tblKartrisConfig table); this has a number of advantages over setting values in the web.config.
- Keeps the web.config relatively uncluttered
- Works even when there is no 'write' access to the root (where the web.config is located)
- Does not force the application to restart (which editing the web.config does)
- Helps config settings to persist when you upgrade Kartris to a newer version
- Config settings can be searched easily from the main back end search box, or from their own dedicated search box within the config settings section.
Some important config settings are set during the setup routine; most of the others are less critical and can be tweaked later once you have Kartris running and your site under development.
3.4.1. Finding config settings
If you are less familiar with the config settings, you will find it easier to navigation to the config settings page (Configuration > Config Settings). From here you can navigate a hierarchical dynamic menu of the config settings. Hovering over either 'frontend', 'backend' or 'general' links will open out the menu – new sections will fold out as you hover over certain entries. This can be a good way to explore and find new settings relevant to particular features.
3.4.2. Changing config settings
Once you have located a config setting, you can click to edit it. Be extremely careful to ensure that you do not set config settings to an invalid value. This can cause errors in the operation of Kartris. Great care should be taken to double check values being changed before you click to submit any changes.
It is also possible to change config setting values directly in the tblKartrisConfig table of the database. However, the new setting will only take effect after the site is restarted (this is because the actual config setting values that Kartris uses are stored as application variables which are built when the application starts from the database values - updating config settings through the Kartris back end also triggers a rebuild of these values).