2.3.2.1. On IIS 7.5+
The process on IIS7 and earlier will be similar, the main difference being that the web site will run as a specific Windows user rather than an app pool identity. So you will need to add that user to your SQL Server, and create Windows permissions for it.
Firstly, you must have Windows, IIS and SQL Server installed.
This example is using Windows 8.1 and SQL Server 2008 R2. But the
process will be similar for other versions of Windows with IIS7 or
above.
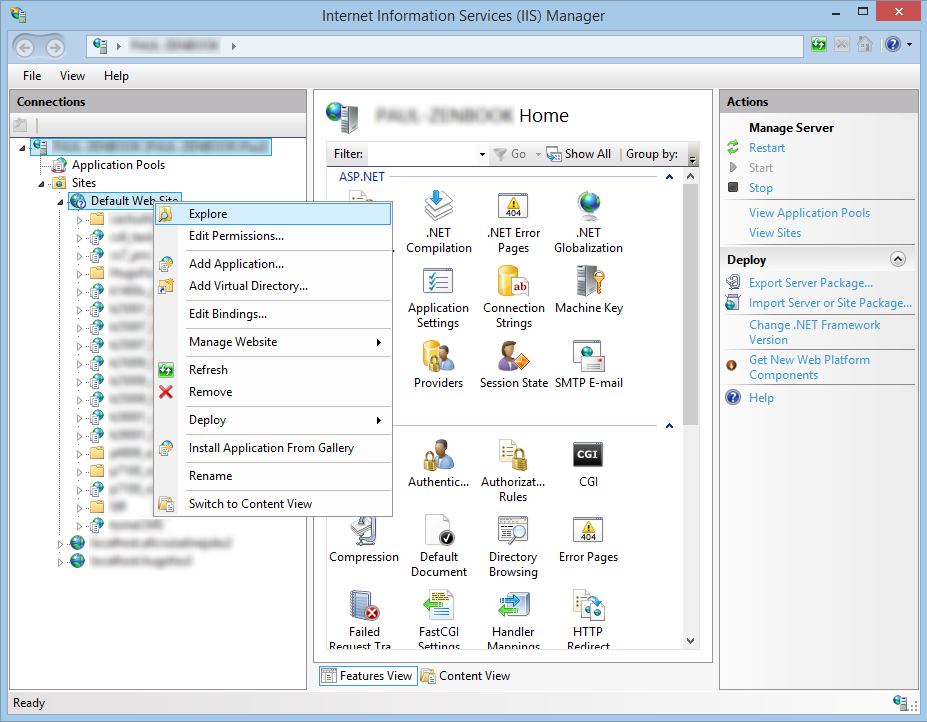
Step 1 - Find where your IIS web root folder is and add a new folder into it. If you're not sure where it is, go to IIS, right click the Default Web Site and select 'explore'. The default location is normally C:\inetpub\wwwroot, but you can move this to another location for disk space reasons, or locate it into your Dropbox if you want files to be backed up to the cloud.
Step 1 - Find where your IIS web root folder is and add a new folder into it. If you're not sure where it is, go to IIS, right click the Default Web Site and select 'explore'. The default location is normally C:\inetpub\wwwroot, but you can move this to another location for disk space reasons, or locate it into your Dropbox if you want files to be backed up to the cloud.
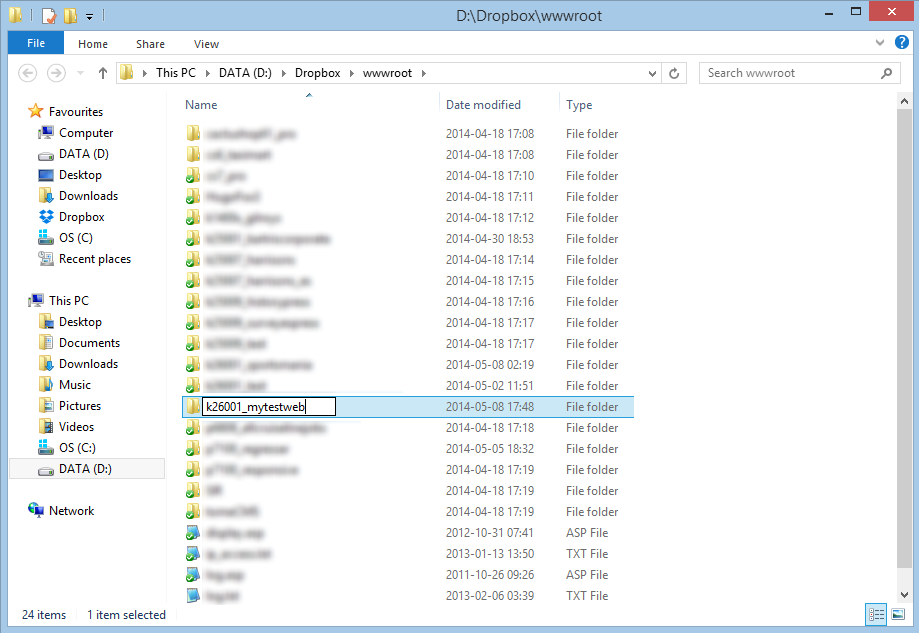
Step 2 - Within windows explorer, add a new
folder into your web root. We tend to use names that help identify
the version of Kartris and the name of the customer or site, to make
it easier to tell these things at a glance later.
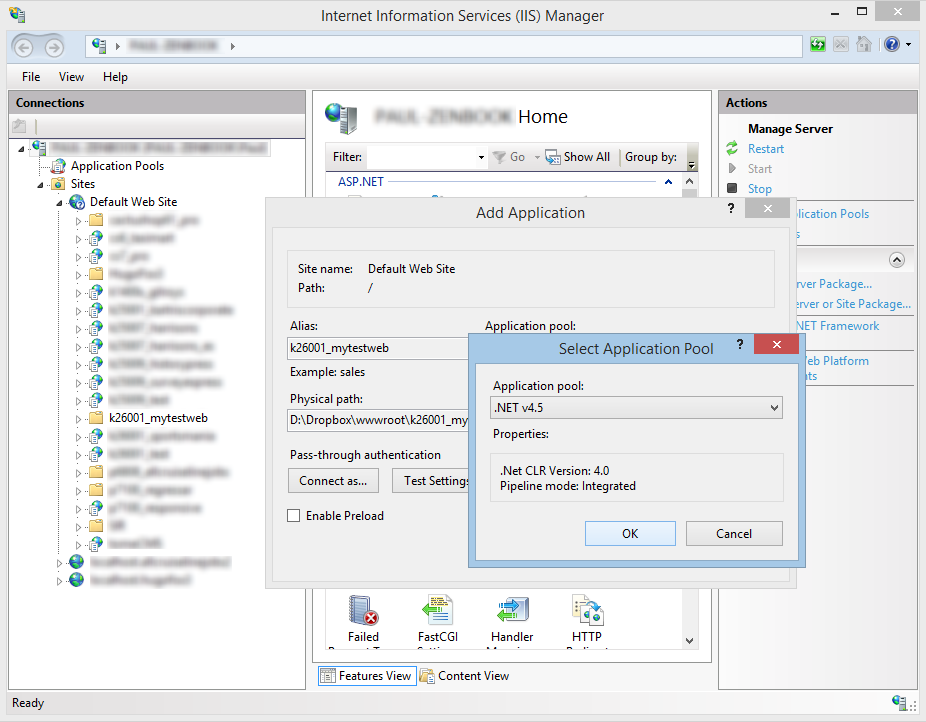
Step 3 - Back in IIS, refresh the sites and
you should see the new folder within 'sites'. Right click this, and
select 'Convert to Application'. A dialogue pops up. Click the
'Select' button and choose the ASP.NET 4.0 or ASP.NET 4.5
application pool. Then Ok everything. You should see the folder
'k26001_mytestweb' icon change. The web is now
set up ready for our files, which will come a bit later.
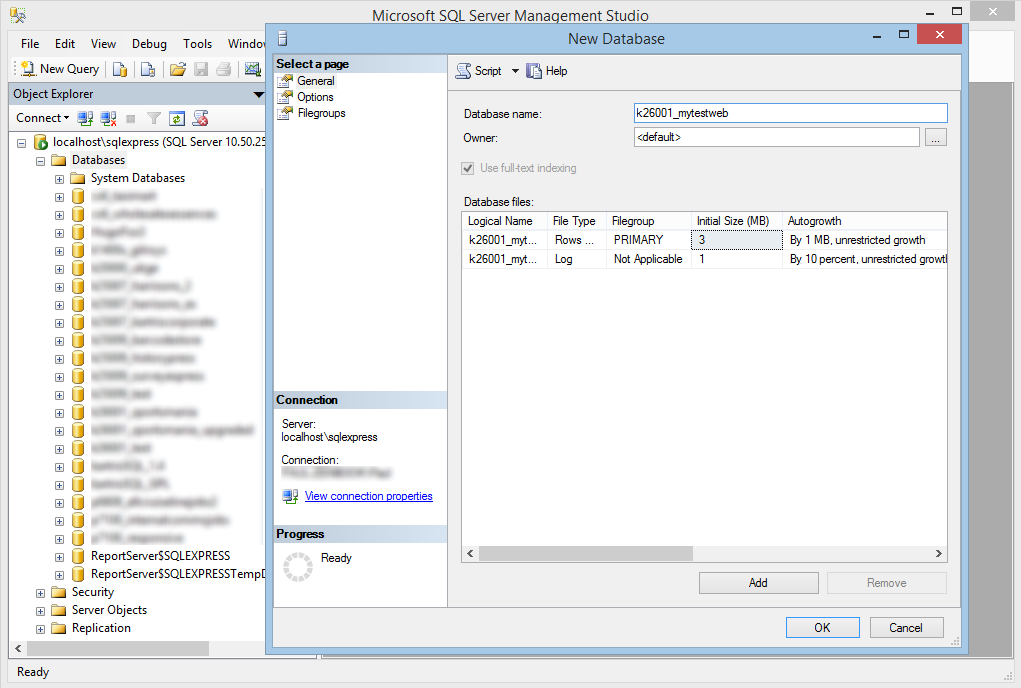
Step 4 - We need to create a new database
for our site. Open up SQL Management Studio and connect. If you are
using SQL Express, the default location will be
localhost\sqlexpress. Right click on the
'Databases' folder and select 'New Database'. Name your database and
save - again, we're going to call it
'k26001_mytestweb' (the name does not have to
match your web, but it's much easier to tie up sites to their
respective databases later if it does).
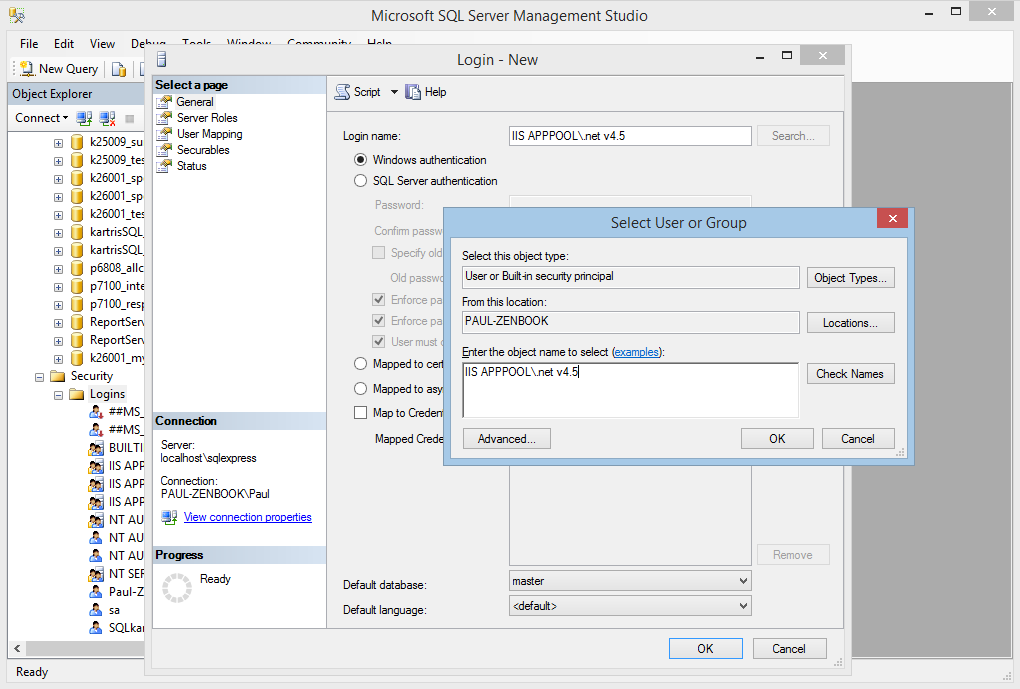
Step 5 - We need to create the right
permissions to allow our web to work with this database. This part
is all about identifying which Windows user your web runs as, and
giving this user permissions. Because we set the site up using the
defaults, it should be running as an app pool identify user called
'IIS APPPOOL\.net v4.5. Remember the application pool we selected in
step 2 above was called '.net v4.5' - the database user you need
will be called 'IIS APPPOOL\[application pool
name]'.
To find users on this database, open up the 'Security' folder in SQL Management Studio and then 'Logins'. If you don't see 'IIS APPPOOL\.net v4.5' (or whatever the name of your app pool is), then you need to add it. If you see the user there already, you can skip to the next step. Otherwise, right click on 'Logins' and type the name of the app pool into the dialogue, then 'Search'. Another window appeals, and you need to enter 'IIS APPPOOL\.net v4.5' again into the box here. When you click 'Check names' you should see the text change, hiding the IIS APPPOOL part. This indicates that it is a valid user. OK everything, and this new user should now appear under 'Logins' in the treeview.
To find users on this database, open up the 'Security' folder in SQL Management Studio and then 'Logins'. If you don't see 'IIS APPPOOL\.net v4.5' (or whatever the name of your app pool is), then you need to add it. If you see the user there already, you can skip to the next step. Otherwise, right click on 'Logins' and type the name of the app pool into the dialogue, then 'Search'. Another window appeals, and you need to enter 'IIS APPPOOL\.net v4.5' again into the box here. When you click 'Check names' you should see the text change, hiding the IIS APPPOOL part. This indicates that it is a valid user. OK everything, and this new user should now appear under 'Logins' in the treeview.
Step 6 - We need to map this database to
this user. Right click on the 'IIS APPPOOL\.net v4.5' user and
select 'Properties'. On the dialogue that pops up, select 'User
Mapping'. Check the box by the 'k26001_mytestweb' database and Ok to
save. This means that this user is now mapped to this
database.
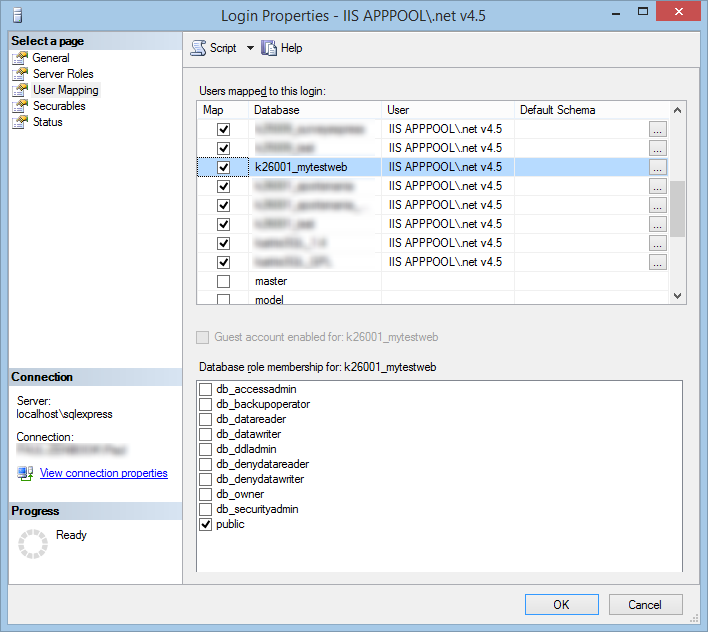
Step 7 - Now we have the user mapped to
this database, we need to give him permissions. Go to
k26001_mytestweb > Security >
Logins and then right click on the app pool user. In the
popup, select 'db_owner' in the
'Database role membership field'. Then
OK.

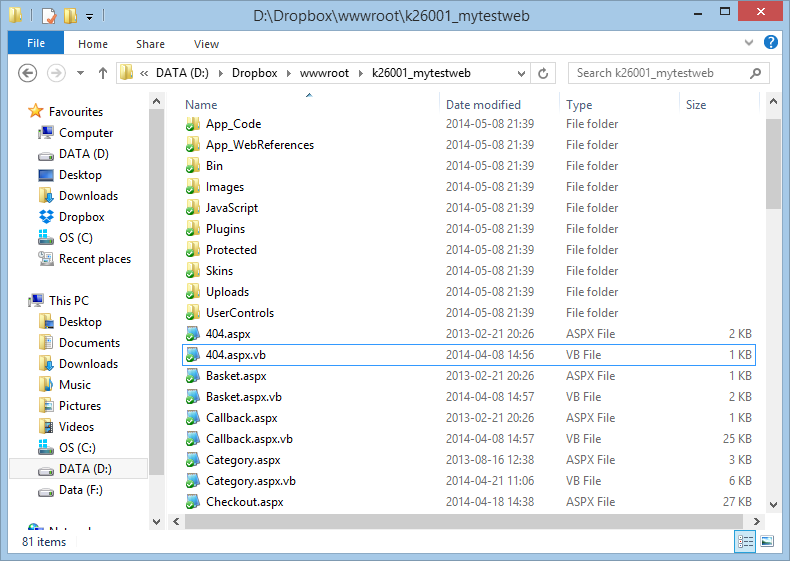
Step 8 - Now we are all set to copy in the
Kartris files. Download the latest zip, and ensure you unblock it
(see here
for more info). Open it up and copy the contents of the
Kartris folder into the 'k26001_mytestweb' folder. Your folder
should look like this:
Step 9 - The final configuration step is to
give the web site user full control permissions. This is so the web
site can write, modify and delete files, which is essential as you
upload product images, make changes to payment systems. It also
means that the install routine can rewrite the web.config file
itself, which makes things a bit easier.
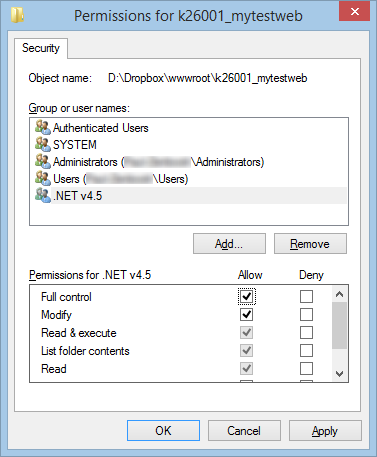
To do this, find the web root in Windows explorer, right click the k26001_mywebsite folder, and select 'properties', then the 'security' tab.
To do this, find the web root in Windows explorer, right click the k26001_mywebsite folder, and select 'properties', then the 'security' tab.

Click the 'Edit...' button, then 'Add...' and enter
'IIS APPPOOL\.net v4.5'. Ok this, and the user
'.NET v4.5' should appear in the
list.

Finally, select this user in the list and give it full 'allow'
permissions, and then OK everything.
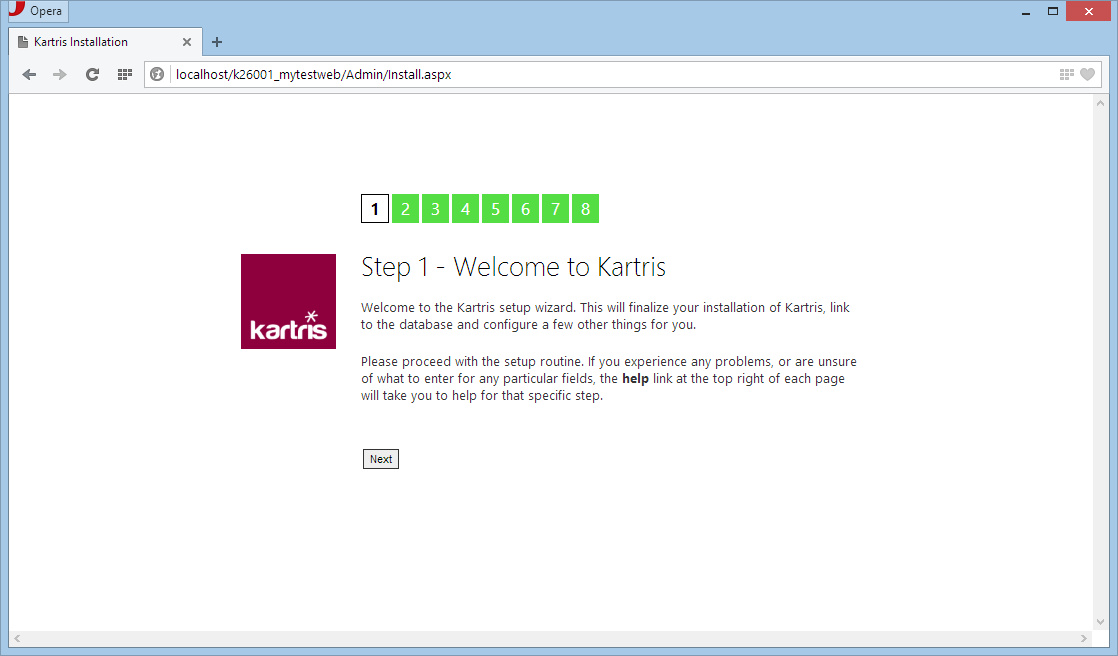
Step 10 - You now have the database and web
set up with full permissions, and should be ready to start the
installer. Call up the web site in a browser - the URL will be http://localhost/k26001_mytestweb/.