
3.5. Regional setup
3.5.1. Tax regime
This value gets set during the setup routine, and it's unlikely most stores would ever need to change this. But if for any reason you do, you can find the tag in the web.config file and change it manually.
<add key="TaxRegime" value="EU" ></add>The possible values are:
- EU
- US
- Canada
- SIMPLE
3.5.1.1. Tax rates
The tax system in Kartris works differently for US/simple models, and EU tax.
The tax rates page itself is only really active when the tax regime is set to EU. It will list various rates which can be used for the various bands of VAT in your country. For example, in the UK these would be 0%, 20%, 5%, etc.
Once these are set, you can choose which tax band applies when creating or editing product versions. For example, in the UK some items such as childrens' clothes are exempt from VAT, while most items will come under the 20% tax band.
3.5.2. Regional setup wizard
The tax settings of your store depend to a large degree on where you are based.
To simplify matters, Kartris features a 'Regional Setup Wizard' (found within the 'Regional Setup' menu). This walks you through some simple questions and then sets up the various tax settings for you, including determining which countries/states are activated and set to have tax charged to them.
Note that the tax regime used is hardcoded in this wizard. That's because it uses the tax regime specified in the web.config file, which is generally set when the store is first set up.
See @3.5.1. Tax regime for more details.
3.5.3. Currency
You will see something like this:
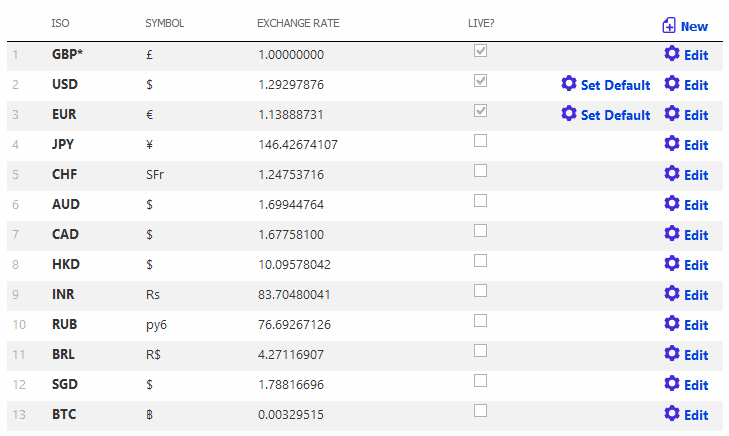
To change your default currency, simple edit the values in the default slot. You will need to know the ISO codes of your currency, which can be looked up here:
ISO 4217 - currency ISO codes
You can also determine how the currency is laid out using the two format fields as well as choose which decimal separator is used. Some currencies have the unit *after* the value, and in much of Europe, the comma is used instead of a point/period as the decimal separator.
You can edit the other currencies in a similar way, but for these, you can also set the exchange rate relative to the default currency.
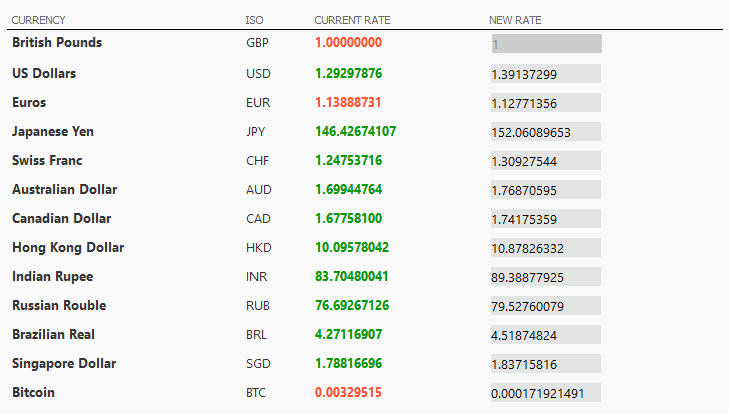
3.5.3.1. Live currency rates
3.5.4. Price display
3.5.4.1. Prices inc/ex tax
This is controlled by the general.tax.pricesinctax config setting which should be set to 'y' for tax inclusive prices, and 'n' for ex-tax prices.
Note that for tax inclusive prices, tax is calculated 'per item' rather than per row of the basket. As such, a rounded 'ex tax' price can be calculated. But for ex-tax pricing, tax is applied to each row of the basket. Consequently, it is not possible to show a rounded inc-tax price for individual items, because this would in many cases not quite tally with the actual tax on the order (due to the different rounding used, per-item and per-row) and would be likely to confuse customers or lead to complaints that the site has added up the tax wrongly. Instead a percentage figure is shown where necessary.
3.5.4.2. Tax display
Most stores will typically show a singe price for each item, which might be either inc tax or ex tax. In this case, you should set your frontend.display.showtax config setting to 'n'. If you wish to show the tax associated with an item, set this to 'y'.
The way prices are displayed within Kartris depends on both of the following config settings:
- frontend.display.showtax
- general.tax.pricesinctax
The exact format will vary as follows:
|
Table to show how the two tax config settings affect the display on the site |
frontend.display.showtax |
||
|
y |
n |
||
|
general.tax.pricesinctax |
y |
Ex tax £8.51 Inc Tax £10.00 |
Price £10.00 |
|
n |
Ex tax £10.00 Tax 17.5% |
Price £10.00 |
|
Note that if you enter prices into your store ex tax, and then switch to inc tax, the prices won't change (for example, an item entered as £10.00 won't suddenly become £11.75 – it will still be £10.00, just that this will now be considered inc tax instead of ex tax).
3.5.5. Shipping / postage
Kartris has a flexible shipping system that lets you define shipping for particular countries/states, order weights/values and for different shipping types. You can also set real-time shipping lookups to handle all or just some shipping possibilities. For example, you may want to ship domestically within the US by one courier, ship orders up to 10kg to Europe by a different courier, and then specify your own pricing for orders to Europe above this weight, and for all other shipping zones.